Search the Community
Showing results for tags 'guide'.
Found 25 results
-
 Hello everyone! I'd like to share some of my knowledge on using riivolution to soft patch Pokemon Battle Revolution. First off, what does "soft patch" even mean? Basically, it refers to patching something, in this case a game disc, by altering the files of the game on the console as they are being read within the console's memory, rather than actually altering any of the files on the disc. The riivolution homebrew software allows us to do just that. I'll attach a copy of my patch for changing the music in battle revolution to this post so that you can follow along with me as I explain what the different parts of this patch do and the logic behind them. So, first we have the following lines: <wiidisc version="1" root="/custommusic"> <id game="RPBE" /> "wiidisc version" doesn't really have any significance here. "root" is the folder on the SD Card that riivolution is going to read from to get the files that will act as our replacements for the ones on the disc. Finally, "RPBE" is, as you might have guessed, the ID of the game disc. Next, we have the meat of our patch file (this is a small snippet): <section name="Custom Music"> <option name="Lagoon Col" id="Lagoon"> <param name="LagoonTheme" value="pokerev_music_demo_v2" /> <choice name="Fear (SayMaxWell)"> <param name="LagoonReplace" value="DoomFear" /> <patch id="LagoonMusic" /> </choice> <choice name="Marnie" value="Marnie" > <param name="LagoonReplace" value="Marnie" /> <patch id="LagoonMusic" /> </choice> </option> "section name" is simply the text that appears at the top of riivolution's menu when you boot it up. "option name" is also a part of this menu. It defines the name of a section of file patches on the riivolution menu. "param name" is what's known as a macro. A macro is, essentially, a placeholder name in the code for something else. In this case, our macro is acting as a placeholder for the exact name of the file on the disc, which is shown in the "value" next to it. "choice name" is the the name of one of the individual file patch choices on the riivolution menu. Finally, "patch id" identifies the name of the patch in the code so that we can reference it later on in our file replacement section (which is the next and last part ) Lastly, we have the actual file replacement section. Here's a part of it: <patch id="LagoonMusic"> <file external="{$LagoonReplace}_L1.brstm" disc="/sound/sound/{$LagoonTheme}.brstm" /> <file external="{$LagoonReplace}_TOURN.brstm" disc="/sound/sound/{$LagoonTheme}.brstm" /> So the first thing of note is that "patch id", which we used earlier. Next, we have the file replacements. The "underscored parts" (for example: "_L1"), are just a thing I do to keep the files on the SD Card organized. "disc" refers to the path of the file on the disc that we're changing. Not too bad, right? I hope this helps all of you aspiring modders out there! pbr.xml
- 1 reply
-
- 1
-

-
- riivolution
- battle revolution
- (and 2 more)
-
This is a guide that will walk you through how to catch your own living Pokédex the fastest way possible with the least amount of playthroughs needed, mind that for the region professor to authenticate the Pokédex as complete some Pokémon are not needed, but those that are available will be covered in the guide, a list of those not available will be provided just below the strategy section. As for generations after Generation III the Pokémon are expected to be transferred forward from the previous generation so they don’t need to be caught again, but first some games are necessary. Necessary games: (Excluding spin-off games, namely Pokémon Colosseum and Pokémon XD Gale of Darkness, if you have either or both jump down the guide and see what they cover, it covers a big chunk of the Pokédex and saves a lot of time.) Pokémon Fire Red Pokémon Leaf Green Pokémon Ruby Pokémon Sapphire Pokémon Emerald Pokémon Diamond Pokémon Pearl Pokémon Platinum Pokémon Black Pokémon White Pokémon Black 2 or White 2 Pokémon X Pokémon Y Pokémon Ultra Sun Pokémon Ultra Moon Pokémon Sword + DLC Pokémon Shield + DLC (DLC is optional) Pokémon GO (Not strictly required) Now some quick points about the save files: To get them all some save resets will be needed, mostly for the starter Pokémon you did not get at the start of your previous playthroughs. Other playthroughs do not require finishing the game, meaning that some games only need to be played until a certain point. Trades are required, so be prepared with two or more systems. In the case of emulators some offer trading and some do not, you will be on your own for this. Some games will be used as “hubs” where most Pokémon will be stored for ease of use. Optimal number of playthroughs per game version: 1 – Fire Red 2 – Leaf Green 1 – Ruby 1 – Sapphire 3 – Emerald 1 – Diamond 1 – Pearl 1 – Platinum 1 – Black 1 – White 1 – Black 2 or White 2 1 – X 2 – Y 1 – Ultra Sun 2 – Ultra Moon 1 – Sword 2 – Shield Strategy for each game and some tips: Catching every species you still do not own along the way saves up a lot of time later. Having your bag full of PokéBalls (and other variants) at all times is recommended. Tracking what you have and have yet to catch. Fire Red 1. Start to finish including Sevii Islands post game. (Generation III “hub”) Leaf Green 1. Play up to the fifth Island in the Sevii Islands post game with a different starter from the Fire Red playthrough, far enough to catch Mismagius, then trade the starter and all other version exclusives to Fire Red. 2. Play up to beating the Elite Four, with the last starter in the Kanto region to be able to catch the third legendary dog (Raikou, Entei, Suicune) which is determined by the starter Pokémon and starts roaming after the Elite Four. Trade the starter Pokémon and legendary dog to Fire Red. Ruby 1. Play up to Route 114 (after the 4th gym), far enough to catch Zangoose, trade it to Emerald alongside the starter Pokémon. Sapphire 1. Play up to Meteor Falls (after the 4th gym), far enough to catch Lunatone, different starter line from Ruby, trade them to Emerald. Emerald 1. Start to finish including the post game with the third starter line. Get one of the Johto starters with Professor Birch after completing the Hoenn Pokédex (trade the missing ones from Fire Red if needed), trade them all to Fire Red. Unfortunately two more playthroughs will be needed solely for the Johto starters because you can only get one per save file. 2. Play up to beating the Elite Four, then trade all the Pokémon needed from Fire Red to complete the Hoenn Pokédex to redeem your second Johto starter line. 3. This is a repeat of playthough two, perform the trades to obtain the third and last Johto starer line. Diamond 1. Play up to Route 206 (after 2nd gym), far enough to catch Stunky, trade it to Platinum alongside the starter Pokémon. Pearl 1. Play up to the 5th gym to unlock the ability to use the HM Surf left from Jubilife and reach Route 218 to catch a Gameow, use the second starter line, perform the void glitch for Darkrai and Shaymin, trade them to Platinum alongside the starter Pokémon Platinum 1. Start to finish including the post game with the third starter line. (Generation IV “hub”) Black 2 / White 2 1. Play up to Driftveil City (after 4th gym) far enough to get a gift Zorua, trade it to Black alongside the starter Pokémon. White 1. Play up to the capture of Zekrom and watch the credits with the second starter line, trade it to Black alongside the starter Pokémon and other version exclusives you caught along the way. Black 1. Start to finish including the post game with the third starter line. (Generation V “hub”) Y 1. Play up to the capture of Yveltal, trade it to X alongside the starter Pokémon, caught Spritzee, Skrelp and Amaura. 2. Quick save reset to obtain the second starter line, trade it to X. X 1. Start to finish including the post game with the third starter line. (Generation VI “hub”) Ultra Moon 1. Start to finish including the post game, version exclusives in this generation go up to the Ultra Beasts right at the end so there is no way to avoid it, trade all of them alongside the starter to Ultra Sun. 2. Quick save reset to obtain the second starter line, trade it to Ultra Sun. Ultra Sun 1. Start to finish including the post game with the third starter line. (Generation VII “hub”) Shield 1. Play up to capture of Zamazenta, trade it to Sword alongside the starter Pokémon, caught Appletun and Eiscue. 2. Quick save reset to obtain the second starter line, trade it to Sword. Sword 1. Start to finish including the post game with the third starter line. (Generation VIII “hub”) *(You can only get one Kubfu per save file, so if you want to have both Kubfu and Urshifu in your box you will need to play Isle of Armor twice, while buying both DLCs (Sword and Shield) would allow you to get two Kufbus and evolve one of them it is possible to get both with just Sword, you need two Switch profiles and beat Isle of Armor twice, one in each, After obtaining one it is just a matter of transferring with Pokémon HOME to the main profile. The same happens with Regileki and Regidrago on Crown, one per save file, and you can use the second account already used for the second Kubfu (that will later evolve into Urshifu) to get the one you missed on the first time completing it.) Pokémon species that are not available anywhere to be obtained and do not count towards Pokédex completion: 1. Arceus – Planned for the Hall of Origin in Pokémon Diamond, Pearl and Platinum, but never saw an official release for those games, would have used the Azure Flute item. Later it was obtainable as a limited time encounter event in Pokémon Black and White. 2. Victini – Originally available for Pokémon Black and White through a limited time event with the Liberty Pass item. 3. Keldeo – Only ever distributed through various limited time events. 4. Meloetta – Only ever distributed through various limited time events. 5. Genesect – Only ever distributed through various limited time events. 6. Diancie – Only ever distributed through various limited time events. 7. Hoopa – Only ever distributed through various limited time events. 8. Volcanion – Only ever distributed through various limited time events. 9. Zeraora – Only ever distributed through various limited time events. 10. Zarude – Only ever distributed through various limited time events. Pokémon Colosseum and Pokémon XD Gale of Darkness coverage: If you have Pokémon Colosseum and Pokémon XD Gale of Darkness these Pokémon are now available to catch in an easier manner: (Pokémon in parenthesis need to be either evolved or bred) Colosseum: 1. Misdreavus 2. Sneasel 3. Remoraid (Octillery) 4. Mantine 5. Raikou 6. Entei 7. Suicune 8. Ho-oh (uncatchable anywhere else) 9. Meditite (Medicham) 10. Bayleef (Chikorita and Meganium) 11. Croconaw (Totodile and Fereligatr) 12. Quilava (Cyndaquil and Typhlonsion) XD Gale of Darkness: 1. Vulpix (Ninetales) 2. Weepinbell (Bellsprout and Victreebel) 3. Hitmonchan 4. Starmie (Staryu) 5. Magmar (Magby) 6. Pinsir 7. Lugia (uncactchable anywhere else) 8. Zangoose 9. Lunatone 10. Roselia (To get both Ho-oh and Lugia you need to catch every single other species available in the games, thus they can also be transferred to Fire Red and Emerald instead of needing to be caught there too to save a bit of time.) This shortens the Leaf Green playthroughs by a lot, the second one meant for the starter line and it’s respective legendary dog are not needed anymore, on top of that the first Leaf Green playthrough is also shortened too. Now it is not needed to go to the Sevii Islands, but only up to Lavender Town and Route 12 where you are able to acquire the Super Rod, meaning you can go back to Route 22 and fish for Slowpokes at 5% chance. It also basically cuts the need for Ruby and Sapphire, games that were only needed to get Zangoose, Lunatone and Roselia, all obtainable on XD Gale of Darkness. This means you can trade all Pokémon from Emerald to Fire Red and reset that game to obtain the missing Hoenn starters (having either Ruby or Sapphire in hand to start a quick new game is still faster) Mythical Pokémon which are technically available but are very hard to obtain and require spin-off games to obtain: (Might not be available in their earliest generation) 1. Mew – My Pokémon Ranch Deposit 999 Pokémon in the Ranch (Requires a Wii with the game installed, the Wii online store is not available anymore) 2. Celebi – Pokémon Crystal Virtual Console Beat the game and retrieve the GS ball, use it on the Ilex Forest Shrine (Game can be purchased in the 3DS eShop) 3. Jirachi – Pokémon Colosseum Bonus Disc / Pokémon Channel Requires the Disc to redeem it (Not an easy disc to find online for purchase) 4. Manaphy – Pokémon Ranger Finish the egg mission and transfer it to a Sinnoh based game to hatch (Egg can only be redeemed once per cartridge, so many cartridges are already used and will never give out any more eggs) 5. Phione – My Pokémon Ranch Deposit 250 Pokémon in the Ranch (Requires a Wii with the game installed, the Wii online store is not available anymore) 6. Meltan – Pokémon GO Just like any other species you need to catch it and transfer to HOME 7. Melmetal - Pokémon GO Just like any other species you need to catch it and transfer to HOME This spreadsheet will help you along the way. If you find any error on it do not hesitate to add a comment and shoot me a message on Discord (RodrigoTR#7420), comments here on the forum work too, but I am less likely to see it. https://docs.google.com/spreadsheets/d/1hZpVHJsvXq8vDO92utx96talexB32yUb/edit?usp=sharing&ouid=108059214759059840813&rtpof=true&sd=true
-
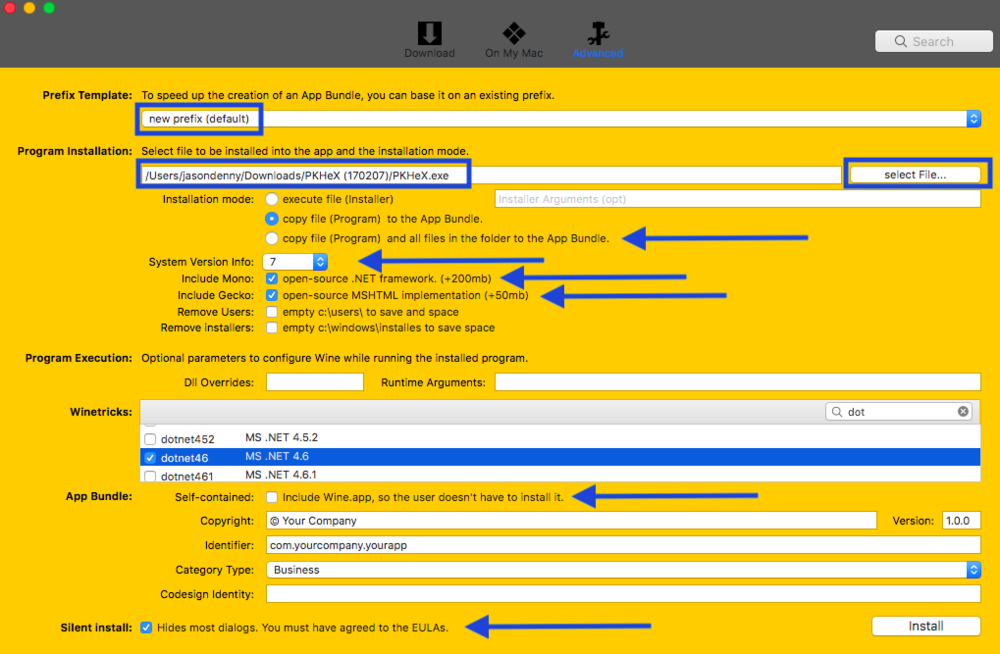
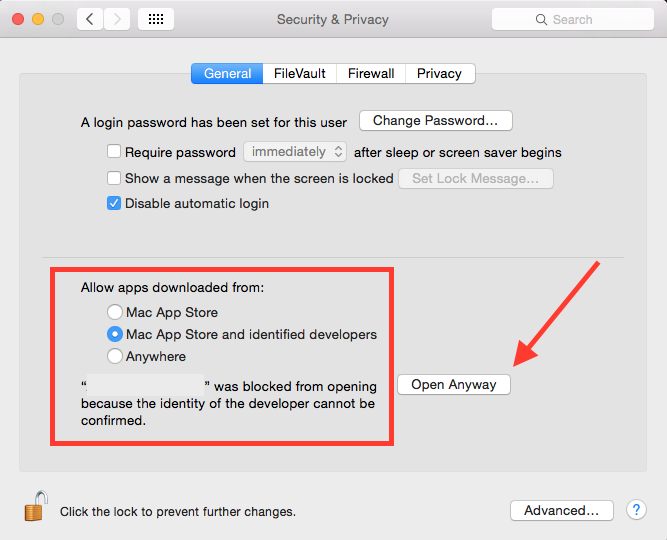
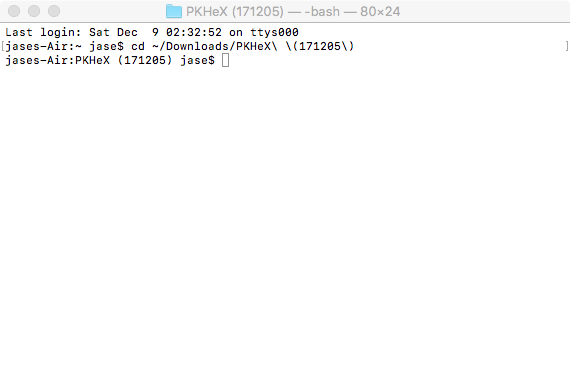
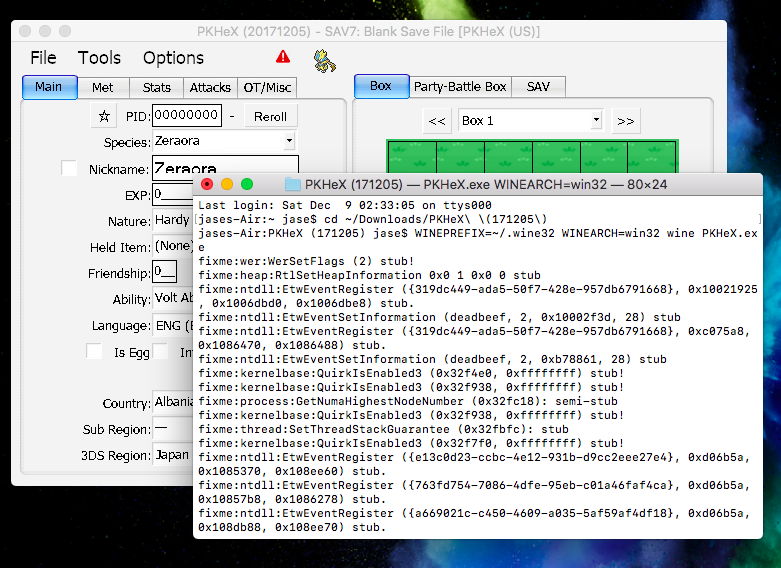
PKHeX on Mac A User Friendly Guide for WINE Intro This guide will hopefully clarify a few things regarding WINE and PKHeX running on MacOS as well as help anyone start from scratch with WINE [in order to run PKHeX]. WINE is a fickle thing; it's not guaranteed to work (at all) but the success rate these days is impressive! So, don't get discouraged if things do not work the first time around. Nothing we do in this guide is permanent, although I encourage you to make a Time Machine backup of your system or at least backup your important data. With that being said, I have been using WINE for quite some time. Regarding PKHeX, It's going on almost a year and I have yet to experience any depressive issues using WINE to run it. I have done several clean installs of macOS Sierra and macOS High Sierra in order to give you the most accurate information possible. If I have missed something or you know any tips or tricks, I would appreciate the feedback! Also, you'll find only the bare minimum information in this guide of what you will need to get PKHeX up and running. I say this because without any theming, the app will look like an old school Windows program. NOTE: Aesthetics may not be the most important thing to consider (especially if you're in a hurry or maybe don't care) however there are some dependencies (winetricks) that are absolutely necessary for some programs to run. Fortunately PKHeX isn't too picky. Choices Download the PKHeX app in the PKHeX for Mac thread Use Winebottler to make a PKHeX.app for yourself Use Wineskin Winery to make a PKHeX.app for yourself (no support here) Use WINE to run the PKHeX executable via Terminal Use a Virtual Machine (VM) or something along those lines (no support here) Winebottler Pretty straight forward process. Tick all of the items with arrows next to them, like in the screenshot below. Also necessary winetricks for PKHeX: dotnet461; corefonts; cjkfonts; tahoma. May need to change security preferences to run the app: NOTE: Winebottler is the fastest, easiest "DIY" option for a beginner. (Some argue that Wineskin Winery is the fastest and most easy way to whip up an app. I'll say it just depends on your skill level, though I agree.) Another thing, apps may be less stable than if they were launched using other methods basically because of the lack of options Winebottler has to fine tune things (e.g.; adding a string in the Registry Editor to enable Retina compatibility.) Install WINE on your Mac [Run PKHeX Using Terminal] Installing WINE on your system using Homebrew is the most noob-friendly way [to install WINE on Mac] that I have found, so let us just use that. To start, I'll tell you that you will be installing 4-5 minuscule things on your Mac; Xcode CLT, Homebrew Package Manager, XQuartz, WINE, and some Winetricks depending on the executable your are attempting to run. In this instance, our target is PKHeX. So onto the first thing, Homebrew. Before you can use "brew commands" in Terminal, you must have Xcode Command Line Tools installed. If you already have Xcode installed on your Mac, you should be peachy. If not, no problem! Open Terminal to get started! Xcode CLT: xcode-select --install If you're asked to agree to Xcode's ToS, next type: sudo xcodebuild -license Homebrew Package Manager: /usr/bin/ruby -e "$(curl -fsSL https://raw.githubusercontent.com/Homebrew/install/master/install)" When that finishes up, you'll want to make sure everything is in order: brew doctor For future reference, you can update Homebrew using: brew upgrade XQuartz: brew cask install xquartz WINE: brew install wine brew upgrade wine # For future reference That will create a 64-bit WINEPREFIX which will be located at: ~/.wine NOTE: If you would rather use the developer version of WINE, use these instead: brew install wine --devel brew upgrade wine --devel # For future reference Winetricks: brew install cabextract brew install winetricks brew upgrade winetricks # For future reference NOTE: You DO NOT need to install every winetrick available, just the ones your programs depend on to function. For PKHeX, you will need to install these; dotnet461, corefonts, cjkfonts, and tahoma (why not). Install the "tricks": winetricks "trick" # (e.g.; winetricks dontnet461) Complete list of Winetricks For some, the winetricks process will be easier with a GUI. I suggest installing Zenity if you want one: brew install zenity # After installation finishes, you will have a neat GUI for winetricks. Use: winetricks --gui Attention Okay, this is important, so listen up. It's a known issue that .NET Framework 4.5 and up, (dotnet45 and up) does not install properly on a 64-bit WINEPREFIX, which was installed by default earlier (brew install wine). That is okay because a 64-bit WINEPREFIX may come in handy in the future. To get around this issue, you will create a 32-bit WINEPREFIX. Creating the 32-bit prefix: WINEPREFIX=~/.wine32 WINEARCH=win32 wine wineboot You will now have a 32-bit prefix located at: ~/.wine32 Next, install the aforementioned winetricks in your new prefix. It is important that you use these next commands any time you want to run or install ANYTHING inside of that 32-bit WINEPREFIX. Remember, we need at least .NET Framework 4.6 to run PKHeX and we must install .NET Framework 4.6 in the 32-bit prefix, therefore we will be running PKHeX from inside of the 32-bit prefix. (I know, don't ask, lol) WINEPREFIX=~/.wine32 WINEARCH=win32 wine "Program.exe" WINEPREFIX=~/.wine32 WINEARCH=win32 winetricks "trick" Senario: You have done all of the above and you're ready to run "PKHeX.exe". Download PKHeX and remember its location. It's usually in the Downloads folder. Open Terminal and change directories to the PKHeX (version) folder. For example: cd ~/Downloads/PKHeX\ \(171205\) Then, run the executable: WINEPREFIX=~/.wine32 WINEARCH=win32 wine PKHeX.exe

-
 Foreground Hi, people! I see you're latest trying to figure how scripts works on BW, and I wanna give my contribution. Really, I've started about two years ago editing BW scripts, for a future addition on PPRE, but nothing happened later and my work remained hidden for a lot. I wanna share with you my knowledge about scripts, so let's go! (This tutorial presume that you know something about hex and programmation) Script Structure In a BW file, like DPP and HGSS, the scripts can divided in two main sections: declarative and command section. Declarative Sections Declarative part contains all "offset" of the scripts (start offset in particular). The Each offset is saved in a UInt32 (4 byte), and we must add the "actual" reader position for reach the real script start. This section end ever with 0x13FD. Example: 0A 00 00 00 08 00 00 00 FD 00 00 00 13 FD This is a declarative part for a/0/5/7-0, containing 3 scripts. 1st offset script: 0x0A + 0x04 = 0x0E 2nd offset script: 0x08 + 0x08 = 0x10 3rd offset script: 0xFD + 0x0A = 0x107 Command Sections Command section contains the real commands that will be executed by scripts. There are 800+ different command, but the main structure is 0x0 -0x4 ID Command [Various parameter] Next lesson, we can see some simple script in action. Stay tuned.
 -
This guide is for people wondering how to edit certain sprites in B2/W2 like Trainer mugshots and Starter selection sprites. It also works for sprites in other DS games. To get started, you need to download the latest version of Tinke, which can be found here. Step 1. Open up Tinke and load the ROM you want to edit. I'll be using Pokemon Black 2 (U). Step 2. The program will load with a directory of the ROM on the left side. Use this link to find where your sprite is located. I want to edit the mugshot of Nate, and mugshots are located in /a/2/6/7 Step 3. After you locate the narc where your sprite is, open it up using the Unpack button near the lower right corner. Step 4. Unpacking this specific narc will reveal a bunch of bin files and a bunch of RLCN (palette) files. Step 5. In order to view the sprite correctly, we need to select the correct palette file first. Nate's palette is near the bottom of the list at 7_72.RLCN. Select it, then press the View button, and you should get a box of 16 different colors. Step 6. Now let's open Nate's mugshot. It's located at 7_47.bin. Unpack it, then click View, and you should see the sprite with the correct colors. Step 7. Now you can save it to your computer as a PNG using the Export button on the lower right corner. Step 8. Use your favorite graphics program to edit the sprite however you want. Do not resize the image and do not use more than 16 colors. Here's an example of an edited mugshot: The green background is the transparency color. Do not use this color in your actual sprite unless you want it to be transparent in the game. Step 9. Save the sprite as a PNG and go to Tinke. Click on the Import button. If you are using different colors than the ones the sprite originally had, be sure the click the "Replace palette" option down at the Palette import options section. Step 10. If your sprite imported correctly, Pack all the files you Unpacked, then click the Save ROM button. Wait for it to finish saving, then test out your edit using an emulator. If everyone looks fine, then congrats, your edit was successful! With Tinke, you can edit pretty much any sprite in the game, including things like Prof. Juniper's intro sprite and even the sprites used during the credits. Sometimes you'll need to change the Offset/Width/Height of the sprite in order to view it correctly. Sometimes you may find an image that looks like a sprite, but is actually a texture (usually ends in .BMD0). You can save these images, but I haven't figured out how to reinsert them or if that's even possible. Anyways, hope this helps someone!
-
No.... I Write this guide entierly from scratch Took me 2 months to finish EDIT: Had my friend help me do some of it, I did one half, he did the other.
-
 /EV, IV, and Nature Guide\ By: A Hacked Soul Requested by: wraith89 This is a altered version that I have made up for here with more info on how to find IV's and keep track of EV's. \Section 1/ • 1.What are EV's? • 2.Why should I EV train my Pokemon? • 3.How to EV Train • 4.Some Pokemon give out more than one EV! \Section 2/ • 1.HP • 2.Attack • 3.Defense • 4.Sp. ATK • 5.Sp. DEF • 6.Speed \ Section 3/ • 1.How to boost your training • a.Pokerus • b.Macho Brace • c.Power Items • d.Pokemon need vitamins • 2.How to keep a stream of a Pokemon • a.Pokeradar • b.VS. Seeker \Section 4. IV's/ What are IV's and What They Affect How to Find What IV's Your Pokemon Have Natures and the Effects they Apply /-----------------------------------------------------------------------\ Section 1 In this section I will talk about the basics EVs /-----------------------------------------------------------------------\ Section 2 In this section I will list some good Pokemon for EV training. [spoiler] • [b]1.Hp[/b] Wild Pokemon ------------------------------------------------------ Pokemon: Bidoof Where: Route 201 EV: 1 Pokemon: Shellos Where: Valley Windworks EV: 1 Pokemon: Gastrodon Where: Route 222 EV: 2 Trainers ---------------------------------------------------------- Who: Cowgirl Shelly Where: Route 209 Pokemon: 5 Bidoofs Who: Fisherman Travis Where: Route 212 Pokemon: 3 Barboach & 1 Shello Who: Tuber Jared Where: Route 213 Pokemon: 3 Gastrodon Who: Tuber Mariel Where: Route 219 Pokemon: 2 Marill • [b]2.Attack[/b] Wild Pokemon ------------------------------------------------------ Pokemon: Shinx Where: 202 EV: 1 Pokemon:Kricketune Where: Route 212 Pokemon: Bibarel Where: Route 212 & 208 EV: 2 Pokemon: Machop Where: Route 208 EV: 1 Pokemon: Snover Where: Acuity Lakefront EV: 1 Pokemon: Machoke Where: Acuity Lakefront EV: 2 Pokemon: Unknown Where: Solaceon Cave EV: 1 ATK & 1 SP.ATK Pokemon: Gyarados Where: Lake Valor EV: 2 Trainers ------------------------------------------------------ Who: Swimmer Sheltin Where: Route 213 Pokemon: 3 Gyarados Who: PI Carlos Where:Route 214 Pokemon: 1 Goldeen & 2 Seaking Who: Fisherman Miguel Where: Route 218 Pokemon: 2 Gyarados • [b]3.Defense[/b] Wild Pokemon ------------------------------------------------------ Pokemon: Geodude Where: Cave to the left of Oreburgh & Orebrugh Mine EV: 1 Pokemon: Onix Where: Orebrugh Mine EV: 1 Pokemon: Hippopotas Where: Ruin Maniacs Cave EV: 1 Pokemon: Graveler Where: Iron Island Mines EV: 2 Trainers ------------------------------------------------------ Who: Ninja Boy Fabian Where: Route 210 Pokemon: 3 Geodude Who: Collector Dominique Where: Route 212 Pokemon: 3 Geodude Who: Collector Ivan Where: Route 221 Pokemon: 3 Hippopotas • [b]4.Sp.ATK[/b] Wild Pokemon ------------------------------------------------------ Pokemon: Dudew Where: Route 204 EV: 1 Pokemon: Ghastly Where: Old Chateau & Lost Tower EV: 1 Pokemon: Haunter Where: Old Chateau EV: 2 Pokemon: Gengar Where: Old Chateau EV: 3 Pokemon: Gloom Where: Route 229 EV: 2 Pokemon: Golduck Where: Resort Area's Pond EV: 2 Trainers ------------------------------------------------------ Who: PKMN Ranger Jeffrey Where: Route 212 Pokemon: 2 Prinplup Who: Psychic Mitchell Where: Route 214 Pokemon: 1 Haunter & 1 Kadabra Who: Collector Douglas Where: Route 214 Pokemon: 3 Roselia • [b]5.Sp.DEF[/b] Wild Pokemon ------------------------------------------------------ Pokemon: Tentacruel Where: Route 223 EV: 2 Trainers ------------------------------------------------------ Who: Ninja Boy Davido Where: Route 210 (Fog) Pokemon: Dustox Who: Swimmer Sophia Where: Route 230 (Surf) Pokemon: 2 Mantyke Who: Swimmer Mallory Where: Route 230 (Surf) Pokemon: 1 Seel & 1 Dewgong • [b]6.Speed[/b] Wild Pokemon ------------------------------------------------------ Pokemon: Starly Where: Route 201 EV: 1 Pokemon: Zubat Where: Almost Any Cave EV: 1 Pokemon: Golbat Where: Caves later on in game. EV: 2 Pokemon: Pikachu Where: Trophy Garden EV: 2 Pokemon: Staravia Where: Trophy Garden EV: 2 Trainers ------------------------------------------------------ Who: Fisherman Andrew Where: Route 205 (Bridge 2nd from right) Pokemon: 6 Magikarp Who: Cycling John Where: Cycling Road Pokemon: 2 Staravia /-----------------------------------------------------------------------\ Section 3 In this section is some tips on how to boost training. • How to boost your training. • A.Pokerus /-----------------------------------------------------------------------\ \Section 4/ IV's & Natures ----------------------------------------------------------- Thanks for reading this guide and I hope it helps. If I have made any mistake please let me know.
 -
I wrote a EV and IV recently and I was wondering if you guys could give me some feed back on how I did? I made it for a site that was getting over loaded in questions on this kinda of topic and made this to help out, but I feel I may have made soem mistakes, Os i wanted to ask since who knows IV's and EV's better then those who hack them. http://www.pokegym.net/forums/showthread.php?t=101095 By Request of wraith89 I brought it here. http://projectpokemon.org/forums/showthread.php?t=2294
-
 k, so as you can probably tell im trying to create legal pokemon. But i hit a typical wall...I DONT KNOW WHAT IM DOING! So the purpose of this thread is to create a "dummies" guide to the three programs above, so that everyone (including myself) can create and edit better pokemon. Depending on the usefulness of the guide, this thread may even be stickied! Note: The guide you are posting must try and: -be simple enough for someone with basic computer knowledge to understand -have a step by step format on how to use it properly -acronym meanings in brackets -include examples -troubleshooting( based on the most common and easily fixable issues) (moderators**you may add and edit this first post if i forgot something) Thanks
 -
 A note of caution before you even begin; this process isn't for the impatient. There's currently very few tools available for editing anything in Platinum, and said tools are a pain in the ass to use because they weren't designed for editing this game. If you want a one-click solution, you'll have to wait 'til someone bothers making proper tools for the job :v Things you'll likely need An English Platinum ROM. It MUST be a true, unpatched, untrimmed ROM file. The sprite offsets are different in a translated game, not too sure about a trimmed one. Just use a fresh copy directly from your cartridge, 'tis ideal (you DO have a physical copy, right?). PokeTEX English (available in the tool thread) Modified sprite index file for PokeTEX (contains the sprites' locations in the ROM; I've attached it to this post, scroll to the bottom. download it into your PokeTEX folder) Tile Molester (available here). For basic edits and recolors, Tile Molester has a paintbrush, linemaker, paintbucket, etc. If you're going to do anything but a very basic edit or recolor, you'll want an image-editing program that can handle modifying one pixel at a time without making a mess of things, open multiple files in one window, and preferably create multiple layers for use in a "tool sheet" image containing bits from other sprites you might use (I used Photoshop 6.0 myself). If you don't have one, I believe GIMP is free, Google it. Lack of carpal tunnel syndrome (optional, but you'd be in far less pain when this is over) Patience First and foremost, back up your ROM. PokeTEX requires that you save when you import a sprite sheet or change palette colors. Next, boot up PokeTEX. A picture noting the basic controls: Click the "Op. ROM" button at the top, find your ROM, and...open it. Drop down the blank box at the top of the window; you'll see several entries, including the hero/heroine ones and the battle tower people. Note that there are several different ones for both hero and heroine; you'll have to come up with sprites for all of them if you want everything working properly. For now, we're focusing on getting the walk animations working. Select any of the tower sprite sheets except for 5. (You can try saving the hero/heroine sheets and editing them directly, but they always screwed up when I re-imported them. I'm not sure what exactly the problem is. If someone else can get it to work right, then by all means tell me, and I will add the significantly-abridged method to this guide.) The sprite sheet should appear in the left pane. Oggle it for a moment, then click the "Save poke" button at the bottom-right corner of the window. At this point, I recommend creating a folder to drop .poke files, exported Tile Molester sheets, and anything you make in your image editor into. It'll save a bit of clicking later on. Congratulations, your first step into sprite-editing hell has been made. Pat yourself on the back, then continue. Open Tile Molester, making sure not to touch its hands. Click the "File" menu and click "Open..." (or if you're savvy, clicking the little folder will do). Browse to the folder where you exported the sprite sheet from PokeTEX earlier. You won't see anything at first; drop down the "File of Type" box and set it to "All Files (*.*)". Double-click your .poke file that magically appears, and wait the millisecond it takes to load. My, this looks like a bunch of gibberish! Tile Molester, by default, isn't set to display a file of this type. Of course, you're not going to let that stop you. Click the "Image" menu at the top of the screen, and select "Canvas Size". Set it to 4 columns, 52 rows. Click the "View" menu at the top of the screen, highlight the "Codec" sub-menu, find the entry "4bpp linear, reverse-order" and click it. Click the "View" menu again, still located conveniently at the top of the screen, highlight the "Mode" sub-menu, and click "2-Dimensional". You may have noticed (if you didn't you're completely out of it) that the image is no longer gibberish, but actually looks like wee little video game characters. The only problem is, the colors are all wonky. Easily fixed---click the "Palette" menu, highlight the "Import From" sub-menu, and click "This File...". The offset for this size sprite sheet is 6708. Tower5 uses 8244. The size for this and any other sprite sheet is 16. Click "Ok". Full list of hero/heroine sprite palette offsets: hero: 13300 herobike: 11028 hero2: 6596 hero2f: 1196 heroback: 2872 herofish: 8756 heroride: 2276 heroshiny: 13300 herouse: 3040 herousepoke: 2276 Heroine sheets are identical in size, so the same offsets should work for them. Again, if you're not a zombie or summat, you'll notice that the sprite sheet, or rather column, is now clear and colorful. Admire your handiwork for a moment, then get back to it. Long way to go and all. Something to keep in mind; the "sprite column" is shifted to the right a little too much, and so the sprites will "wrap around" to the left side. Make sure you edit not only the sprite itself, but the "wrapped" portion on the left side. If you only intend to edit the head of the sprite, you can make the sprites stop "wrapping" by clicking the button near the top-right of the tool bar that looks suspiciously like a fast-forward button. It will make the sprite at the bottom of the "column" appear cut-off, but don't worry, it's just been shifted to the top and converted to gibberish. Click the "Edit" menu, and click "Select All". Click the "Edit" button again, and click "Copy To...". For the file type, select "Windows Bitmap". Name the file and save it in the editing folder I assume you made. Now for the actual editing. I can only offer instructions for limiting the palette size and preventing a smeary mess with tools in Photoshop; for any other program, consult the help file or summat. Open the file you just saved in Photoshop. Click the "Image" menu, highlight the "Mode" sub-menu, and click "Indexed Color...". Set the palette to "exact", uncheck Transparency and click "Ok". This will prevent Photoshop from using transparencies while you paint and inadvertedly adding colors to the palette. Open the sheet with the sprites you're going to use. I recommend coloring it with the colors of the sheet you imported from your ROM before you copy it over---it makes it much easier to get things right the first time later when you're modifying the palette in PokeTEX. Keep the colors themselves as close to the originals as possible, to ease reintergrating the sprite sheet with its .poke file. Yes, this means your character will be strangely-colored. No, there's nothing you can do about it at this point. Important: Do NOT, in any way, edit the coding at the very top of the image. If I have to guess, I would say that this is the file's header. Screwing around with it makes Very Bad Things happen. Actually, it'll just make PokeTEX tell you to go do inappropiate things to your pet dog. Or that's what I assume it says, anyway. Someone forgot to translate the error messages. Don't touch it in any case. Once you've completed your recoloring and editing, select each sprite with the "Retangular Marquee" tool and drag it over into its respective slot. If you recolored the sprite beforehand, the colors should automatically remap themselves to use their respective spots in the palette. If not, your sprite is going to look very strange for now. Save the sprite sheet when you're done copying sprites over. Don't overwrite the one you originally exported, as it will be useful later. Back in Tile Molester, click the "Edit" menu and click "Paste From...". Select the sprite sheet you just saved and open it. It should automatically align itself. Resize the window so that it's slightly wider than the sprite sheet, and click the grey area to deselect and complete the paste operation. All colors should automatically remap themselves to the palette if they're close enough to the originals. If not, don't fret, it doesn't much matter anyway. Click "File", then "Save As..." and save the .poke under a different name than the original. Do not overwrite the original, as you will need it to restore part of the ROM you're about to overwrite. Bring PokeTEX back up, and select the sprite sheet that you originally exported. Click the "Open poke" button at the bottom-left of the screen, and open your modified sprite sheet. One or two colors may be wrong; as mentioned at the beginning of this guide, Tile Molester especially, and PokeTEX itself weren't designed to handle this game, and a color or two might have gotten screwed in the import/export process. Ignore it for now, and click the "Unk.1" button near the bottom-left of the screen. You're almost done. Click the "Extend" button at the bottom-right of the screen. The window will expand, and a pane full of numbers will appear in the left of the expansion. This is the sprite's color mapping. You could, in theory, edit sprites solely through this interface, skipping this entire guide, if you were very good at visualizing the final product. But if you're not, read on. There will be a red square around your character in the upper-left pane that contains the character sheet. Pressing the < and > buttons to the right of the color mapping move this square through the sheet. For now, select the first spot in the character sheet, select everything in the color map pane, right-click and click "Copy". Drop down the box at the top of the window, and select either the hero or heroine character sheet. Down next to the color map, click < to select the first spot, select everything in the color map, right-click, and click "Paste". To finalize the replacement, click the "Save ROM" button in the bottom-right of the window. Do this after each copy-paste cycle, or the change won't take. Continue doing this until all the frames you have made are placed in their respective spots on the hero/heroine character sheet. The following shows what to replace (as some of the running frames look similar to walking frames: Back (standing): A1 Facing right, right step: B1 Facing right, standing: C1 Facing right, left step: D1 Facing left, standing: A2 Facing left, left step: B2 Facing left, right step: C2 Back, left step: B3 Back, right step: A6 Front, standing: B6 Front, left step: C6 Front, right step: D6 When you're done, modify the palette so that your character is colored properly. I opened up another PokeTEX window and copied the colors from the original sprite sheet (since I was just modifying a tower sprite and reinserting it), but there's no reason you couldn't copy the HSL/RGB values directly from the sprite sheet you used with help from your image editor's Color Picker and palette view. Just keep in mind that you only have 15 colors to work with (+1 transparency color), and the first color must be set to the background color. And there you have it. Repeat the same procedure for running, swimming, fishing, biking, etc etc. If you would like a specific sprite added to the index, request it and I'll see if I can find it. For now, only sprites that I've deemed important are indexed. Eventually, I hope to get them all done. Also coming soon: editing trainer screen picture and battle back picture. Update: new offsets added to the PokeTEX sprite list. Credit goes to mindfreak over at The PokéCommunity Forums for listing'em. Only the "important" ones are named, still. Redownload below~ Bigger Update: pictures added. If any more are needed, lemme know. Importantish Update: It was brought to my attention that I'm a screwup and forgot to include the palette offsets for ALL the hero/heroine sprite sheets, such as the ones used for biking/fishing/pokeballin'/etc. They have been added in the appropriate section of this tutorial. Thanks to mouses11 on the PokeCommunity Forums for bringing this to my attention. Credit to D-Trogh and his video found for the locations of the sprites' palettes and the dimensions that enable easy editing of the sprite sheets in Tile Molester. list.txt
 -
Pokémon Legality Guide - This guide was intended for the use of D/P Welcome to the Pokémon Legality Guide. This guide will provide you information on the defintion of Legit, Legal and Illegal. In addition, there is also a step-by-step guide on how to make a Legal Pokémon with Pokesav under any situation, weather you want it to be PalPark, Hatched or caught in the Wild--this guide will help you. Definition * Legal (Valid) Pokémon are able to exist naturally in the game without the use of external devices. * Illegal Pokémon are not able to exist naturally in the game without the use of external devices. * Legitimate (Legit) Pokémon are created without the use of external devices. Because all of these Pokémon are also able to exist naturally in the game, legitimate Pokémon are a subset of legal Pokémon. Although illegal Pokémon can only be created with the use of an external device (they simply cannot exist without the intervention of such a device), legal Pokémon can be created either naturally or through the intervention of an external device. Legitimate Pokémon, however, are always created naturally. Because of the nature of these definitions, it is possible to check for the legality of the Pokémon, but impossible to check for legitimacy. Therefore, there is no objective way to tell whether a Pokémon is truly legitimate or not. Programs such as Legality Checker and pAC can only check for legality, not legitimacy. Examples: * A Torterra, originating as a starter Pokémon in the game and raised only in the game is legitimate. * A Spiritomb with Wonder Guard is illegal because Spiritomb cannot naturally have Wonder Guard as an ability. * The perfect 31 IVs, shiny, docile, Umbreon from the PKM Database is legal because it was created with the use of external devices, however, it could have naturally occurred or existed in the game without the use of an external device. Although it would be extremely rare to encounter such a Pokémon, all aspects of its underlying data could have been generated by the game naturally. Preparation First, in order to create a Legal Pokémon, the user will need: * Pokesav * Legality Checker * SCV's PID/IV Program * Trash Byte Normalizer "Pokésaving" The Pokémon And will also need a way of transferring Pokémon into your game. Beginning 1. Open Pokesav 2. Open your .sav file 3. Go into the Storage menu on the bottom right corner of the main Pokesav screen and select an available spot in any of your boxes and click Edit 4. At this point, select a Pokémon and the enter desired Trainer ID, Secret ID, Level, Happiness, Name, Held Item, and OT Name. 5. Enter in the correct ability of the chosen Pokémon. 6. Select a valid moveset. 7. Enter desired EVs, but make sure that the sum does not exceed 510 8. Contest Stats can be anything desired. 9. Marking can be anything desired. Hatched Pokémon 1. Region/Version, choose either Diamond, Pearl, or Platinum 2. Ball Caught With to Pokéball 3. Egg Hatched at to DayCareCouple 4. Met Level to 0 5. Met at Place to a location that is in the game, where an egg may hatch. Common locations include Route 209. Wild/Caught Pokémon 1. Region/Version, choose either Diamond, Pearl, or Platinum 2. Ball Caught With to any Pokéball that can be purchased at a PokéMart. It is not recommended to use a Master Ball. 3. The Pokémon may not know any moves which can only be learned from hatching. 4. Met at Place to the location where the desired Pokémon can be caught. 5. Met Level and choose a valid level depending on the Met at Place. Consult a Pokédex for this information. 6. Hidden Hex Values section, change 85h according to the method of encounter: 02 – Tall Grass 04 – Dialga/Palkia 05 – Cave/Hall of Origin 07 – Caught in the Water 09 – Catught in Building 0A – Great Marsh 0C – Starters/Fossils PalParked Pokémon 1. Region/Version, choose the GBA Pokémon Game or Colosseum/XD from where the Pokémon may be caught from. 2. Ball Caught With to any Pokéball that can be purchased at a PokéMart. It is not recommended to use a Master Ball. 3. Met at Place to 55 (Pal Park). 4. Met at Level needs to be the level at which the Pokémon migrated. This should not be lower than the level it can be obtained at. Trash Bytes 1. In POKESAV, click on Save in the Storage menu. 2. Name the file and save it somewhere accessible. 3. Drag the saved file (extension is .pkm) over the Trash Byte Normalizer. 4. The program will ask you to press Enter to exit. 5. Click on Load in POKESAV from the Storage menu to import the normalized Pokémon. Making a Valid PID/IV Individual values (IVs) are stat values given at random to Pokémon when they are encountered in the wild. Pokémon which have been bred have a higher predisposition to the individual values of their parents. Both the PID/IV Generator in POKESAV and SCV’s PID/IV Generator will generate a Personality Value (PID) for a given set of IVs. Using POKESAV 1. Choose the desired IVs and click on PID/IV in POKESAV. 2. Click Generate, look at the algorithms and find the one that matches the Pokémon being created. 1. eg. A wild Starly will be Normal or Wild NDS. 3. The corresponding natures are displayed to the right of the algorithms. Using SCV's IV/PID Generator 1. Open SCV’s PID/IV Generator and select the appropriate option. 2. The program will guide ask various questions relating to the Pokémon. 3. After answering the questions, the program will output legal PIDs. 4. Copy the first one to POKESAV. TIP: Some natures may not yield desired results. Try changing one of the IVs slightly. This will radically alther the given PIDs. Testing the Pokémon 1. In POKESAV, click on Save from the Storage menu 2. Name the file and save it somewhere accessible. 3. Drag the saved file (extension is .pkm file) over the Legality Checker. 4. Make sure nothing says Invalid. 5. The last line, Type should correspond to the algorithm used during the PID/IV stage. Congratulations! The Pokémon is legal and ready to be used! Frequently Asked Questions Will a legal Pokémon work on Pokémon Battle Revolution? * A: Yes, if the Pokémon is legal, it will work on PBR. How does a person make a shiny legal Pokémon? * A: Select the option for a shiny Pokémon in SCV’s PID/IV Generator. Exporting the Pokémon as an Action-Replay code does not work? * A: Due to translation limitations, a second program was created, POKESAVARDSOutput.exe. Load the Pokémon using this version of POKESAV. Will editing an existing Pokémon still be legal? * A: Yes, as long as it follows this article. Credits * SCV - IV/PID Program * Sabresite - Legality Checker and Trash Byte Normalizer * coolhbo3K - Definition section * Greencat - Creating this article for the guide.
-
 Pokémon Team Building Guide - Guide Created From: Silent Storm Welcome to the guide! This guide will cover everything you need to know about team building and the statics of a Pokémon and how they be modified. We hope you enjoy the guide and be sure to read the EV Training Guide for more info on how you can make the most of the Pokémon's stats. Movesets I take it you know what movesets are so there is no point explaining what they are. When deciding a moveset you have to consider the fact that you can't have two moves of the same types unless its a power up move or a move like Spikes or whirlwind. You also have to consider that the moveset should be varied to take down a good selection of Pokemon. Take this moveset of an Infernape as an example. Earthquake Grass knot Close combat Flare blitz. This is a standard moveset for a competitive Infernape. Flare blitz and close combat cover a fair majority of Pokemon, mostly common Pokemon used in this generations teams. The moveset is a mixed sweeper moveset, so it can take down a a good selection of Pokemon without too much trouble. Earthquake takes down electric, ground, rock and steel Pokemon, Grassknot takes down the likes of water Pokemon and works effective with heavy Pokemon like Snorlax. Close combat takes down rock, ground, steel and normal Pokemon, and with a hasty nature, defense being lowered while using it is not important. However, movesets are dependent on the natures, a topic that I will cover later in this guide. IV's A Pokemon has 6 stats: - HP - Atk - Def - Sp. Atk - Sp. Def - Spd And every Pokemon gets a random Individual value (consider it an extra bonus) ranging from 0 to 31. (to get an idea of the individual values of a Pokemon JUST BORN you can use two methods, leveling up to at least lvl 20 with rare candies or using the day care, IT NEEDS TO LEVEL UP WITHOUT FIGHTING OR GETTING EXPERIENCE OF ANY FIGHT = no exp.share, and using an IV calculator like the one at Serebii.net) Getting a 0 doesn't mean it's bad, but you're not getting any extra push that could mean victory or defeat... so people aims to get better values on their Pokemon by catching, trading or random breeding the Pokemon they want. But there's an option to at least make it easier. Breeding helps to inherit or "pass down" some of those individual values from the parents to the babies. This is an example (showing stat/IV) Male: HP/31 Atk/16 Def/30 Sp.Atk/2 Sp.Def/31 Spd/20 Female: HP/11 Atk/30 Def/0 Sp.Atk/25 Sp.Def/31 Spd/29 Let's say this Pokemon will be a defensive wall, the Sp.Def on both parents is 31, they can reach the highest value on Sp.Def, and look.. the father has also the highest HP and a very good Def. so we'll be aiming to get those 3 values inherited... the HP and Def of the male and the SP.def of the female... Why only 3? There's a rule for IV breeding; 3 of the IV's of the baby will be inherited from the parents at random and the other 3 will be totally random, so it still be a matter of luck... only that you have a higher chance now of getting the combination needed. Getting the right 3 values can take a long time and lots of rejected babies but you don't need to aim for perfection.. you can use the better babies you get if you get tired. In Pokemon Emerald there was a guy who evaluated your Pokemon by their IV's but now each Pokemon has a little flavor text on their summary Here's the different options and the range of values they cover: the ones in bold contain the highest value of 31... so you should aim for those and check with the calculator if theyare indeed 31's... cause they can be of a lower value btw... the message appears depending on the HIGHEST IV the pokemon has, but if it has more than 1 value at 31, the message will be chosen at random form them (a 31 hp 31atk pokemon can say either "often dozes off" or "likes to trash about" for example) Hidden Power Hidden Power is move where its power and type are dependent on the IVs, this move becomes very useful in the field of battle when you get the type and power you want. To calculate the type and power of HP look at the time below. Or if you like taking the easy and effective route, then use MetalKid's calculatorhttp://www.metalkid.info/Pokemon/OnlineProgram/Calculators/HiddenPower.aspx Remember the higher the IVs, the stronger Hidden Power is: NaturesLike EV's and movesets, Natures are vital when you are preparing a good balanced team. These are the natures. Ok by following this, if I get a snorlax with a Adamant nature, I will EV train it with 252 attack evs. 252 defense evs and 4 hit points evs, focusing on attack EVs most cause of the nature. If you don't get the nature you want the first time, re breeding helps (or if its a one off Pokemon like Rotom, soft resetting helps cause Natures are random, hopefully it won't come to that if you are lucky.) Hold items Hold items are also important, cause they can either power up the stats of your Pokemon, or lower the stats of your opponents Pokemon. Hold items can either work in battle or outside of battle, but I am talking about in battle in this guide. So say I have a Snorlax and it has a rest move, I would have it hold a Lum berry so that when it uses rest, Lum Berry effect is that when the Pokemon holding the item is affect by any status affecting moves it will automatically heal the Pokemon. Seeing as rest makes the user sleep, it will heal the user's status, maing it a +1 on your side, and a -1 on the opponent's side. Leftovers is another common hold item, it heals the Pokemon by a bit while battling. Using it with a defensive will make it annoying as hell to beat, especially if you fighting a Blissy or Snorlax. To find out about the different kinds of hold items, check the site's new Pokedex from SCV! To sum it up, to build a competitive team, you are going to have to consider IV's, EV's, Natures, movesets and hold items. Also, I wanted to talk about egg moves, but there is not really much to say, just look on Serebii for egg moves. http://www.serebii.net/index2.shtml Tip - By catching a ditto with an adamant or jolly nature, giving it an Everstone and breeding it with the Pokemon you want to train will give the egg Pokemon the nature of the Ditto. Same applies to female versions of Pokemon. Type Chart Links - Under Construction - Threats In The Game Credits Dark_Azelf, JUDGEMENT0, Serebii and Silent Storm.
 -
EV Training Guide - Guide Created From: Silent Storm Hello and welcome to the Pokémon EV Training Guide! We hope you find the guide helpful and informative. Please fallow the rules when posting and enjoy. Tiers (Ranking System) Competitive environment has it set of tiers (sometimes, in this case Pokemon) tiers are merely there to promote diversity in the world of Pokemon, without tiers, stuff like Groudon, Mewtwo, Kyogre and Darkrai would be on every team (same with Arceus when he comes out). To find out what Pokemon belong which tiers follow this link, ot that the Uber tier and Borderline Tier mearly exist as a banlist fo the Overused and Underused tier. http://www.projectpokemon.org/forums/showthread.php?t=15 Competitive Roles Guide The great thing about competitive battling is that every Pokemon has a specific role on teams, to find out these roles, follow the below. http://www.projectpokemon.org/forums/showthread.php?t=34 Standard Rules. We have tiers and roles, now all we need are rules right? To find out the rules of competitive battling, then follow the link below. http://www.projectpokemon.org/forums/showthread.php?t=37 Effort Values EV stand for Effort Value, Pokemon can gain these when battling other Pokemon in game. Each Pokemon that you battle gives out a certain amount of Effort Values. Effort Values are hidden from viewing in game though, so it is up to you to keep track of them, though another way is to use PokeSAV if you have a flashcart or ARDS codes. Each Pokemon gain up to a total of 510 EVs. Every 4 EVs equals one stat point gained when you level up (if you gained 4 EVs of that stat while training). Out of those 510, 508 of them are usable. However, each stat can only have a maximum of 252 Effort Values. That means you can max out 2 different stats. 252 EVs translates into 63 stat points. (63 times 4 is 252). Also, this can be supplemented by a nature. (A beneficial nature adds 10% more stat points overall, while a hindering nature takes away 10% overall. So a Pokemon with an Adamant nature gets 10% MORE stat points in Attack but 10% LESS stat points in Special Attack). Why should we EV train? Simple really, EV training helps greatly in the field of competitive battling, for instances, people that EV train have a MAJOR advantage over those that don't (EV trained Pokemon can take hits deal more damage or are just plain faster). Do you know any good EV training spots? Well yes, these or great spots to make EV training faster. Or you could follow this. Power Items: These items boost the number of EVs gained per battle with a pokemon in their respective stat. Power Ankle: Boosts Speed EVs Power Band: Boosts Special Defense Evs Power Belt: Boosts Defense EVs Power Bracer: Boosts Attack EVs Power Lens: Boosts Special Attack EVs Power Weight: Boosts HP EVs Equation goes like this: x + y = t x = EV's from pokemon y = EVs boosted from Power Items (+4) t = Total EVs Now with Pokerus we multiply the whole left side of the equation by 2 so... 2(x + y) = t Now assume we have a pokemon that grants 2 points per battle... 2(2 + 4) = 12 Speeding up EV Training Here are some factors to take into consideration before beginning your training: Reducing EVs In Pokemon Emerald version, there are 6 berries that can reduce EVs. Each one reduces 10 EVs from their respective stat. - Pomeg Berry - HP - Kelpsy Berry - Attack - Qualot Berry - Defense - Hondew Berry - Special Attack - Grepa Berry - Special Defense - Tamato Berry - Speed Credits Dark_Azelf, JUDGEMENT0, Serebii and Silent Storm.
-
- Greencat @ 12:34 PM Thank you for contributing Silent Storm! Your guide was so great, it had two in one. I went ahead and reposted it in two forms. You have been credited and mark up was added. Thanks again. http://projectpokemon.org/forums/showthread.php?p=6773 http://projectpokemon.org/forums/showthread.php?p=6782 I will now lock this thread and everyone can fallow the links above.
-
To begin, I would like to emphasize all of the seventeen Pokémon types in the game. They are the Normal-, Fire-, Water-, Grass-, Electric-, Ice-, Fighting-, Poison-, Ground-, Flying-, Psychic-, Bug-, Rock-, Ghost-, Dragon-, Dark- and Steel-type. Each type has its own advantages and weaknesses. Well, I've been playing Pokémon RPG for almost 6 years already. Building a team, "my way" is quite hard and takes a lot of effort for this works strategically. From Pokémon Yellow all the way up to Pokémon Platinum, I've established many great teams that could outwit all the Pokémon types. At this time, my team Pokémons are: Weavile, Lucario, Swellow, Arcanine, Milotic and Tyranitar. I will use my team as an example on how I create teams. To make things easy, let's refer on the chart. Type -------> Effectiveness Normal-----> x1 Fire-------> x5 Water------> x1 Grass------> x5 Electric---> x5 Ice--------> x3 Fighting---> x3 Poison-----> x5 Ground-----> x2 Flying-----> x3 Psychic----> x4 Bug--------> x4 Rock-------> x6 Ghost------> x4 Dragon-----> x3 Dark-------> x1 Steel------> x6 For my Weavile, I have the moveset: Dark Pulse, Psychic, Ice Beam and Earthquake. This enables my Weavile to outwit Fire-, Grass-, Electric-, Fighting-, Poison-, Flying-, Psychic-, Rock-, Ghost-, Dragon- and Steel-type Pokémons. Weavile is immune to Psychic-type moves. For Lucario, I have the moveset: Aura Sphere, Dark Pulse, Earthquake, and Flash Cannon. This enables my Lucario to outwit Normal-, Fire-, Electric-, Ice-, Poison-, Psychic-, Rock-, Ghost-, Dark- and Steel-type Pokémons. Lucario is immune to Poison-type moves. For Swellow, I have the moveset: Aeroblast, Fly, Air Slash and Earthquake. This enables my Swellow to outwit Fire-, Grass-, Electric-, Fighting-, Poison-, Bug-, Rock- and Steel-type Pokémons. Swellow is immune to Ground- and Ghost-type moves. For Arcanine, I have the moveset: Magma Storm, Crunch, Power Whip and Flamethrower. This enables my Arcanine to outwit Water-, Grass-, Ice-, Ground-, Psychic-, Bug-, Rock-, Ghost- and Steel-type Pokémons. For Milotic, I have the moveset: Air Slash, Surf, Ice Beam and Earthquake. This enables my Milotic to outwit Fire-, Grass-, Electric-, Fighting-, Poison-, Ground-, Flying-, Bug-, Rock-, Dragon- and Steel-type Pokémons. For Tyranitar, I have the moveset: Rock Slide, Crunch, Earthquake and Dragon Pulse. This enables my Tyranitar to outwit Fire-, Electric-, Ice-, Poison-, Flying-, Psychic-, Rock-, Ghost-, Dragon- and Steel-type Pokémons. Tyranitar is immune to Psychic-type moves. Well, there it goes... I hope that you get the point on how I make good teams. I have made a bunch of teams and I would be happy to share it with you guys. I can supply them to you by either giving you the .pkm files or by using an ARDS code. This guide emphasizes only one aim and that is to outwit all Pokémon types by just 6 Pokémon. Send me a message or a post if you have any comments... Thanks!!! God bless ProjectPokémon!!!
-
Hexadecimal Converter: http://www.mathsisfun.com/binary-decimal-hexadecimal-converter.html ~Preston's Guide to 44h, 45h, 46h, 47h, 85h, and 86h Values~ Last updated: 10/09/09 ~Which game uses these values?~ On R/S/E/FR/LG/CO/, none of the hidden values are used. On D/P, only the 85h is used. On Platinum, 44h-47h and 85h are used. On HeartGold and SoulSilver, 44h-47h and 85h-86h are used. ~What are the values for a Pokemon that was migrated from Pal-Park?~ D/P Migration: Set all values to 00 Platinum/HG/SS Migration: Set 46h to 37 (Pal-Park in hexadecimal) and the rest to 00. ~What do the values mean?~ 44h and 45h are used for who you recieved the egg from in Platinum/HG/SS. 46h and 47h are used for where the egg was hached at or where the Pokemon was caught at in Platinum/HG/SS. 85h is used to determine how the Pokemon was caught/received in D/P/Pt/HG/SS 86h is used to determine what Pokeball was used to capture the Pokemon in HG/SS ~Do the values change when you trade them to a different game?~ Once a Pokemon's values have been determined by the game, they will never change. This means trading a Pokemon from Diamond to Platinum will keep its regular hex values from Diamond. There are exceptions for Pokemon eggs when they are traded. Finding the Values: 44h and 45h 44h and 45h will always be 00 if your Pokemon did not come from an egg. If you obtained your Pokemon as an egg, go to PokeSav and look for the decimal number of where the egg was received at. For example, my Riolu was received from Riley. Riley's decimal value is 2010. (The decimal number is shown in PokeSav right next to Riley.) Now I need to convert 2010 to hexadecimal. If you don't know how to convert, then just use the link at the top. 2010 is 7DA in hex. Egg location and Met location are written from right to left in hex (called little endien). I'll rewrite 7DA to 07DA to make things easier. Since we have to read this from right to left, we need to break it in two and then flip the values. 1. 07DA 2. 07 DA 3. DA 07 So the 44h value will be DA and my 45h value will be 07. 46h and 47h These are found just the same way as the egg locations. Find the decimal number for where your Pokemon was hatched or caught at in PokeSav. My Riolu hatched at Iron Island, and Iron Island is 69 in decimal. So now I just convert 69 into hexadecimal, and I get 45. (0045) Since we have to read this from right to left, we need to break it in two and then flip the values. 1. 0045 2. 00 45 3. 45 00 My 46h value is 45, and my 47h value is 00. 85h 85h Values are used in Diamond and Pearl too, along with Platinum. 00 - Egg/Pal Park/Event/Honey Tree/Shaymin (D/P/Pt) 02 - Tall Grass/Darkrai (D/P/Pt) 04 - Dialga/Palkia (D/P/Pt) 05 - Cave/Hall of Origin/Giratina (D/P/Pt) 07 - Caught in the Water (D/P/Pt) 09 - Caught in Buildings (D/P/Pt) 17 - Distortion World (Giratina) (Pt) 18 - Starter Pokemon/Bebe's Eevee/Fossil Pokemon (Pt) 0A - Great Marsh/Safari Zone (D/P/Pt) 0C - Starter Pokemon/Fossil Pokemon (D/P) My Riolu was in an egg, so my 85h would be 00. 86h 86h Values are used in HeartGold and SoulSilver only to determine the PokeBall. (Thanks to Wylfred for listing them out!) If there is an *, that means the normal Pokeball slot in Pokesav should be set to a Pokeball. Never set the normal Pokeball slot in Pokesav to any Apricorn balls. 01 = Master Ball 02 = Ultra Ball 03 = Great Ball 04 = Poke Ball 05 = Safari Ball 06 = Net Ball 07 = Dive Ball 08 = Nest Ball 09 = Repeat Ball 0A = Timer Ball 0B = Luxury Ball 0C = Premier Ball 0D = Dusk Ball 0E = Heal Ball 0F = Quick Ball 10 = Cherish Ball 11 = Fast Ball* 12 = Level Ball* 13 = Lure Ball* 14 = Heavy Ball* 15 = Lovely Ball* 16 = Friend Ball* 17 = Moon Ball* 18 = Compé Ball* My Riolu's Summary: 44h: DA (Egg recieved from Riley) 45h: 07 (Egg recieved from Riley) 46h: 45 (Pokemon was hatched/caught at Iron Island) 47h: 00 (Pokemon was hatched/caught at Iron Island) 85h: 00 (Pokemon was hatched) 86h: 00 (Pokemon was hatched on Pt, not HG/SS) All the other values you see on Pokesav should be 00. None of them have been used yet. The Giratina Factor Giratina, as well as any other Pokemon caught or hatched in a new Platinum, HeartGold, or SoulSilver location, are kind of tricky. This will show you how the game reads these new locations, and how to create them. First of all, these are the new locations added. 112- Battle Frontier 113- Battle Factory 114- Battle Castle 115- Battle Roulette 116- Battle Stage 117- Distortion World 118- Global Terminal 119- R.A House 120- Match Place 121- Rotom's Room 122- Eterna Galactic HQ 123- Iron Ruins 124- Iceberg Ruins 125- Rock Peak Ruins 2011- Cynthia* (In Hex) 7E - New Bark Town 7F - Cherrygrove City 80 - Violet City 81 - Azelia Town 82 - Cianwood City 83 - Goldenrod City 84 - Olivine City 85 - Ecruteak City 86 - Mahogany Town 87 - Lake of Rage 88 - Blackthorn City 89 - Silver Cave 8A - Pallet Town 8B - Viridian City 8C - Pewter City 8D - Cerulean City 8E - Lavender Town 8F - Vermillion City 90 - Celadon City 91 - Fuchsia City 92 - Cinnabar Island 93 - Indigo Plateau 94 - Route 1 95 - Route 2 96 - Route 3 97 - Route 4 98 - Route 5 9A - Route 6 9B - Route 7 9C - Route 8 9D - Route 9 9E - Route 10 9F - Route 11 A0 - Route 12 A1 - Route 13 A2 - Route 14 A3 - Route 15 A4 - Route 16 A5 - Route 17 A6 - Route 18 A7 - Route 19 A8 - Route 20 A9 - Route 21 AA - Route 22 AB - Route 23 AC - Route 24 AD - Route 25 AE - Route 26 AF - Route 27 B0 - Route 28 B1 - Route 29 B2 - Route 30 B3 - Route 31 B4 - Route 32 B5 - Route 33 B6 - Route 34 B7 - Route 35 B8 - Route 36 B9 - Route 37 BA - Route 38 BB - Route 39 BC - Route 40 BD - Route 41 BE - Route 42 BF - Route 43 C0 - Route 44 C1 - Route 45 C2 - Route 46 C3 - Route 47 C4 - Route 48 C5 - Diglett Cave C6 - Mt. Moon C7 - Cerulean Cave C8 - Rock Tunnel C9 - Power Plant CA - Safari Zone CB - Seafoam Islands CC - Sprout Tower CD - Tin Tower CE - Burnt Tower CF - National Park D0 - Radio Tower D1 - Ruins of Alph D2 - Union Cave D3 - Slowpoke Well D4 - Lighthouse D5 - Rocket Hideout (Mahogany Town) D6 - Ilex Forest D7 - Goldenrod Underground D8 - Mt. Mortar D9 - Ice Path DA - Whirl Islands (Lugia's Chamber) DB - Silver Mountain Cave DC - Dark Cave DD - Victory Road DE - Dragon's Den DF - Tohjo Falls E0 - Viridian Forest E1 - Pokéthlon Dome E2 - S.S. Aqua E3 - Safari Zone Gate E4 - Cliff Cave E5 - Frontier Front E6 - Path to Tin Tower E7 - Shinto Ruins E8 - Hidden Tower E9 - Pokéwalker EA - Cliff’s Gate *2011 is the Hall of Fame for D/P/Pt, but when read for where the egg was from, Pt regards it as Cynthia. Okay, these are the new locations. But how would Diamond and Pearl read these unknown areas? Nintendo came up with a "good" solution. Here's how to do it: The first step is to convert your location to hex. I'm gonna give an example of me hatching a Togepi in Rotom's Room. Rotom's Room is 121 in decimal, and 79 (0079)in hex. 0079 00 79 79 00 So 46h will be 79 and 47h will be 00. This is where most people screw up. If you are using a new location in Platinum, you must set the place you met at to 3002 (FarAwayPlace). When the game notices your Pokemon was caught in a Faraway place, it then looks at your 46h and 47h values. If they are both 00, then the game will simply show FarAwayPlace. If they have values, such as my Togepi here, your game will show the hex value location for where the Pokemon was caught. This way, if you trade Giratina or any Pokemon from a new location in Platinum, it will show up as FarAwayPlace on Diamond and Pearl. (D/P do not read the 46h/47h values at all.) Please respond with any questions you have, or any part that was confusing to you! I would love to help! If you have any Information that isn't up here, please tell me! Special Thanks to: damio Sabresite SCV ZMaster Xeomyr Wylfred
-
My first game-related guide. Hope it helps!
-
Here i am posting a hex guide(thank you SCV for telling me where to put this) anyway hex is what is used in codes. I am going to show you a hex chart showing what = what, this will help you figure out how to edit/modify a code. Here we go. HEX BACKGROUND(HEX IS A SERIES OF NUMBERS AND LETTERS USED IN CODE THEY ARE ORGINNIZED LIKE THIS 1-9 AND A-F 1-9 IN HEX EQUALS (DUH) 1-9 BUT! A-F EQUALS 10-15) hex. 1 2 3 4 5 6 7 8 9 dec. 1 2 3 4 5 6 7 8 9 alright this may seem weird at first but it gets easy. Note: You can use a calculator on your computer to convert the values I am just sowing you how to do it manually(Thanks Janime6 for telling me this) hex. A B C D E F dec. 10 11 12 13 14 15 now this is a pattern which you will see next. hex. 10 11 12 13 14 15 dec. 16 17 18 19 20 21 this pattern of: 1 2 3 4 5 6 7 8 9 A B C D E F 10 11 12 13 14 15 16 17 18 19 1A 1B 1C 1D 1E 1F 20.. will continue on. so that is an easy way to remember. so lets say in a code you want 100x of something well you can not just put 100 in or else you would have 256 of something because 100 in hex is 256 in regular dec.(dec. is the numbers we always use all the time) so you would follow the pattern until you get to this 64 that is the number you want 64 in hex. is 100 in dec. so lets use this in a real code i will be modifying a code from codejunkies.com it is a code for pokemon diamond version. it is super exp. gain. But i will be modifying it to what i want. HERE: Super EXP Gain (Hold R at the End of a Battle) 94000130 000002ff 62106fc0 00000000 b2106fc0 00000000 100458dc 0000270f d2000000 00000000 now once you start to notice hex in a code you can figure out how to modify it(notice i have been dealing with codes for about 2-3 years this may take some time to completely understand. notice2: this will not take you 3 years maybe a day to learn ) the line in lime green is the line with the exp. in it(the part in blue is what i will mod for you) HEY look there is hex in the blue it is 270F so what does 270F equal in hex it equals 9999 in dec. which is how much your pokemon will gain in exp. So i want it a little bit higher so i will modify it to about 20,000(dec.) so what does 20,000 equal in hex. it equals 4E20(hex.) so my new code is THIS: 94000130 000002ff 62106fc0 00000000 b2106fc0 00000000 100458dc 00004E20 d2000000 00000000 now every time i beat a pokemon i will gain about 20,000(note this changes besause of wild pokemon and pokemon trainers so it will vary) and if i wanted it at a crazy level i would put FFFF and FFFF equals 65,535 so it would be: 94000130 000002ff 62106fc0 00000000 b2106fc0 00000000 100458dc 0000FFFF d2000000 00000000 this is a basic way of changing a code. FEEL FREE TO ASK ME QUESTIONS IF YOU DO NOT UNDERSTAND. Note: you cam use a calculator to convert the values(thanks Janime6 for telling me this).
-
 Ok, my current wiki project is a large one. I'm working on building a guide to all the places in pokemon sort of like Serebii's pokeearth. These pages would include a lot of information that of course is only obtained while in game and not using any other outside resource to build the page. It will cover detailed information on all the places a page for each place. This information should be listed by game so for example route 201 (my current page in the works) should have information for platinum, pearl, and diamond games. What is included in these pages? ~Place name ~How to get to place ~Pokemon that are in this place while walking around in morning, day, and nighttimes ~Pokemon that can be found using only the pokeradar ~Pokemon that can be found only when a certain GBA game is inserted into the GBA slot on the ds/lite ~Trainers in this place and pokemon ~Items Where I need help Everywhere, this is a big project for one person to take on alone. I was hoping to get people to handle certain routes or people to handle certain aspects of a page. Like a certain group of people will handle what pokemon can be found in the morning in platinum. Or people that do specifically the pokeradar pokemon. If you would like to offer your services PM me. What region to start with? Sinnoh is the current region to work on. Then we'll work back from there. However, sinnoh, in and of itself will be hard to complete and should take a while. The next region to work on will be hoenn but dont even bother with that. For now sinnoh. I will update this post when sinnoh gets completed. Questions? PM me if you have any questions or you want me to assign you a job. If you do help.... If you do help and decide to finish a route or notice a route is complete please PM me telling me it is complete so I can take it off of the list. Note: I will be doing other side things for wiki whenever I get like, a light bulb idea, so to speak but this will be my main focus. Please comment, and PM me with your questions and offers to help!
 -
Ok, I looked on these forums and there wasn't a Pokemon Shiny Egg Guide, so here it is. Firstly, find the pokemon you want a lvl 1 Shiny of. Catch a Ditto, and put it and the other Pokemon into the Day-Care. Next, you'll need a site that says when, roughly, the eggs will hatch, like http://serebii.net/pokedex-dp/ Now, save once you get 1 Number away from the egg hatch Number. Now walk forward until the egg hatches (This may be about 200 steps) When the egg hatches, don't move, and look at the number of steps. Write this down. Turn the power off, then on. Now, go to the number before that, and save. Now, walk forward, and the egg will hatch. How cool is that? Now, if it isn't shiny, soft reset (L, R, Select, Start) and keep repeating the process. This may be pointless with a terrible pokemon, but with something like a Magikarp or Feebas, it will be your saviour! Note, I do not own Serebii.net, nor do I work with them in any way.
-
What is HTML? HTML, which stands for Hyper Text Markup Language, is the predominant markup language for web pages. It provides a means to create structured documents by denoting structural semantics for text such as headings, paragraphs, lists etc as well as for links, quotes, and other items. It allows images and objects to be embedded and can be used to create interactive forms. It is written in the form of HTML elements consisting of "tags" surrounded by angle brackets within the web page content. It can include or can load scripts in languages such as JavaScript which affect the behavior of HTML processors like Web browsers; and Cascading Style Sheets (CSS) to define the appearance and layout of text and other material. The W3C, maintainer of both HTML and CSS standards, encourages the use of CSS over explicit presentational markup The Basic Tags Basic Structure Basic Presentation Dividers Lists Positioning Links and Graphics Scripts&Java Note: This guide is not finished, i just don't have the time to finish it now. If you have any questions, just ask. Credits Me for writing this BareBones for teaching me HTML Many years ago CloneCharizard for pointing out some key tags. I hope many people will use this when building their Websites
-
 Over the the years I have witnessed some pretty poorly typed RMT threads, though the teams themselves were not bad, the way the RMT was presented defiantly played a part in their threads dying. I quite frankly am sick of seeing poorly written RMTs on Serebii, Pokecommunity and Smogon even, its not the layout that I am sick of (well kinda) but I am also sick of the fact that they do not give us much information on why they chose their party members and as well as having a central strategy, normally I see "standard set he is my revenge killer nothing much to say" what generally should be said is "I chose X Pokemon as my revenge killer, he provides my team with scouting capabilities while checking a lot of threats to my team" at minimum. So I decided to type up a small quick guide on how to produce a tidy informative and nicely presented RMT. Step 1 - Be consistent with your layout. What this means is that you use images with the same art style, type with the same font while putting important info in bold letters (IE damage calculation if you want to add them) and also keeping to the same format throughout your RMT. Step 2 - Try to be as informative as you humanly can. This is hard even for me as some sets are hard to talk about, to make things easier look up an analysis on Smogon, take bits from their and add them to your thread (edit some parts out so it does not look like you copied it) Step 3 -Type up your move sets in a way that makes it easy to read. This is the biggest problem I have, people tend to be lazy with this which results in their RMT dying before it had a chance. Try to follow a format like this: Pokemon @ Item Nature: Ability: EVs: Role: - Move 1 - Move 2 - Move 3 - Move 4 Comment: Step 4 - Have an introduction. Tell us what your team is trying to accomplish - are you trying to use paralysis hax to win or are you playing stall? Do you want to clear all common Salamence switch ins so that he has an easier time switching? Is it sandstorm or hail? Something like this would help us know what kind of team you are running etc and it will tell us you know what you are doing when you made this team. Final Step - Try and get a Threat List Threat lists tell us how you handle certain threats, add colors to show us what your problem Pokemon are and stuff like that. This is short (imo) but this is what I follow, it also helps to lurk before posting an RMT, people on smogon have asked if they can use my style as that is very important, sorry but people don't want to rate messy RMTs as they are hard and annoying to read. Lurking also helps you become a better player, lurking on places like Smogon show what the next big thing is while it shows you ways of beating or "checking" it etc, it also helps you build successful teams (the RMT Archive on Smogon). Resource Section Threat list. OU Sprites Bulbapedia for sprites. Legendary Pokemon for official artwork. Arkies for fan made art work (they seem to be popular atm). I will add more soon.
 -
Frontier Brains: Frontier Facilities Battle Tower: Battle Hall: Battle Factory: Battle Castle: Battle Arcade: Some info i researched on Mahalo and cheatsguru so credit to them
-
Competitive Pokémon Role Guide Welcome to the Competitive Pokémon Role Guide! Located below is information regarding the Role of Pokémon usually associated with Competitive Battling. Hopefully this will be found helpful. Sweeper Comment: Sweepers are Pokémon with amazing Attack and usually are fallowed up with great speed (And sometimes Stat Boosters). If they don't have great speed, they tend to have great Defenses as well to sustain at least some damage and Agility or Rock Polish it's speed up to par. They are usually defined as a Special or Physical Sweeper depending the stats. However, sometimes you will get Pokémon where the Special Attack and Attack Stat are similar and strong enough enough to become a Mix-Sweeper. Choice Band/Specs/Scarf-er usually fall under this section. Tank Comment: Tanks are very hard to get rid of at times due to there "bulkiness". Tanks have great defenses and at least decent Attack or Special Attack. The downside to these Pokémon is there usual slow Speed, but at times, this won't matter. They commonly have a Recovery move and sometimes a way of raising there stats. This group also has some variations: Physical Tank and Special Tank. Hazer Comment: Usually, the opponent will raise his/her Pokémon's stats and leave you in a ton of trouble, but a Hazer can get rid of that problem. Hazers have Haze , a move that eliminates all Stats. Another variation is Roar and Whirlwind, which causes the Opponent's Pokémon to switch and when a Pokémon switches it's Stat Boosts are removed. Very helpful when your opponent is attempting to sweep your whole team. Staller/Wall Comment: These Pokemon have huge defenses, but in return, sacrifice their Atk/SpAtk/Spd. They consists of moves that slowly KO their opponent such as Toxic and Will-O-Wisp. With low Atk/SpAtk, it is wise to throw on a Seismic Toss if possible. It's also recommended to choose a Pokemon with few weaknesses and/or many resistances. Variations include Special and Physical Wall. Cleric Comment: The main role of this Pokémon is to heal the team with Aromatherapy or Wish. They are capable of taking a few hits depending on the Pokémon. Spiker/Rapid-Spinner Comment: Spikers "spike" the opponent with either Spikes, Stealth Rocks, or Toxic Spikes while Rapid-Spinners get rid of "spike" related attacks. Often, Spikers are capable of causing the opponent to switch with Roar or Whirlwind. -Er Comment: Usually Pokémon with a specifically useful move or moves (i.e. BoltBeamer = Thunderbolt & Ice Beam) are given this name. Lead Comment: Generally a Pokémon that carries moves that "Set-Up". These include Spikes, Stealth Rocks, Toxic Spikes, etc. They also sometimes carry the move Explosion and U-Turn. Anti-Lead Comment: Anti-Lead's main purpose is to counter a Lead. They usually have the move Trick along with a Choice item (Scarf, Band and Specs) to stop their foe from using other moves and foil their move-set. - Greencat @ 6:52 PM If you think something is missing please PM me, Greencat.
-
We have a new awards system, complete with descriptions on each award. This post will no longer be maintained. If you have any suggestions for new badges, please create a thread in Forums Feedback, or if you wish to nominate someone for an award, please open a ticket. The old post: ----- Project Pokémon's Forum User Ranks Guide There are a few more ranks in this Forum than before. Information regarding the rank is provided in the below space. Hope you find it helpful and if you have any questions regarding User Ranks please feel free to post here. Be sure to remember this is only for questions, congratulations and information, but we are also one to new rank suggestions. Project Pokémon's Forum User Ranks Staff Ranks: - Administrator - Assistant Administrator - Super Moderator - Moderator - Event Staff - News Team - Former Staff IRC Ranks: - IRC Owner: Owner of the site's IRC. - IRC SOP: Super Op User on the site's IRC. - IRC AOP: Op User on the site's IRC. - IRC HOP: HalfOp User on the site's IRC. - IRC VOP: Voice User on the site's IRC. Contributor Ranks: - Image Contributor: User contributes images to the site that are implemented for use. - Event Contributor: User contributes Event Pokémon to the site. - Site Contributor: User who adds to the site significantly. - Forum Contributor: User who significantly contributes to the design of the forum. - Wiki Contributor: User contributes high quality articles to the wiki. Articles should be clear, detailed and show a mastery of the subject matter. - Save Editing Contributor: User has made significant contributions to Save Editing programs and/or related subjects but not qualifying as research. - Translation Contributor: User has contributed to the translation projects. Researcher Ranks: - RAM Researcher: User researches the games' RAM and publishes research and/or AR Codes using that research. - ROM Researcher: User researches the games' ROM and publishes information regarding structures found within ROM. - Game Save Researcher: User researches info on the games' Save structure and related information. - Developer: User creates and/or helps making either Save, RAM, or ROM editing programs for the use of others. - ROM Hacker: User uses ROM hacking tools to make quality ROM hacks. Misc. Ranks: - Helpful Q&A Member: User who has significantly posted helpful posts and aids users in need often. - Helpful Request Member: User who has given custom works to people such as custom Signature Requests, Pokésav Requests, etc. - Team Rater: User who contributes often in "Rate My Team" discussions as well as helping in "Rate My Team"s.