


NinFanBoyFTW
-
Posts
202 -
Joined
-
Last visited
-
Days Won
4
Content Type
Profiles
Pokédex
Portal
Technical Documentation
Pages
Tutorials
Forums
Events
Downloads
Gallery
Blogs
Posts posted by NinFanBoyFTW
-
-
Hey guys I have 1 extra code if anyone wants it.
U901-4ATV-7EXP-48Y6
-
 1
1
-
-
In this tutorial you will learn how to back up your Nintendo switch saves using a homebrew program called JKSV. The latest version of JKSV can be downloaded from here.
Note: This guide is meant for CFW emuNAND extracting from/importing to CFW emuNAND, or CFW sysNAND extracting from/importing to CFW sysNAND.
It's not meant for CFW emuNAND extracting from/importing to Stock sysNAND. In this unintended case, it may work for some of the readers,
but note that the sysNAND and emuNAND may unlink at any time, causing this unintended consequence to stop working.
The only real fix that we know thus far, is creating a new emuNAND using the present sysNAND.0. Download JKSV.nro from their Github page, from the latest release.
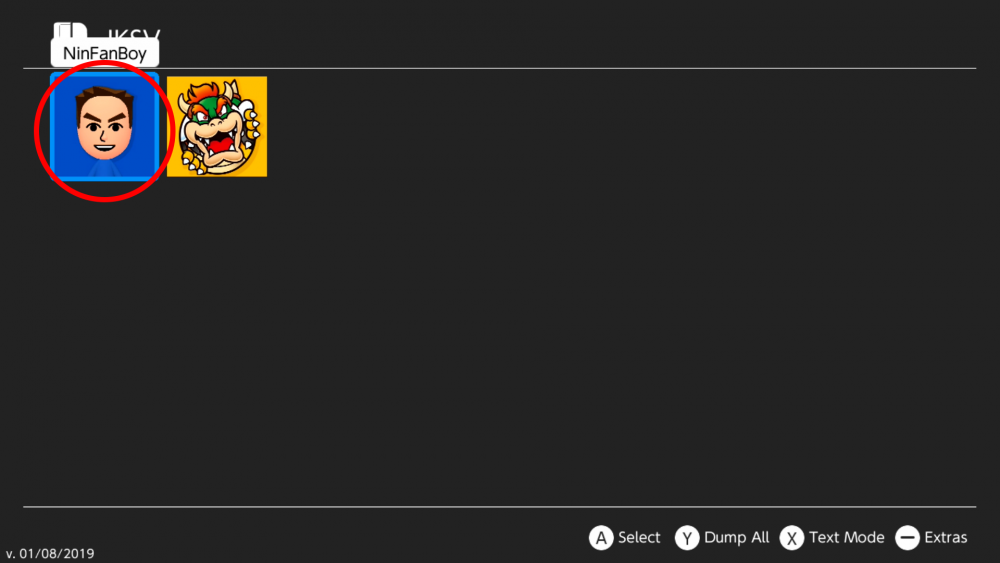
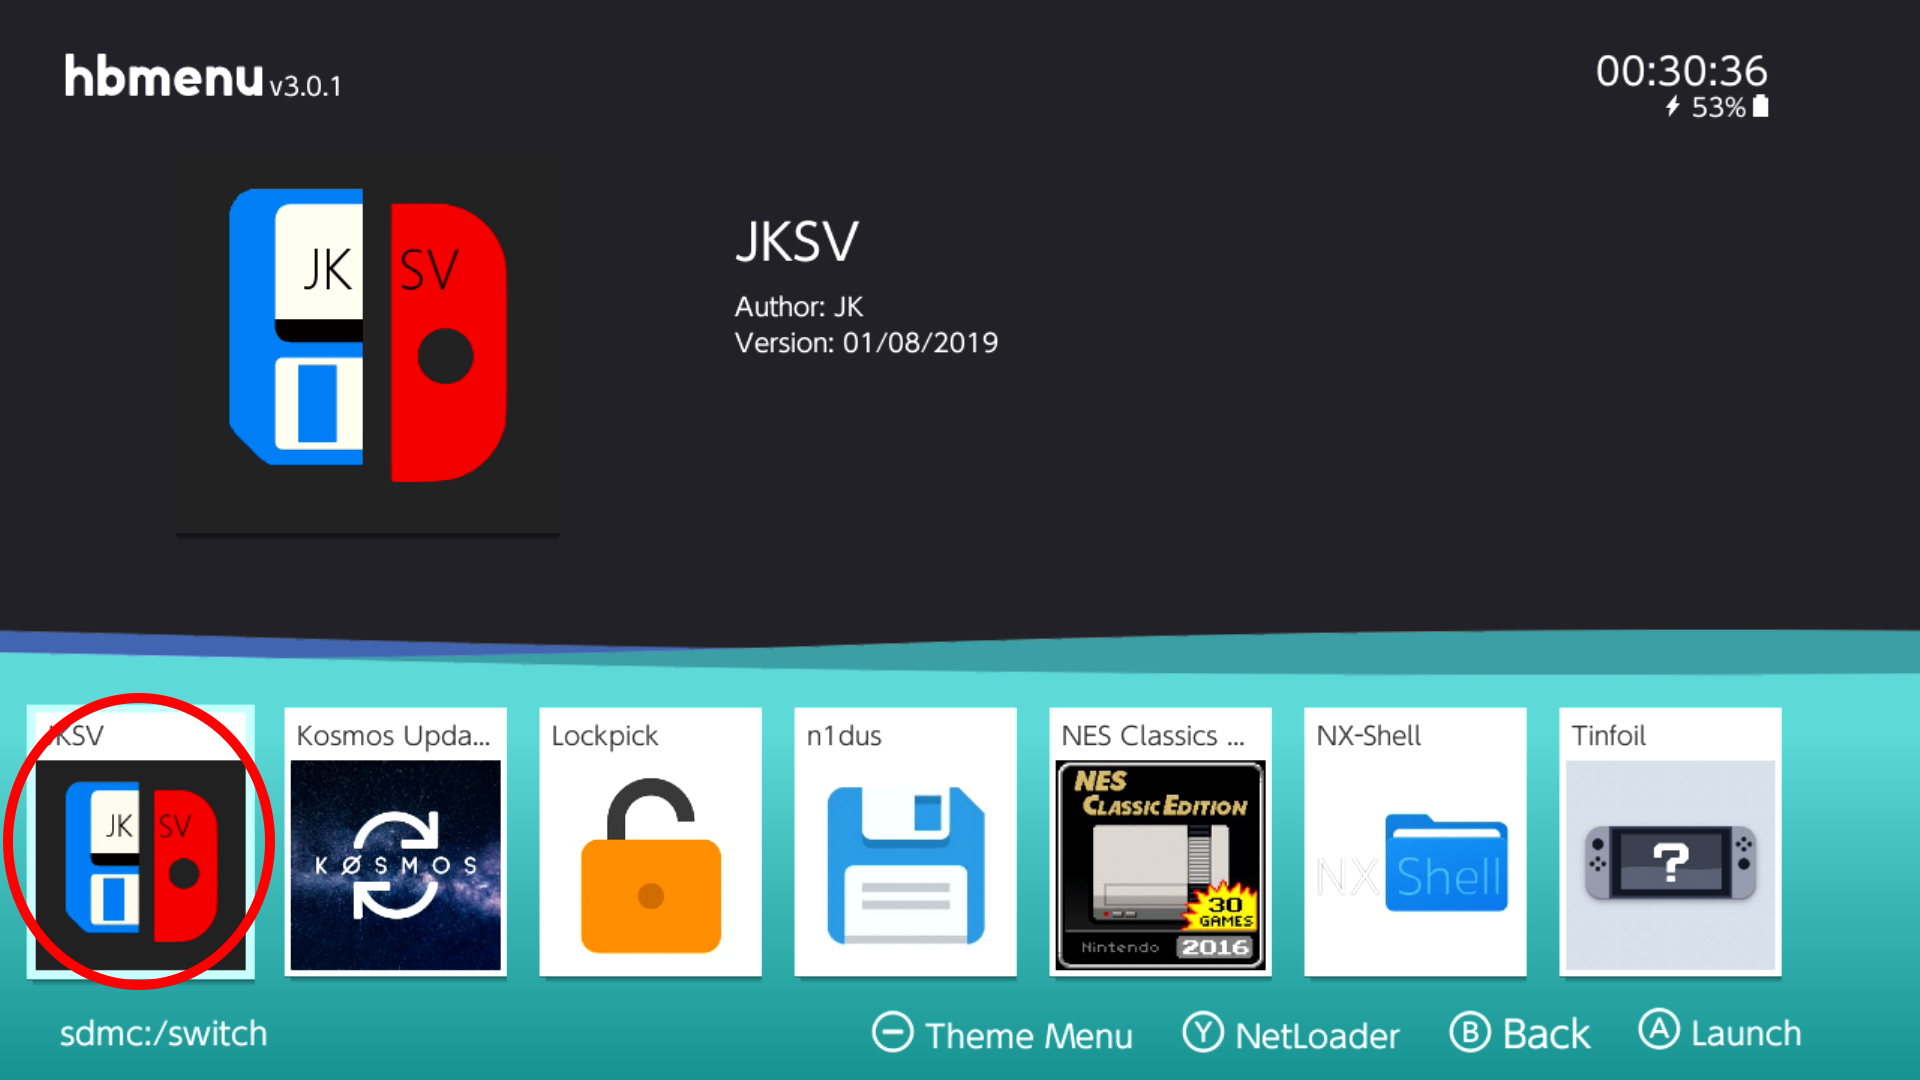
Then place it into the Switch folder of your SD card.1. Launch the Homebrew Menu from your Switch and look for JKSV. Then launch JKSV by pressing "A"

2. Pick your desired user
3. Navigate to your desired game
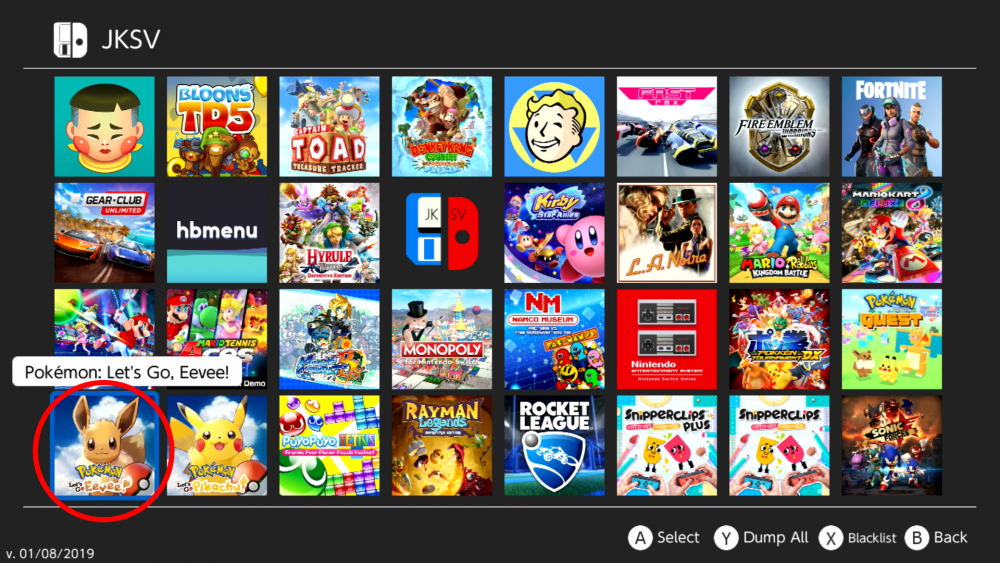
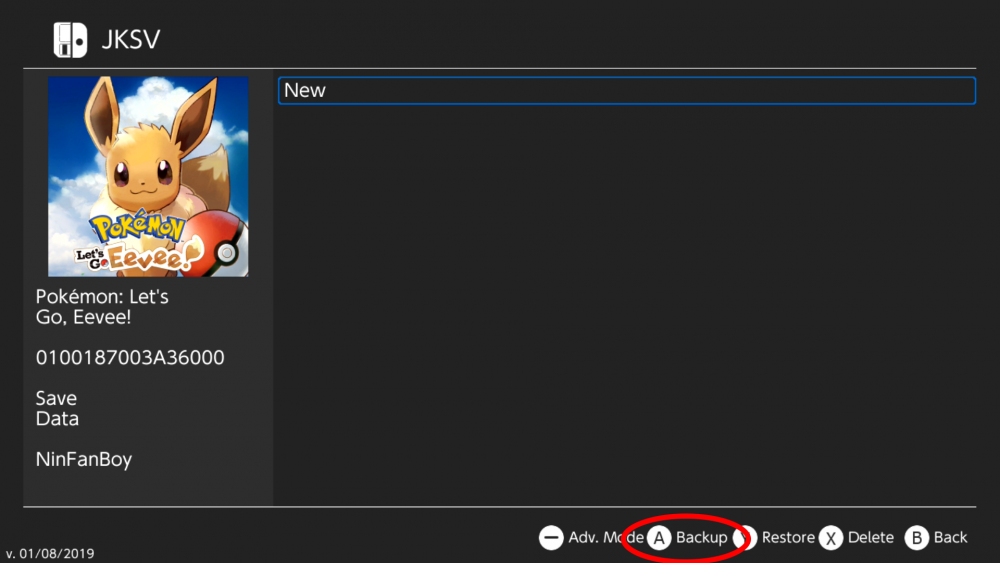
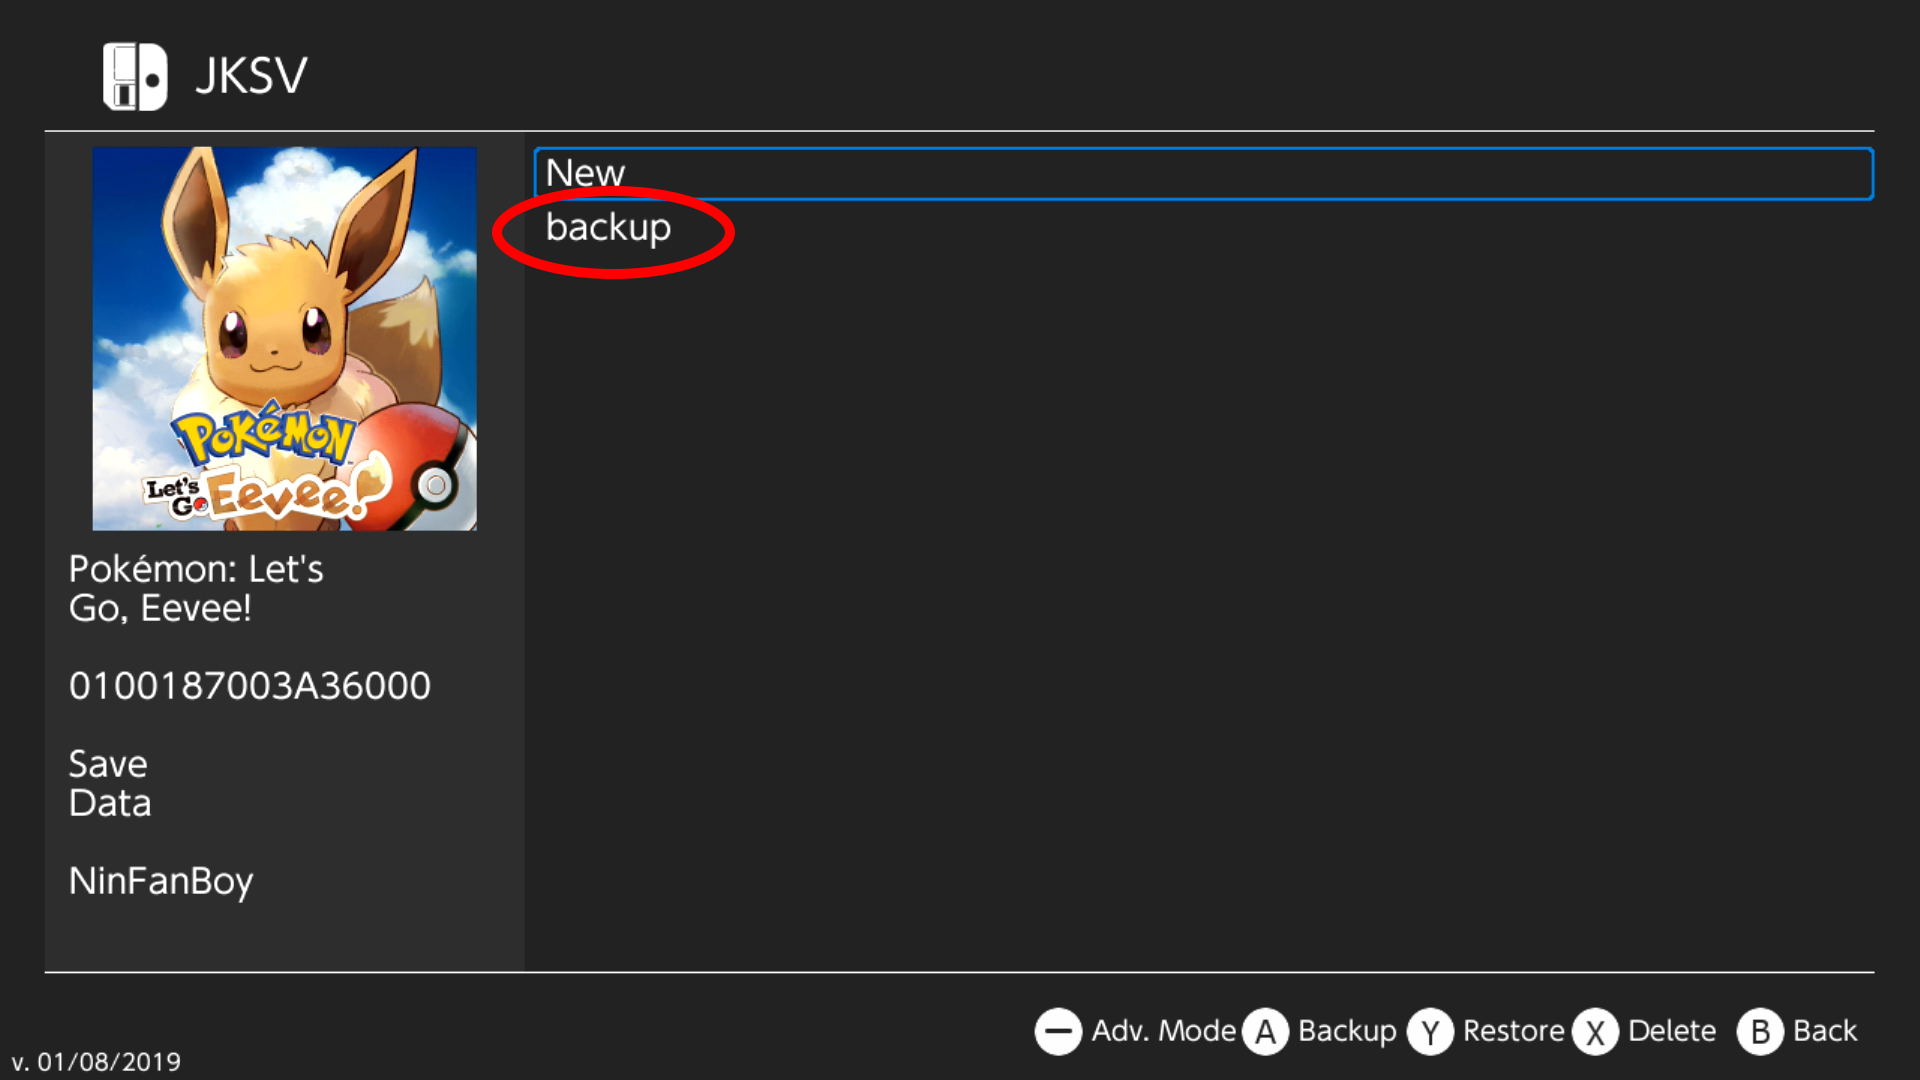
4. Press "A" to select your desired game. Then press "A" to begin backing up your save
5. Enter a name for your new save. Then click on the "Accept" button or click "+" to complete the backup process.
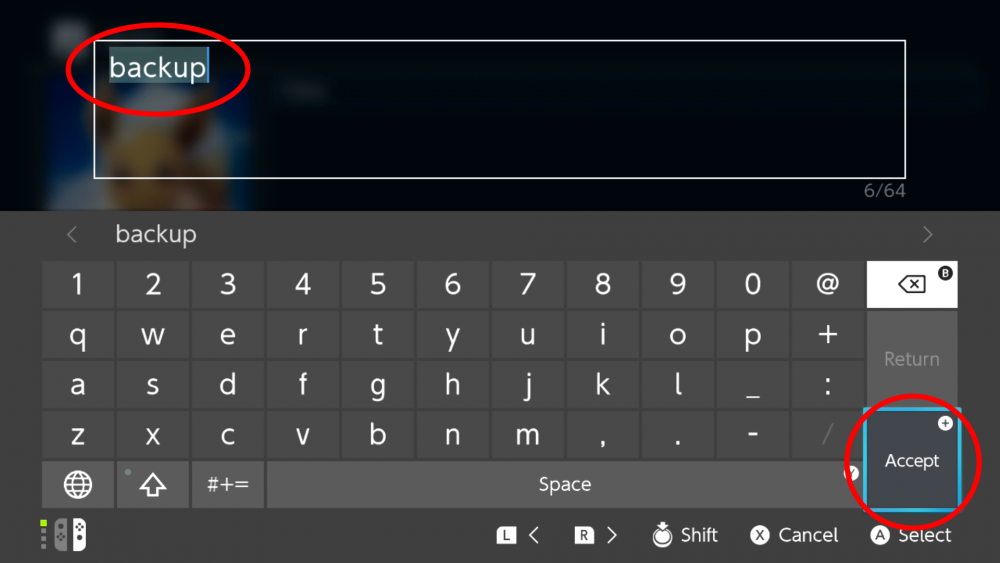
6. If the backup has completed you will see a new save with the name you chose under your desired game.

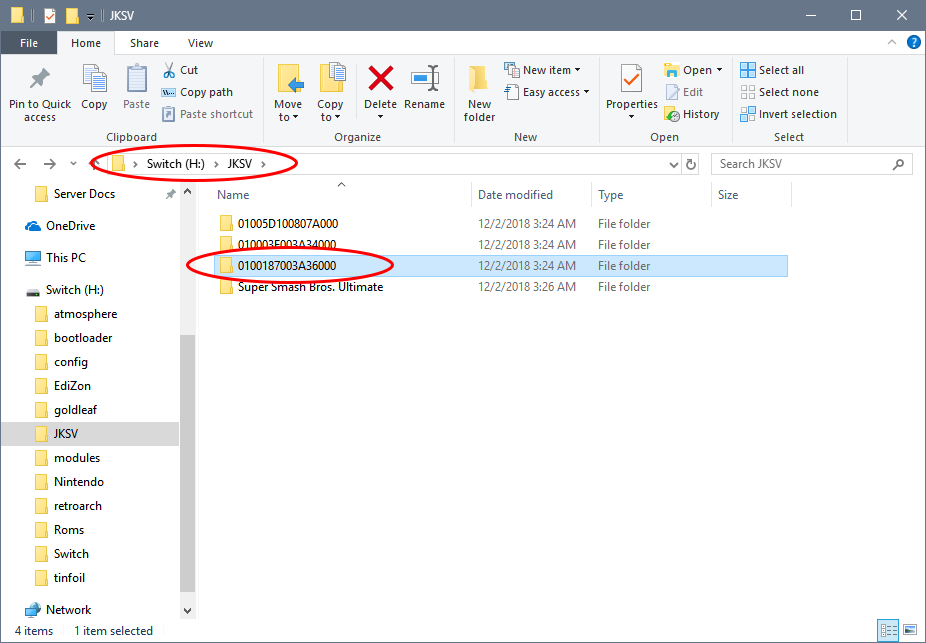
7. Turn your Switch off, insert your SD card into your computer and Navigate to "JKSV". Then find your desired game in the list of games.
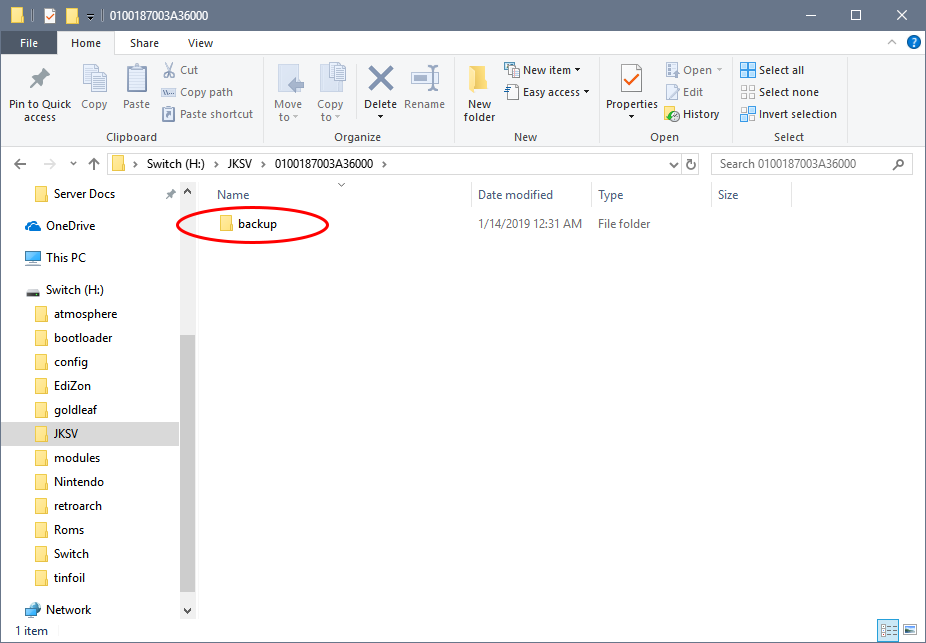
8. Open your desired game's folder. Inside will be the folder you named in step 5. Note: this folder will contain all of the subsequent backups you make of this game.
9. Navigate through the folder of the backup you created and you will find your save file. Note: this step may be different and the resulting save file may be different depending on the game you have chosen.
10. MAKE A BACKUP OF THIS FILE BEFORE USING OR EDITING IT WITH ANY SAVE EDITORS.
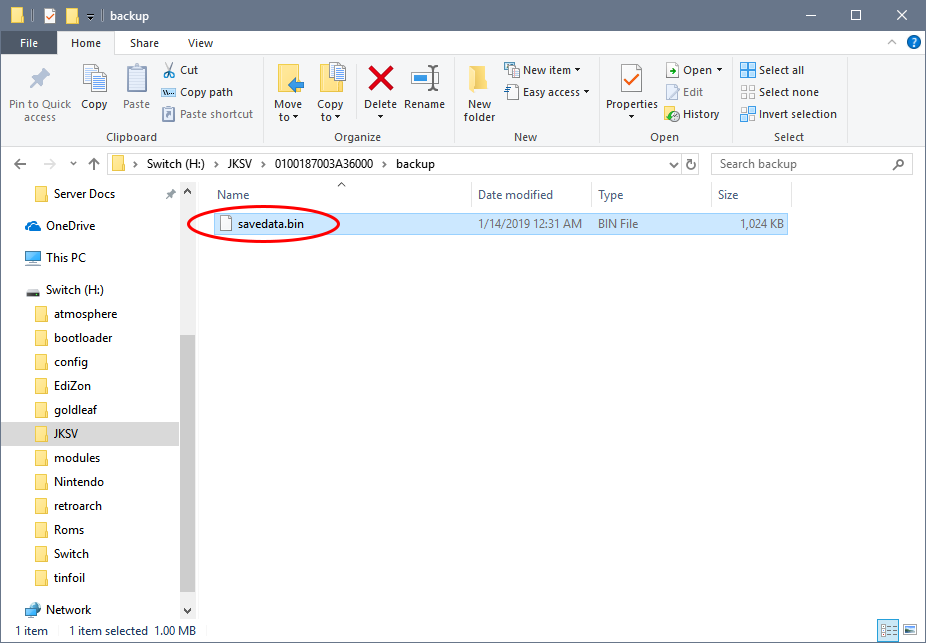
Note:
LGPE -> savedata.bin
SWSH -> main, backup and poke_trade. Use main with PKHeX.
Note: Switch Cartridges do not store saves. So whether physical or digital copy, the saves all goes into your Switch, and that is what this tool is dumping.
-
2
-
-
3DS versions don't have to do with PKHeX. You just need to get access to homebrew or CFW, and backup your save file which PKHeX is always going to be compatible with.
-
4 hours ago, shay123 said:
How do you use it? Do I need homebrew? Or just take the sd card out?
You need homebrew. Then you need to use checkpoint to backup and restore your save
-
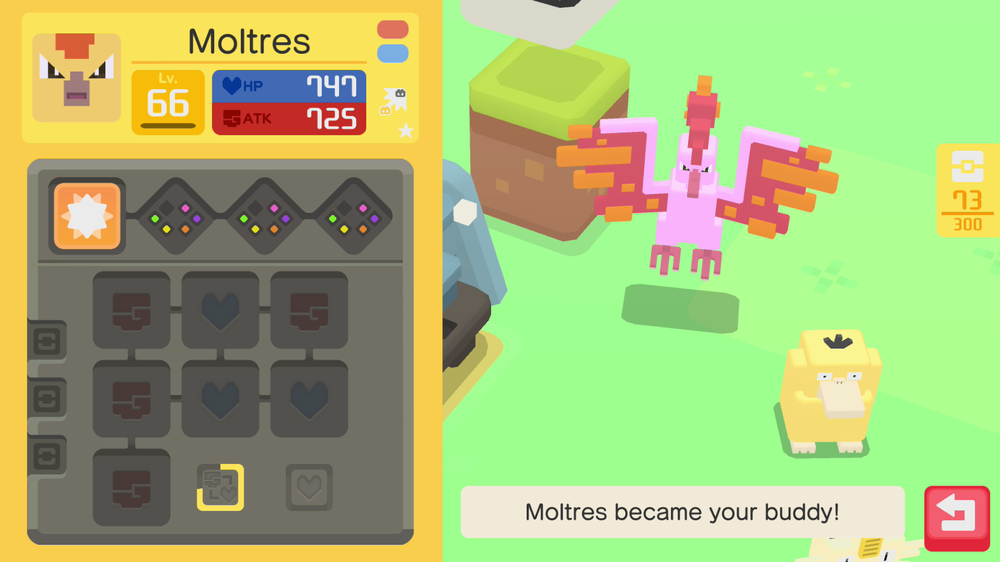
Wow this is actually ridiculous now. I literally opened up the next pot right after my shiny Moltres and I got another shiny (2 shinies in a row) I know that the odds of a shiny are much much higher than the normal games but this is just hilarious.

-
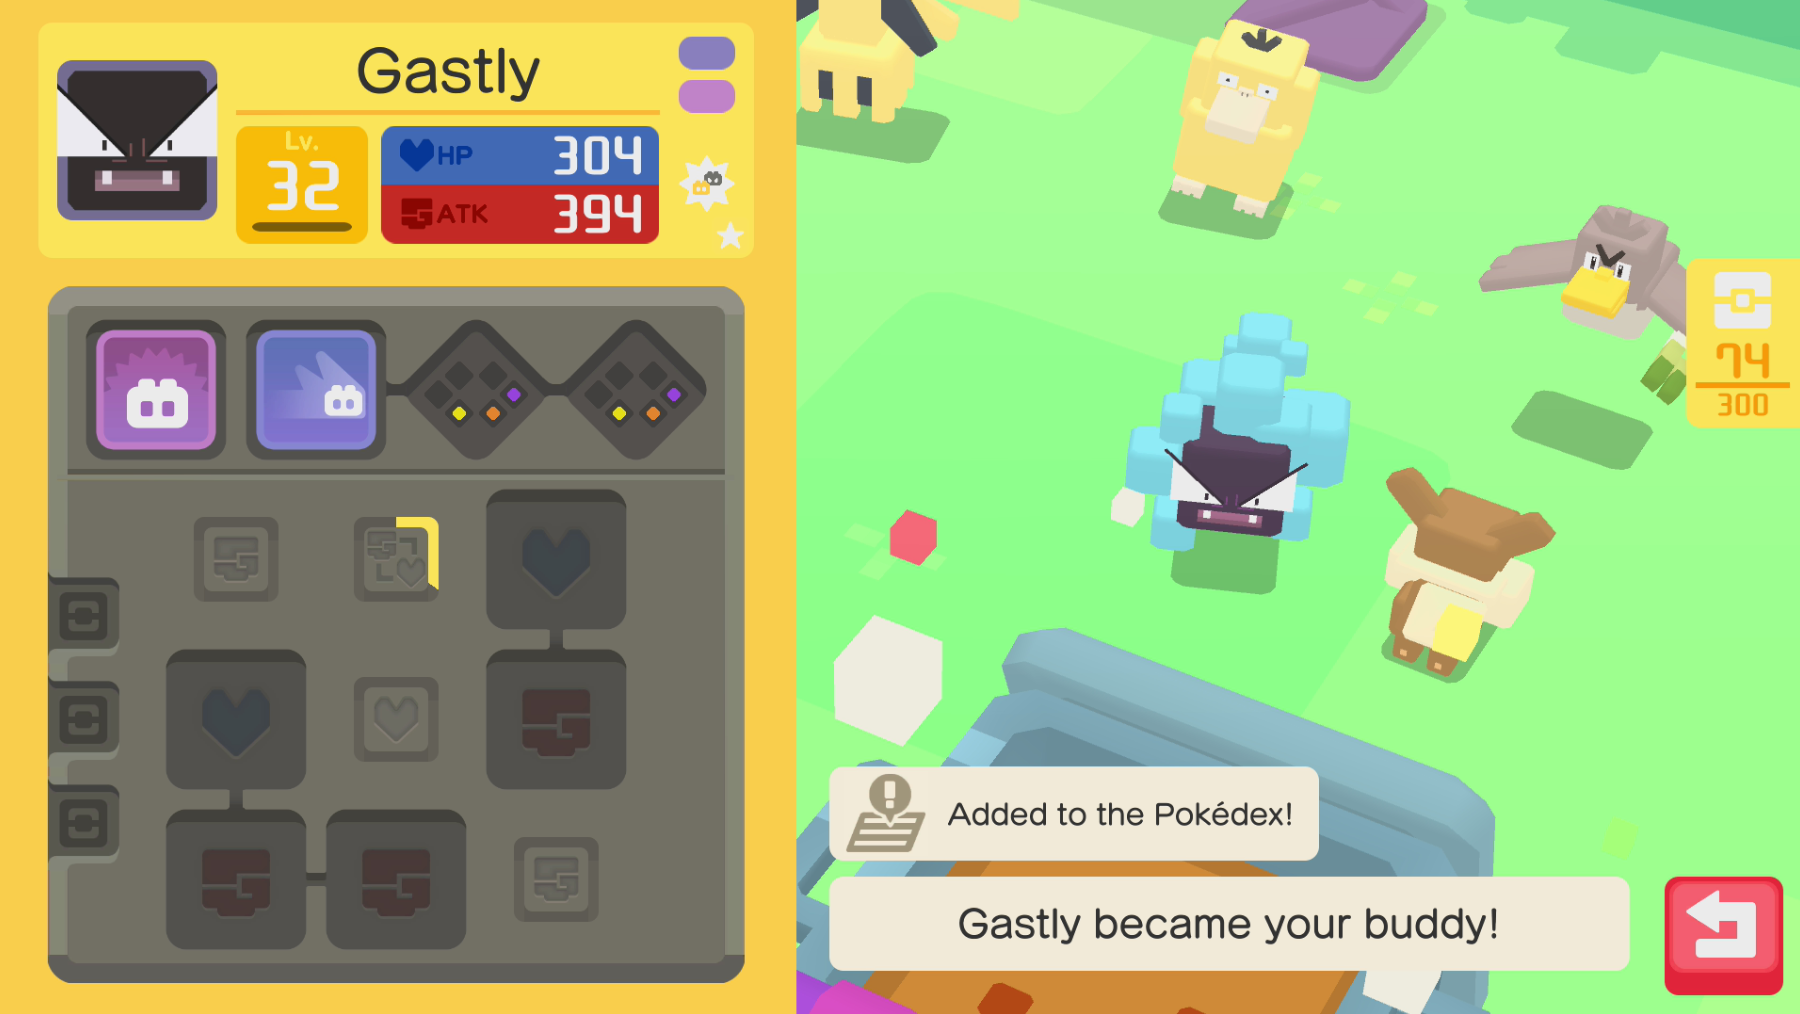
Hahahaha. I just randomly got a shiny Moltres. Even though I used cheats for getting more materials and tickets, there are no hacks yet for changing pokemon to shiny. This is awesome. I also got a shiny Cubone the other day but I forgot to post it.
-
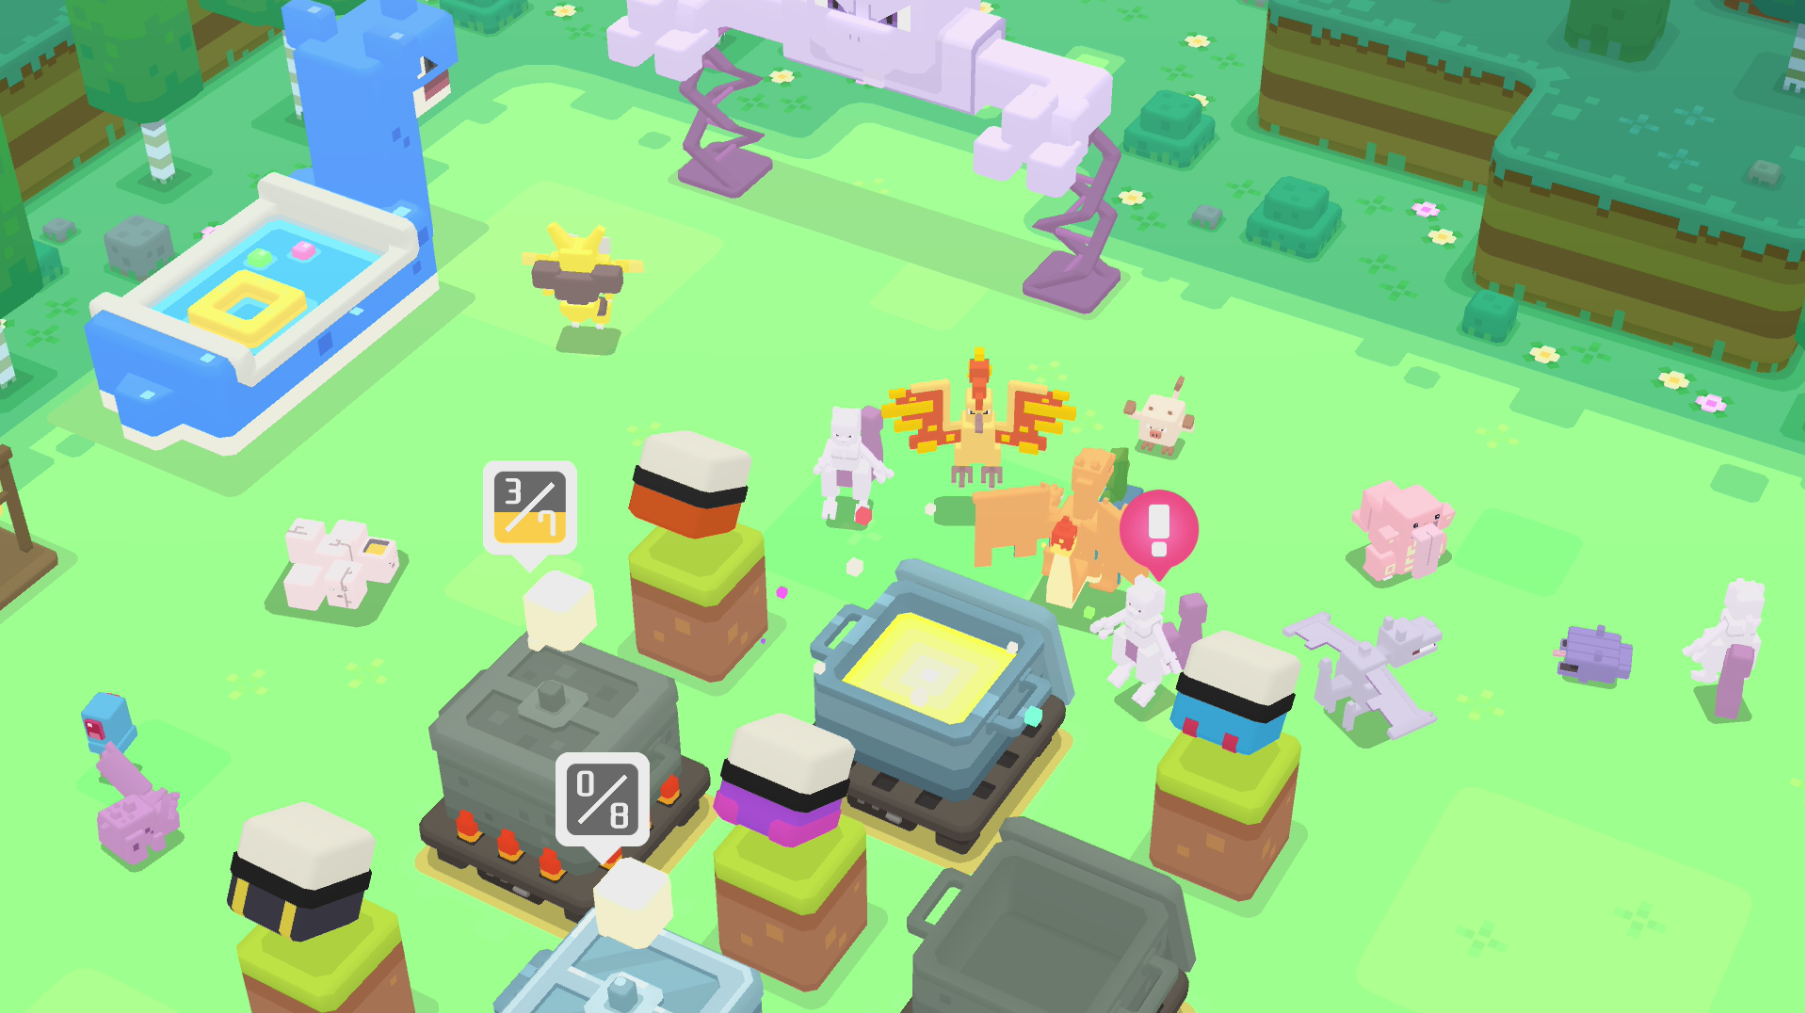
Pretty happy right now. Someone just released a Pokemon Quest Save Editor that gives you max ingredients and max tickets. Makes the game so much more fun (especially because I paid $30 for the expansion packs and I felt like I got almost nothing). Also I was getting extremely tired of grinding the same exact level 20 times and having to wait hours.
You can find the Editor here: https://github.com/Thealexbarney/PqSave/releases

-
3
-
-
I actually can't believe it but somehow I got a shiny Pokemon in Pokemon quest already. I'm not sure what the odds are for this but It's still pretty cool. I have only found a few shiny pokemon ever in all of my Pokemon games but somehow I have found one shiny in the original Pokemon rumble for wii and now Pokemon Quest lol. Post replies with your own shiny Pokemon if you find one.
-
1
-
-
8 hours ago, phact said:
hey, so im sure you all geeked out as much as i did from the Lets Go trailers
my question to you is, should i go ahead and buy a 3.0.0 switch NOW from ebay while they are still cheap so that i can use Homebrew and its save editor for PKHex when lets go comes out?
i assume Kaphotics will be making PKHex for Lets go as well correct? so should i pull the trigger half a year early so that i will be able to use it?
You don't need a 3.0.0 switch to homebrew (and most likely CFW) your switch. They have homebrew up to the latest firmware now, with that hardware exploit they found. Here is a tutorial
-
Hey I'm not sure if you still need any other information but my Batch editor guide has all of the values for met location
Just scroll down to met location and open it up.
-
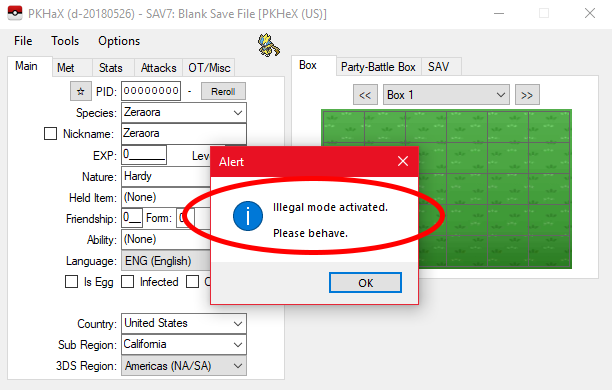
This tutorial will show to to activate PKHaX mode on PKHeX. This mode will allow you to give Pokemon illegal abilities, stats, and much more.
Please Note: "Project Pokémon does not support or condone cheating at the expense of others. While this community contains research, information, and utilities allowing people to create their own Pokémon, we do not agree with using them against players who are unaware that significantly hacked"
Please visit the following page for more information about Project Pokemon's Cheating Policy:
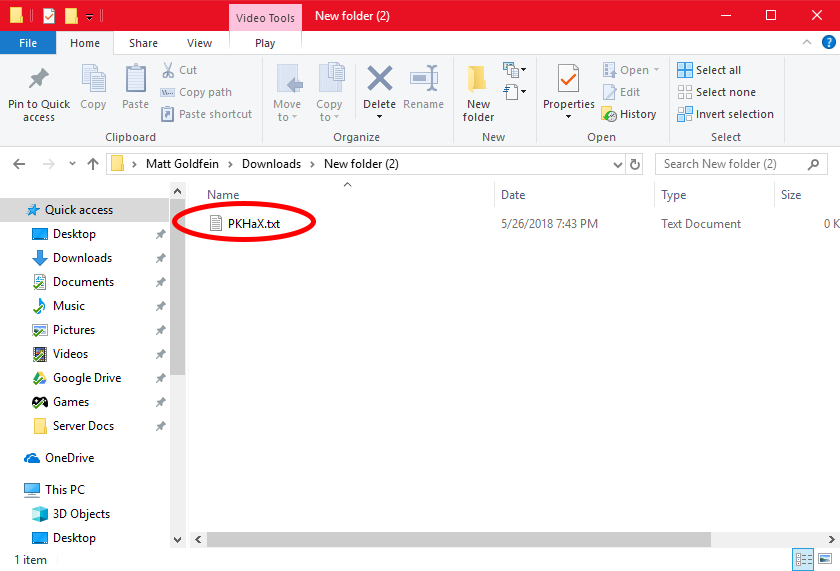
Making your own batch file for PKHaX is fairly simple. In this tutorial, the resulting batch file will be identical to the file I provided above, but will not have an icon, and will be in a ".bat" format instead of a ".exe" format.1. Navigate to a folder to make the batch file. Right click inside of the folder, then click on "new", then click on "Text Document"

2. Rename the new text file to whatever you like (I will rename mine "PKHaX").
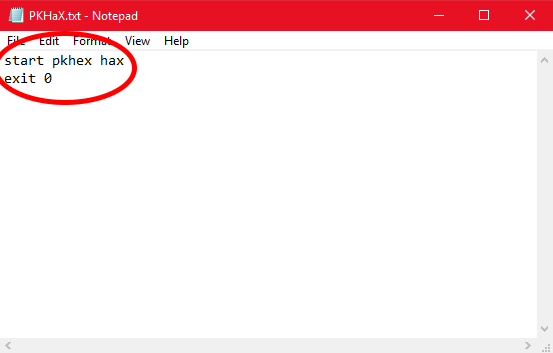
3. Open your new text file, then paste in this code
start pkhex hax
exit 0
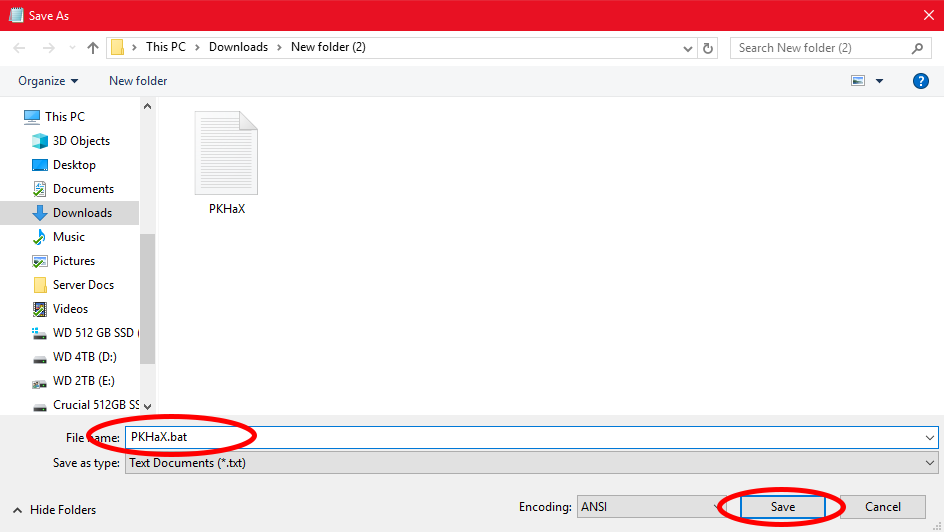
4. Click on "File" then click on "Save As"
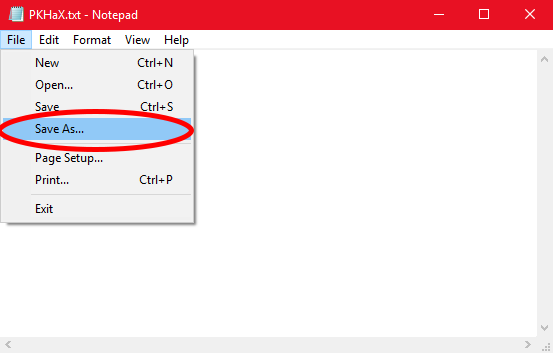
5. When the "Save As" window comes up, add ".bat" as shown in the picture below, to the end of your file name. Then click "Save"
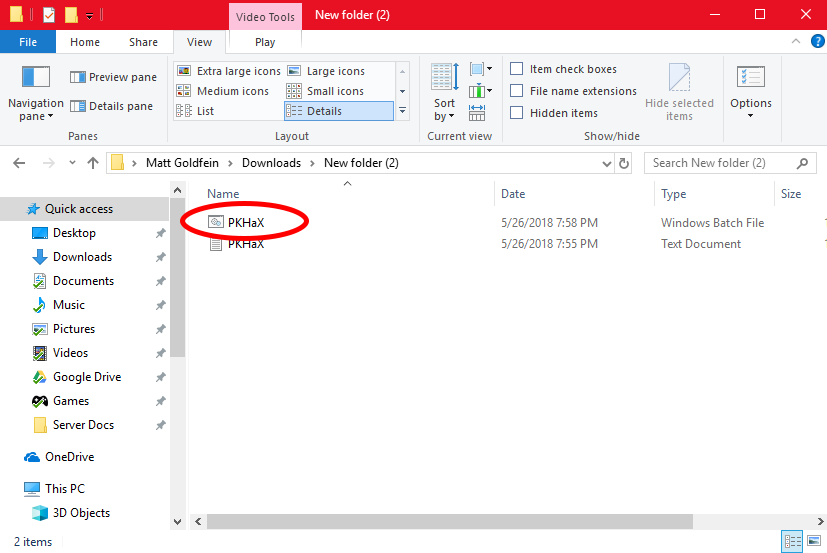
6. Go back to the folder in which you just saved your new batch file. Make sure you are using the batch file and not the text file.
7. Move the batch file you just created into the same folder as PKHeX. Then open your PKHaX batch file and PKHeX with PKHaX mode should open correctly.
-
In this tutorial you will learn how to properly use the Batch Editor in PKHeX. The batch editor, when utilized fully and correctly, can be an extremely useful tool for fixing, and editing Pokemon.
Please Note: The Batch Editor does NOT have an undo option and therefore all actions taken with the Batch Editor are FINAL
unless you quit PKHeX without saving. As a result.
MAKE SURE YOU HAVE BACKUPS OF YOUR SAVE BEFORE YOU EDIT IT WITH THE BATCH EDITOR.
Section 1: Basic Fundamentals and operation of the Batch Editor
The Batch editor works on the simple premise that all possible characteristics pertaining to a Pokemon, boil down to a set of numbers which correspond to certain values in the Pokemon games themselves. Because of this, changing, and editing Pokemon using the Batch Editor is like a mathematical statement, with if then, and true/false statements.
The basic operators of the Batch Editor are:
"." = Sets the desired value Equal to the value you input
"=" = Narrows the editing of Pokemon down to the Pokemon which have the same value as your input value
"!" = Narrows the editing of Pokemon down to the Pokemon which do not have the same value as your input value.
As an example of how these operators are used, Once you select a variable you would like to change (OT Name, Pokemon Species, Pokemon Level, etc...) and the correct operator, click "Add". This will add your desired variable with your desired operator in the correct format. The next step is to create the formula in which the Batch Editor will run.
As an example of a possible combination for use in the Batch Editor, the following formula will change the OT trainer name on Pokemon with a specific OT to a specified OT trainer name, as well as give every Pokemon with that filter, a Master Ball to hold.
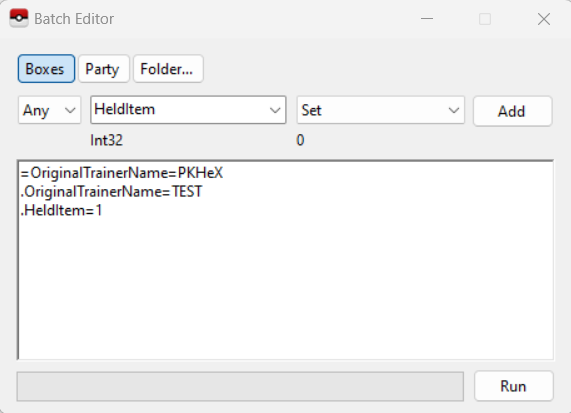
=OriginalTrainerName=PKHeX This line instructs the Batch Editor to narrow it's scope down to every Pokemon with the OT Trainer Name "PKHeX" .OriginalTrainerName=TEST This lines instructs the Batch Editor to set the OT Trainer Name for all of the previously filtered Pokemon to "TEST" .HeldItem=1 This line instructs the Batch Editor to set the Held Item for all of the previously filtered Pokemon to a Master Ball - which Item Index number is 1. Some Special Tricks to use in the Batch Editor, Courtesy of @Kaphotics (Creator of PKHeX)
-
The Batch Editor window references the PKM that is currently viewed in the editing tabs.
- If you select a property name, the Batch Editor will indicate whether or not the tabs PKM has that property.
- If the tabs PKM has that property, the Batch Editor will display the property's current value as well as the data type (number, text, etc).
- To Randomize a PID, use ".PID=$rand".
- To Randomize EncryptionConstant, use ".EncryptionConstant=$rand"
- To Randomize a value within a range, use ".Nature=$x,y" for an inclusive range of [x,y].
- To make a Pokémon Shiny: use ".PID=$shiny".
- To copy the Encryption Constant to the PID, use ".EncryptionConstant=PID"
- To delete a Pokémon, use ".Species=0"
-
To set a date (Met / EggMet), use yyyyMMdd for the string.
- Example: ".MetDate=20160409" will set the Met Date to April 9th, 2016.
-
Suggestions can be automatically applied for Moves, RelearnMoves, and Met_Location.
- Example: ".Moves=$suggest" will retrieve and apply suggested moves from the legality interpreter, same as if you clicked on the Moves groupbox in the tabs editor.
- Legality can be used as a filter. Use "=Legal=false" to only modify illegal Pokémon.
- A full up to date list is available by reading the Pokémon properties from the PKHeX source code
Section 2: ID Numbers for Use with the Batch Editor
This section will focus on the input values you can use in conjunction with the Batch Editor. The Batch Editor uses the in-game index values to set the desired properties to Pokemon. Because of this you will need to use said index numbers instead of relying on the standard text based input present in PKHeX. As an example, to set the species of a Pokemon using the Batch Editor, you must use the equation
.Species=150
Not .Species=Mewtwo
Below are many of the common variables you may want to use, along with the possible values to use with those variables.
Please Note: Some variables (like location, items etc...) have different ID numbers for different generations. Please ensure that you are using the correct ID numbers that correspond to the generation of the game you are editing.
Ability:
SpoilerUsing this variable will change the ability of a Pokemon to a desired ability. This is NOT supported for Gen 3 and when creating Pokemon with illegal abilities, you will need to be in PKHaX mode to view the ability correctly.
The ID numbers are as follows:
AbilityNumber:
SpoilerUsing this variable will change the ability of a Pokemon to a desired ability within it's legal abilities. This is useful for changing many Pokemon from one of their standard abilities to their hidden abilities at once.
If you have issues getting values to stick, and trying to suggest abilities,
try $0 (Ability 1), $1 (Ability 2) or $2 (Hidden Ability)[the value to be used with batch editor is in bold]
Form:
SpoilerUsing this variable will change the form of a Pokemon to the desired form (If applicable). Please Note: I only include the first 3 ID numbers as an example, but for Pokemon like Unown, you will be able to go all the way up to the ID number 27 (28 total Unown forms) etc...
The ID numbers are as follows:
0 = Pokemon's "normal" form
1 = Pokemon's First alternate form
2 = Pokemon's Second Alternate form etc
Note:
Usage of FormArgument may be required for some mons, and FormArgument usage can differ based on species,
For example,
Alcremie uses values written there to denote the decorations (strawberry, ribbon etc)
Runerigus uses it to denote how much damage it received before evolution
Furfrou and Hoopa Unbound denotes how many days left before the forms reverts.Ball:
SpoilerUsing this variable will change the Poke Ball that a Pokemon was caught, bred, or given with.
The ID numbers are as follows:
Box:
SpoilerUsing this variable will select (or except) a particular box in the PC from being put through the Batch Editor
The ID numbers are as follows:
1 = Box 1
32 = Box 32
CanGigantamax
SpoilerThe name of this variable should explain sufficiently what it can do.
The ID numbers are as follows:
True = It can Gigantamax
False = It cannot GigantamaxNote:
Giving True to species that do not have a Gigantamax form will not allow it to "change form" upon Dynamaxing. It'll just Dynamax normally.
Giving True to Zacian, Zamazenta and Eternatus will not allow it to Dynamax in battle.ConsoleRegion:
SpoilerUsing this variable will change the 3DS region of origin (if applicable) on a Pokemon
The ID numbers are as follows:
0 = Japan
1 = Americas
2 = Europe
4 = China
5 = Korea
6 = Taiwan
Country:
SpoilerUsing this variable will change the country of origin (if applicable) on a Pokemon. Please Note: I will only be giving some of the common country codes. You can find any country code you would like by using tip #1 on Kaphotic's "Special Tricks", mentioned above.
The ID numbers are as follows:
49 = United States
1 = Japan
18 = Canada
110 = United Kingdom
65 = Australia
160 = China
144 = Hong Kong
77 = France
83 = Italy
CurrentFriendship:
SpoilerUsing this variable will change the friendship of a Pokemon.
The ID numbers are as follows:
0 = No Happiness
255 = Max Happiness
CurrentLevel:
SpoilerUsing this variable will change the level of a Pokemon.
The ID numbers are as follows:
1 = Level 1
100 = Level 100
DynamaxLevel:
SpoilerUsing this variable will change the Dynamax level of a Pokemon (how many Dynamax Candies were fed)
The ID numbers are as follows:
0 to 10TeraTypeOriginal and TeraTypeOverride:
SpoilerTeraTypeOriginal refers to the original Tera Type a Pokémon has once it's caught.
TeraTypeOverride refers to the current Tera Type, if the original has been overridden with Tera Shards.
These uses the MoveType as follows:
Normal, Fire, Water, Electric, Grass, Ice, Fighting, Poison, Ground, Flying, Psychic, Bug, Rock, Ghost, Dragon, Dark, Steel, Fairy.To remove the Override, use: .TeraTypeOverride=19
EggLocation:
SpoilerUsing this variable will change the location in which your Pokemon (when it was an egg) was met. Please Note: Unless your Pokemon was an in-game gift with a special met location, this should be set to some form of the Pokemon daycare (depending on the generation) when trying to make the Pokemon legal.
The ID numbers are as follows:
EggMetDate:
SpoilerUsing this variable will change the date in which you received your Pokemon as an egg. Please Note: This does NOT effect the date in which your Pokemon was hatched. If you are trying to change the date that your Pokemon was hatched, use the "MetDate" section below
The format is as follows:
The MetDate is in the format of "yyyymmdd"
as an example, if you want to make your MetDate January 30th 2018, the corresponding ID would be
20180130
EV_ATK, EV_DEF, EV_HP, EV_SPA, EV_SPD, EV_SPE:
SpoilerUsing either one of these variables will modify the corresponding EV of a Pokemon to the desired value.
The ID numbers are as follows:
0 = 0 (No EVs in specified stat)
252 = 252 (Max EVs in specified stat)
FatefulEncounter:
SpoilerUsing this variable will turn the Fateful Encounter flag on or off on a Pokemon
The IDs are as follows:
True = Fateful Encounter on
False = Fateful Encounter Off
Gender:
SpoilerUsing this variable will change the gender of a Pokemon to the desired gender.
The ID numbers are as follows:
0 = Male
1 = Female
2 = No Gender
HeldItem:
SpoilerUsing this variable will change the Held Item of a Pokemon to a desired Item. Please Note: Illegal items (Items that cannot be held normally) have been removed from the following Lists. If an item you are looking for is missing, it is likely an illegal item.
The ID numbers are as follows:
HPType:
SpoilerUsing this variable will change the Hidden Power type of a Pokemon to a desired Type. Please Note: Because of the way Hidden Power Types work, the IVs on a Pokemon will also be changed once you change the Hidden Power Type
The ID numbers are as follows:
IsEgg:
SpoilerUsing this variable will set a Pokemon back to an egg, or will make and egg "hatch".
The IDs are as follows:
True = Pokemon is an Egg
False = Pokemon is not an Egg (hatched)
IsNicknamed:
SpoilerUsing this variable will either make a Pokemon lose it's Nickname, or enable it's Nickname. This variable can be used in conjunction with the "Nickname" variable (shown below) to first enable a Pokemon's Nickname, and then specify what said Nickname should be.
The IDs are as follows:
True = Nickname is activated
False = Nickname is deactivated (deleted)
IV_ATK, IV_DEF, IV_HP, IV_SPA, IV_SPD, IV_SPE:
SpoilerUsing either one of these variables will modify the corresponding IV of a Pokemon to the desired value.
The ID numbers are as follows:
0 = 0 (No IVs in specified stat)
31 = 31 (Max IVs in specified stat)
Language:
SpoilerUsing this variable will change the language (and nickname) of a Pokemon to a desired language
The ID numbers are as follows:
1 = JPN
2 = English
3 = French
4 = Italian
5 = German
7 = Spanish
8 = Korean
9 = Chinese Simplified
10 = Chinese Traditional
Legal:
SpoilerUsing this variable will allow you to narrow your search of Pokemon down to Legal, or illegal Pokemon.
The IDs are as follows:
True = Legal Pokemon will be selected (or deselected based on the operator)
False = Illegal Pokemon will be selected (or deselected based on the operator)
MarkCircle, MarkDiamond, MarkHeart, MarkSquare, MarkStar, MarkTriangle:
SpoilerUsing this variable will let you set (or unset) The specified markings on a Pokemon.
The ID numbers are as follows:
0 = Unset (deselected)
1 = Set (selected)
MetLevel:
SpoilerUsing this variable will change the level in which a Pokemon was met at.
The ID numbers are as follows:
1 = Level 1
100 = Level 100
MetLocation:
SpoilerUsing this variable will change the location in which your Pokemon was met.
The ID numbers are as follows:
MetDate:
SpoilerUsing this variable will change the date in which you met, or hatched your Pokemon. Please Note: This does NOT effect the date in which you received your Pokemon as an egg (if applicable). If you are trying to change the date that your Pokemon was received as an egg, use the "EggMetDate" section above
The ID numbers are as follows:
The MetDate is in the format of "yyyymmdd"
as an example, if you want to make your MetDate January 30th 2018, the corresponding ID would be
20180130
Move1, Move2, Move3, Move4:
SpoilerUsing this variable will change the move of the specified slot (1, 2, 3, or 4) to a specified move.
The ID numbers are as follows:
If you would like to change a Pokemon's Moves to suggested moves (based on legality) instead use the "Moves" variable and input "$suggest" into the Batch Editor.
If you would like a specific move, please use the IDs below.
Move1_PPUps, Move2_PPUps, Move3_PPUps, Move4_PPUps:
SpoilerUsing this variable will change the number of PP Ups a Pokemon has on a specified move slot.
The ID numbers are as follows:
0 = 0 PP Ups
1 = 1 PP Up
2 = 2 PP Ups
3 = 3 PP Ups
Nature:
SpoilerUsing this variable will change a Pokemon's Nature to a desired Nature.
The ID numbers are as follows:
Nickname:
SpoilerUsing this variable will set a Pokemon's Nickname to the desired Name. This variable can be used in conjunction with the "IsNicknamed" variable (shown above) to first enable a Pokemon's Nickname, and then specify what said Nickname should be.
The format is as follows:
as an example, if you want to make your nickname "PKHeX". Just Input "PKHeX" into the Batch Editor
OriginalTrainerGender:
SpoilerUsing this variable will change the gender of the OT (Original Trainer) to the desired gender.
The ID numbers are as follows:
0 = Male
1 = Female
OriginalTrainerName:
SpoilerUsing this variable will set a Pokemon's OT (Original Trainer) Name to the desired Name.
The format is as follows:
as an example, if you want to make the OT Name "PKHeX". Just Input "PKHeX" into the Batch Editor
PID:
SpoilerUsing this variable will Set a desired PID on a Pokemon.
The format is as follows:
A Pokemon's PID is in an 8 digit format. if you want to make the PID "00000000". Just Input "00000000" into the Batch Editor
If you want to make all Pokemon shiny, input "$shiny" into the Batch Editor
if you would like to randomize a Pokemon's PID, input "$rand" into the Batch Editor
Starting in Gen 8, if you want a Pokemon to be square shiny, input "$shiny0"
Starting in Gen 8, if you want a Pokemon to be star shiny, input "$shiny1"
(Useful for Dynamax Adventures)
Note:
1: If the Pokemon was already shiny, you gotta make it not shiny, before you can apply another layer of shiny code.
2: Any shiny mons from previously generation would become either star or square in Gen 8, depending on their PID.RelearnMove1, RelearnMove2, RelearnMove3, RelearnMove4:
SpoilerUsing this variable will change the relearn move of the specified slot (1, 2, 3, or 4) to a specified move.
The ID numbers are as follows:
If you would like to change a Pokemon's Relearn Moves to suggested moves (based on legality) instead use the "RelearnMoves" variable and input "$suggest" into the Batch Editor.
If you would like a specific move, please use the IDs below.
Ribbons
SpoilerUsing this variable change the ribbons on the Pokemon.
The format is as follows:
$suggestAll = Gives all legal ribbons (doesn't give marks in Gen 8.)
$suggestNone = (removes all ribbons except required ones)ShinyLeaf (Gen 4 HG/SS Only)
SpoilerUsing this variable will turn on or off the Shiny Leaf Property of a Pokemon (if applicable). Please Note: This property only exists in Gen 4 Heart Gold and Soul Silver
The format is as follows:
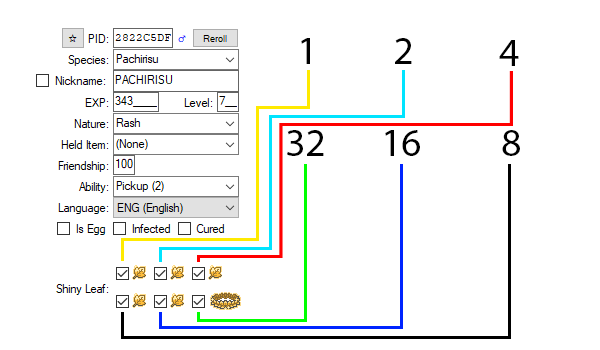
Each Shiny Leaf corresponds to a specific value. to get the desired number of Shiny Leaves, just add the ID numbers of the Shiny Leaves you want, and input that number into the Batch Editor.
As an example:
0 = No Shiny Leaves
1 = First Shiny Leaf
3 = First and Second Shiny Leaf
63 = All Shiny Leaves
SID16 or TrainerSID7:
SpoilerSID16 - for SID format Gen 3 to Gen 6 (5 digit)
TrainerSID7 - for SID formats Gen 7 and above (4 digit)Using this variable will Set a desired SID (Secret Trainer ID) on the OT of a Pokemon.
The format is as follows:
Just Input "12345" into the Batch Editor for SID16 (Gens 3 - 6)
or "1234" for TrainerSID7 (Gen 7 and above)TID16 or TrainerTID7:
SpoilerTID16 - for TID format Gen 3 to Gen 6 (5 digit)
TrainerTID7 - for TID formats Gen 7 and above (6 digit)Using this variable will Set a desired TID (Trainer ID) on the OT of a Pokemon.
The format is as follows:
Just Input "12345" into the Batch Editor for TID16 (Gens 3 - 6)
or "123456" for TrainerTID7 (Gen 7 and above)Slot:
SpoilerUsing this variable will select (or except) a particular slot of every box (unless stated otherwise with other variables) in the PC.
The ID numbers are as follows:
1 = Slot 1
30 = Slot 30
Species:
SpoilerUsing this variable will change the Species of the selected Pokemon to the desired Species.
The ID numbers are as follows:
Please Note: Using the ID number of "0" will delete all of the selected Pokemon.
Stat_ATK, Stat_DEF, Stat_HP, Stat_SPA, Stat_SPD, Stat_SPE:
SpoilerUsing this variable will allow you to narrow your search of Pokemon down to Pokemon with a particular value in a specified Stat.
Version:
SpoilerUsing this variable will change the Origin Game that a Pokemon Originated from.
The ID numbers are as follows:
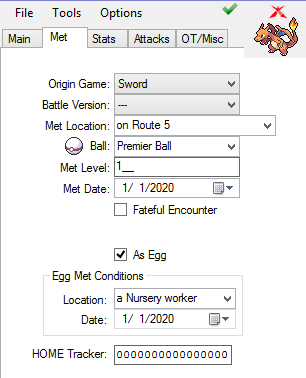
JUST IN CASE ANY OF THE VALUES ABOVE ARE NOT UPDATED:
You can use Batch Editor to also view the particular values you want.Spoiler1) Make a mon with a particular value you want.
In this example, you want the origin game to be Sword
2) While keeping that entry on the left side (view) portion of PKHeX, open up Batch Editor
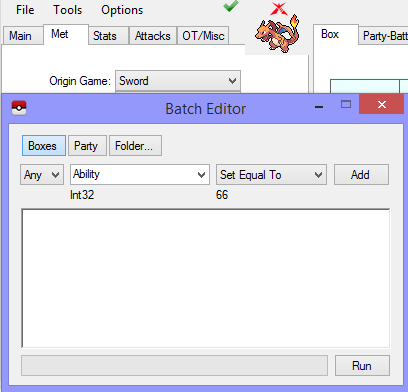
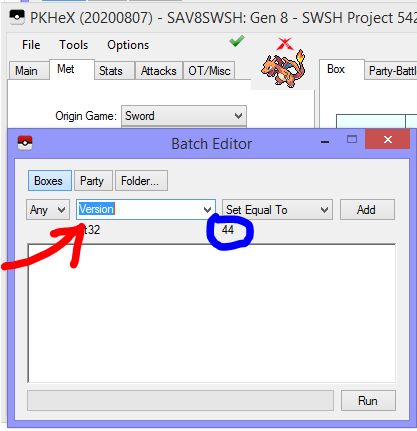
3) Change the text in the drop box to the field you're looking for (red arrow).
The value will be updated to show the value you're searching for (blue circle).
In this example, we're looking for the value for origin game Sword.
Special Thanks to @theSLAYER for help with making and researching this guide with me
-
5
-
 2
2
-
 1
1
-
 1
1
-
The Batch Editor window references the PKM that is currently viewed in the editing tabs.
-
If you aren't using the latest build, here it is. Try it and see if your issue is resolved, because I'm pretty sure that they have been fixing multiple issues with pokemon showdown import.
-
Hi. Do you have the latest GitHub build of PKHeX or are you using the latest release of PKHeX from Project Pokemon
-
1 minute ago, zephyr20 said:
thankyou! would you telling me how to use this? i opened it with citra but it said the rom was incompatible?
Use my guide on importing saves.
You need to run your game at least once so that the save folder gets created
-
Here you go.
The Dialga is in the PC, otherwise you wouldn't be able to pick up your starter.
All of these pokemon are legal (except the Latias until you level it up) so once your playthrough is over, these will be legal.
Added all items except for HMs because I think it can mess up certain story events.
-
1
-
-
Ill make one for you. Give me a few minutes
Edit: what trainer name do you want
-
1
-
-
Just now, ICanSnake said:
Great, thanks! It's just weird how most of my set is fine except for those two.
Yeah it's an issue PKHeX has with the pokespot pokemon. Something about the way they are generated in the game is hard for PKHeX (at this time) to determine if they are legal.
-
Hi. This is a known issue I raised. It requires more research so for now it isn't going to be resolved, but don't worry about your pokemon not being legal. They should be fine.
-
1
-
-
This tutorial will show you how and where to access your save files while using a Wii emulator. This guide will cover the most popular emulator for running Wii games: Dolphin (Computer). This guide assumes that you have already set up and played one of these emulators at least once. Scroll down to your emulator of choice.
This is not a setup guide. This guide is meant to show where to find or inject your save files.
Dolphin (Computer):
1. Open up Dolphin

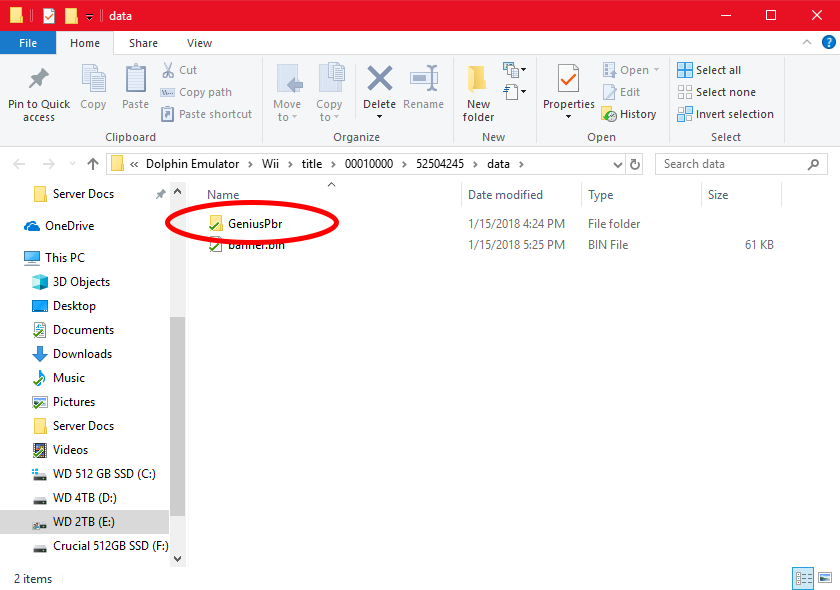
2. Right click on your desired game. Then click on "Open Wii save folder"
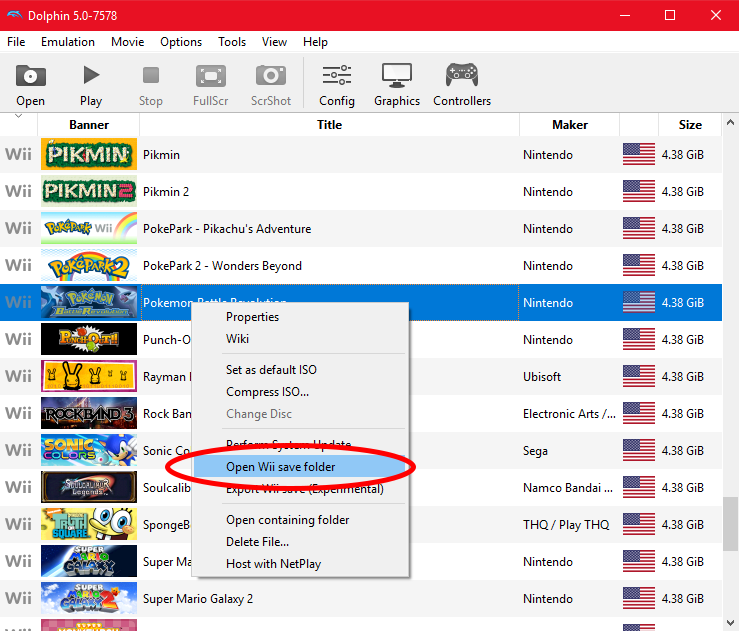
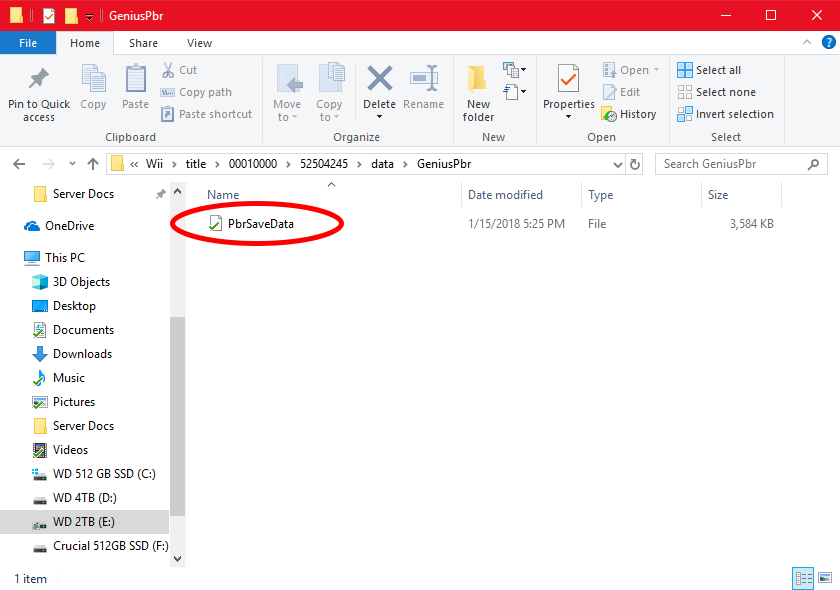
3. Inside this folder will be your save file. Note: depending on the game you chose this step will look different.
4. MAKE A BACKUP OF THIS FILE BEFORE USING OR EDITING IT WITH ANY SAVE EDITORS.
-
1
-
-
This tutorial will show you how and where to access your save files while using a GBA emulator. This guide will cover 3 of the most popular emulators for running GBA games: Visual Boy Advance, NO$GBA (Computer), and My Boy! (Android). This guide assumes that you have already set up and played one of these emulators at least once. Scroll down to your emulator of choice.
This is not a setup guide. This guide is meant to show where to find or inject your save files.
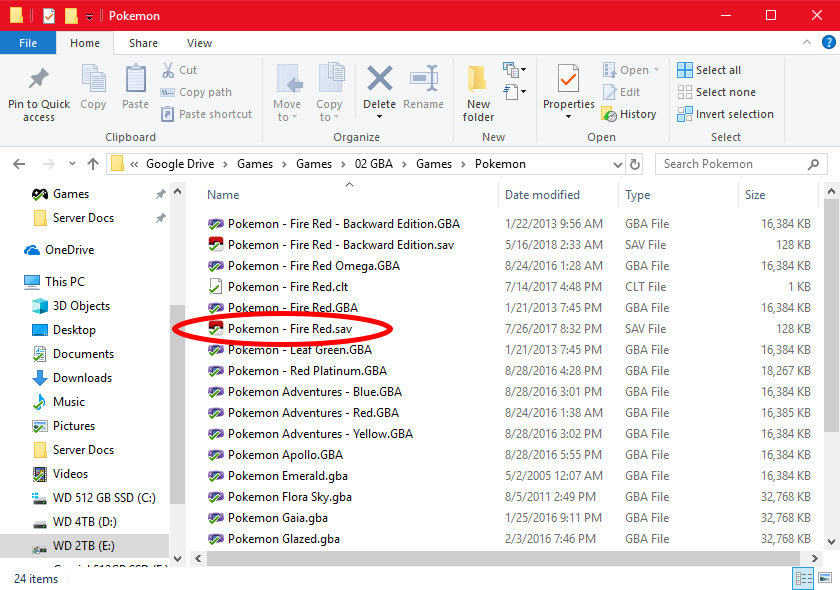
Visual Boy Advance:
1. Navigate to the folder that your games are located in.
2. Open the folder and your save should be inside with the same name as your desired game with the file extension (.SAV) instead of the file extension (.GBA)
3. MAKE A BACKUP OF THIS FILE BEFORE USING OR EDITING IT WITH ANY SAVE EDITORS.
NO$GBA:
1. Navigate to the folder that NO$GBA is located in. Then open the folder called "BATTERY"
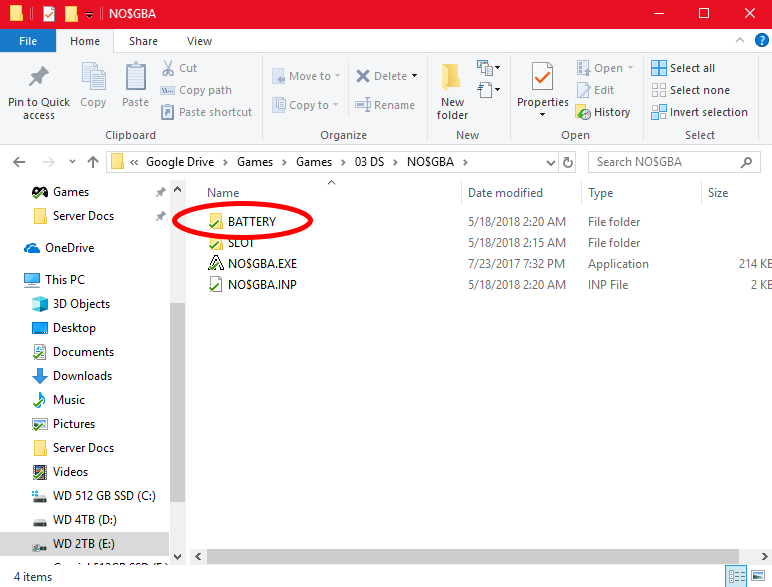
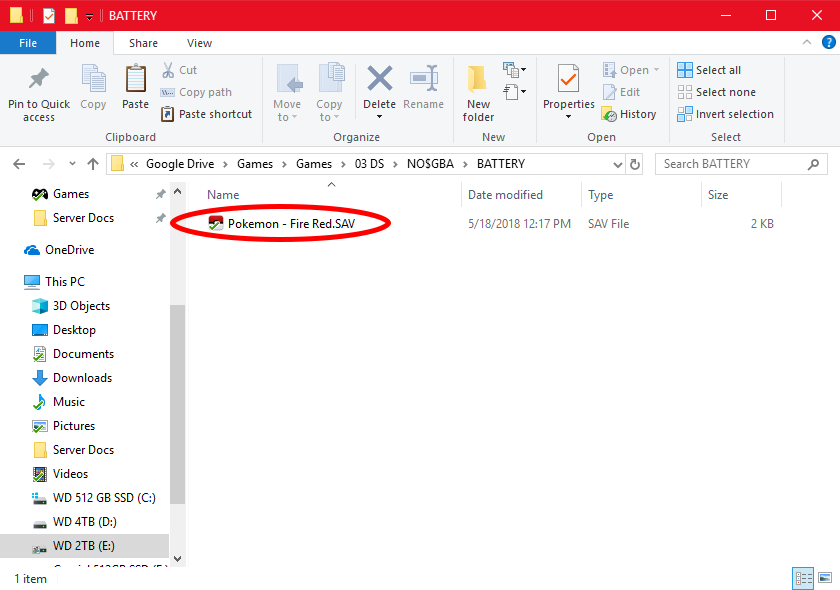
2. Inside the "BATTERY" folder should be your save files.
3. MAKE A BACKUP OF THIS FILE BEFORE USING OR EDITING IT WITH ANY SAVE EDITORS
4. Although the save type given by NO$GBA appears to be the standard (.SAV) file type, all saves created and used by NO$GBA will need to be converted to the proper (.SAV) file type to maximize compatibility with emulators, programs such as PKHeX, and reduce possible errors you may encounter.
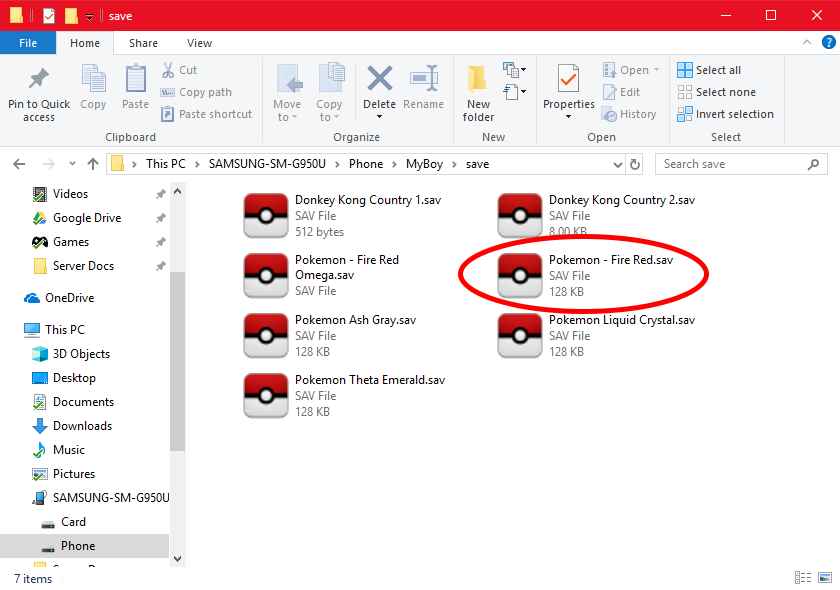
My Boy!:
1. Either plug your Android device into your computer or open a file browser on your Android device
2. Navigate to the "MyBoy" folder on your Android device (normally located on the device memory not the SD-Card)
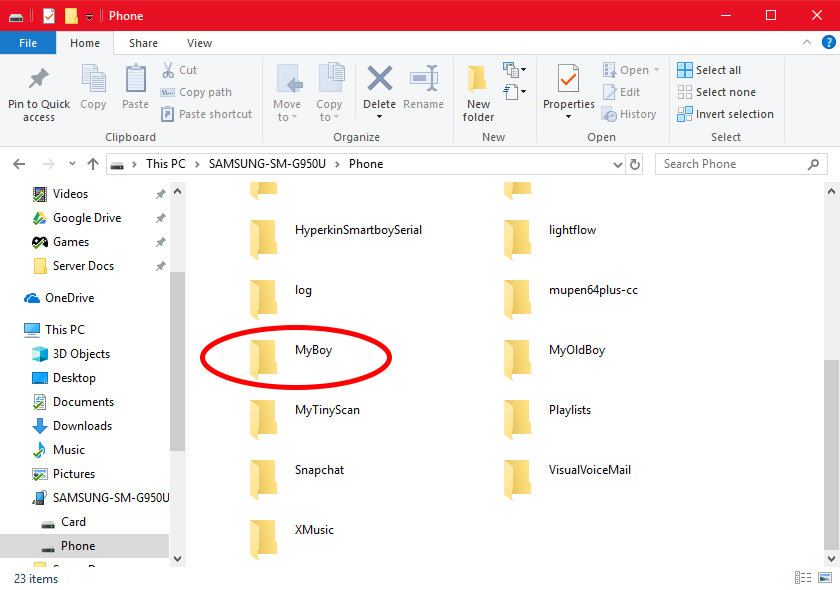
3. Open the "MyBoy" folder. Then open the "save" folder
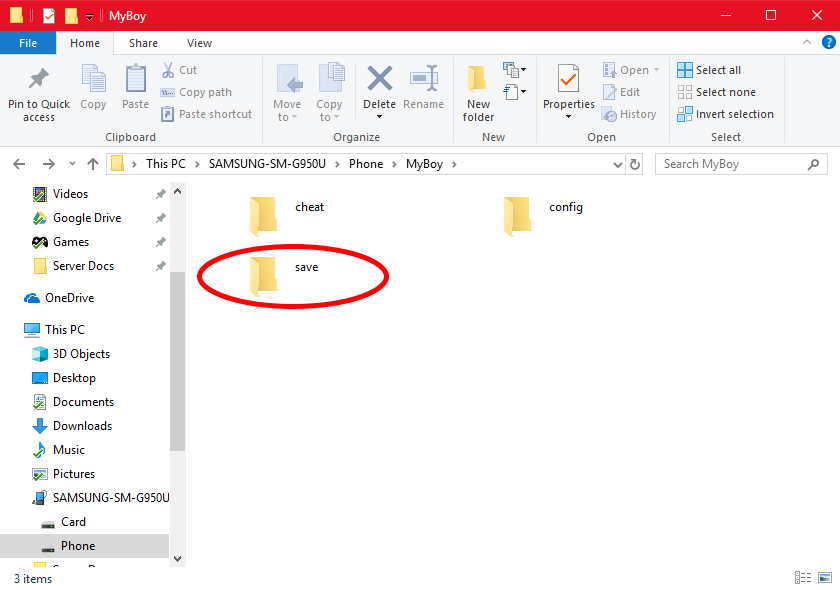
4. Inside the "save" folder should be your save files.
5. MAKE A BACKUP OF THIS FILE BEFORE USING OR EDITING IT WITH ANY SAVE EDITORS.
-
This tutorial will show you how and where to access your save files while using a 3DS emulator. This guide will cover the most popular emulator for running 3DS games: Citra (Computer). This guide assumes that you have already set up and played one of these emulators at least once.
This is not a setup guide. This guide is meant to show where to find or inject your save files.
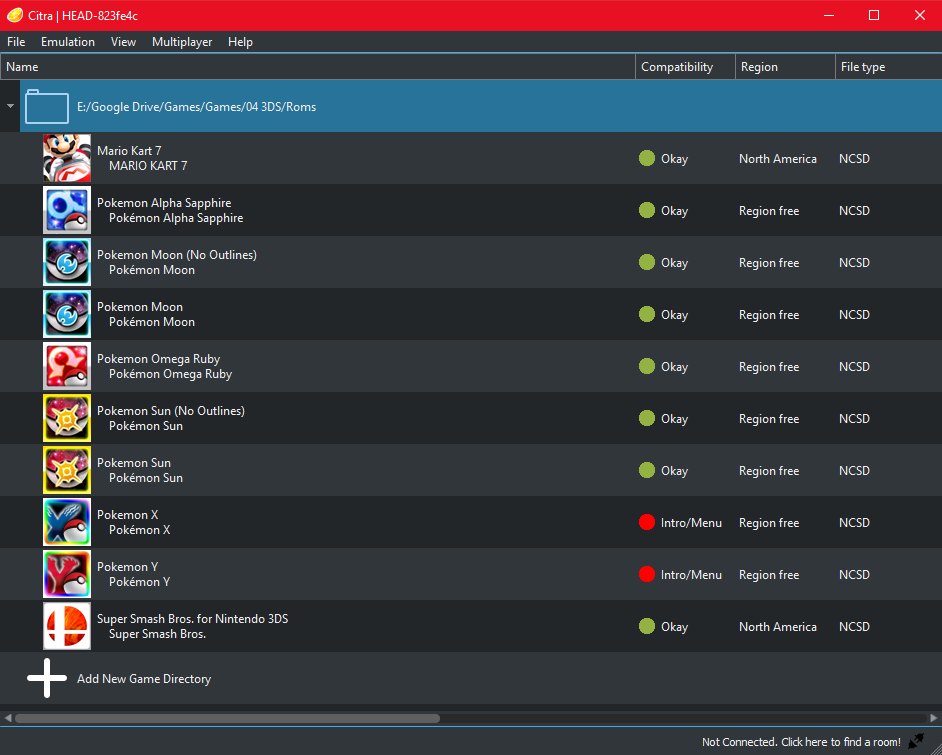
Citra:
1. Open up Citra.

2. Right click on your desired game. Then click on "Open Save Data Location"
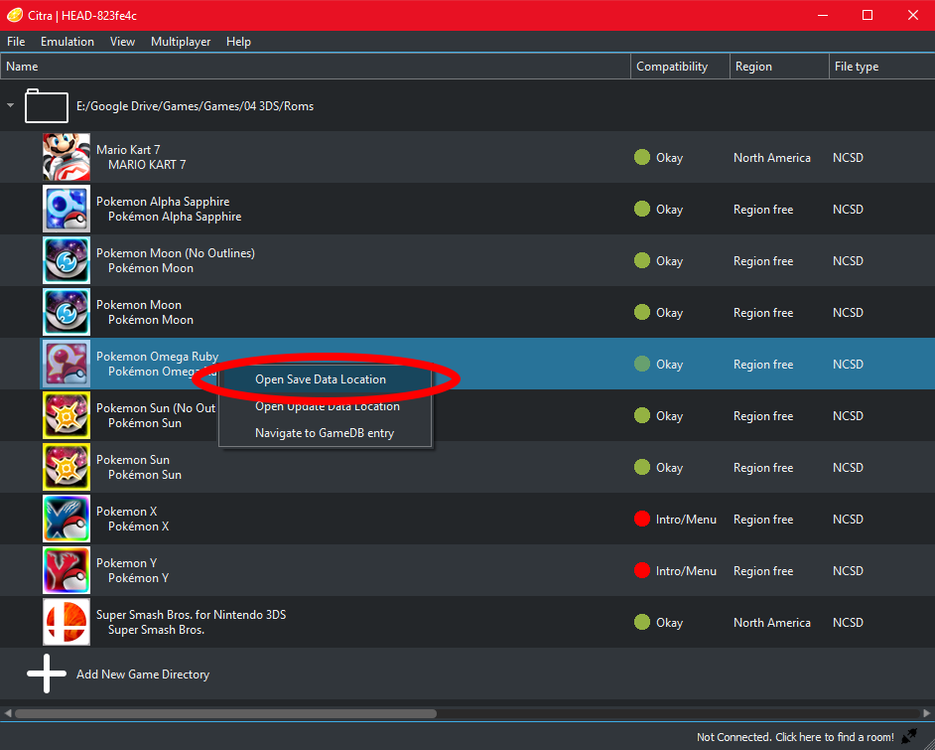
3.Inside this folder will be your save file.
4. MAKE A BACKUP OF THIS FILE BEFORE USING OR EDITING IT WITH ANY SAVE EDITORS.
For this to work, make sure:
(1) File name is main
(2) It is the only file in this folder.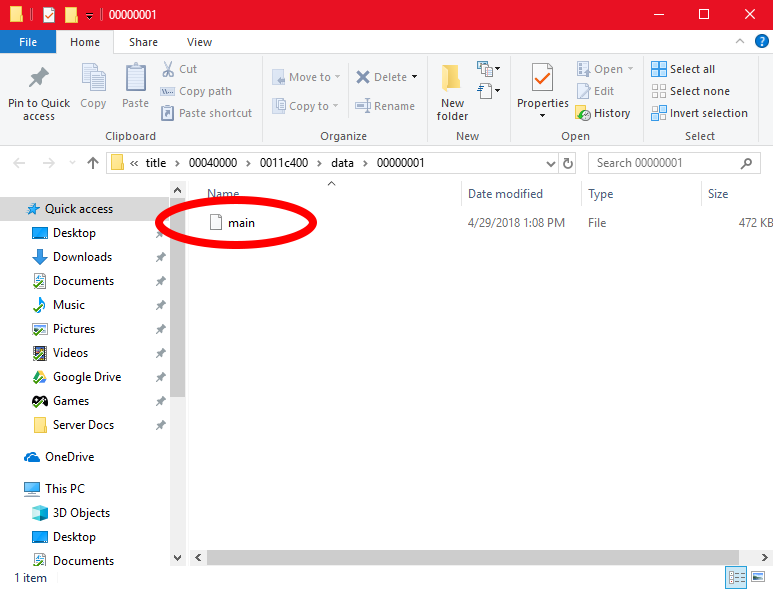
-
This tutorial will show you how and where to access your save files while using a Gamecube emulator. This guide will cover the most popular emulator for running Gamecube games: Dolphin (Computer), and Dolphin (Android). This guide assumes that you have already set up and played one of these emulators at least once. Scroll down to your emulator of choice.
This is not a setup guide. This guide is meant to show where to find or inject your save files.
Dolphin (Computer):
1. Navigate to your default "Documents" folder
2. Inside your "Documents" folder, look for a folder named "Dolphin Emulator"
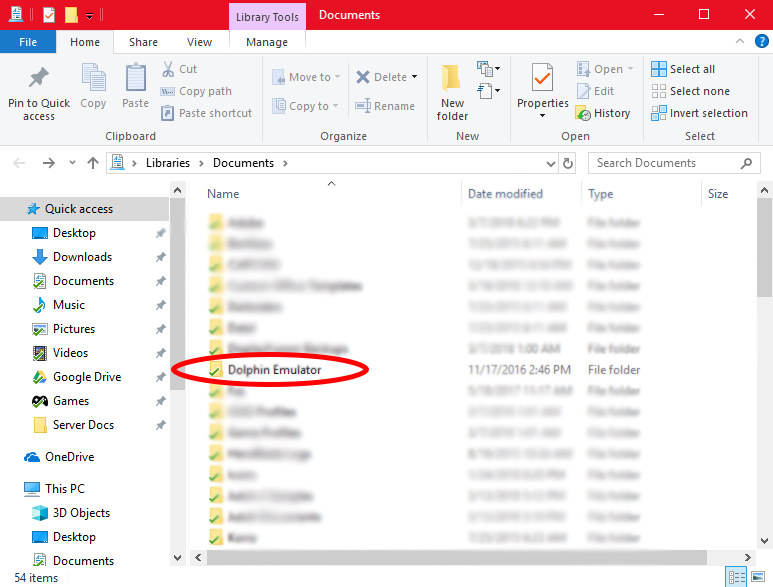
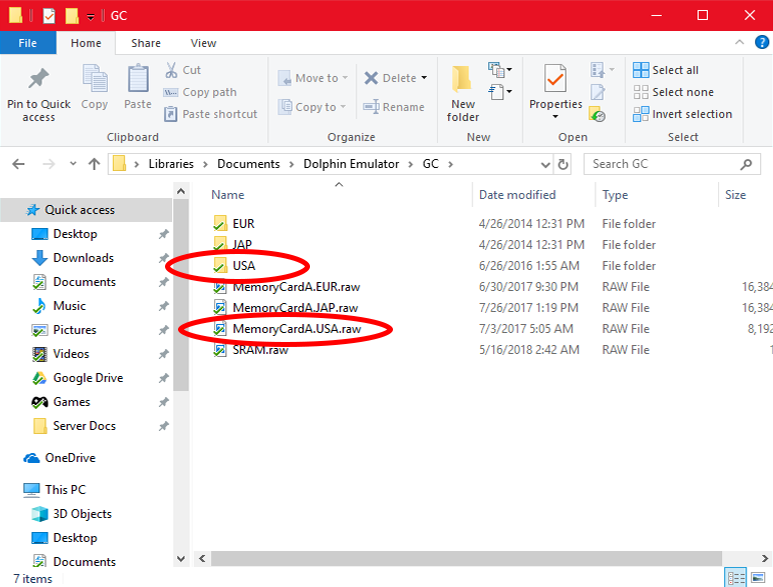
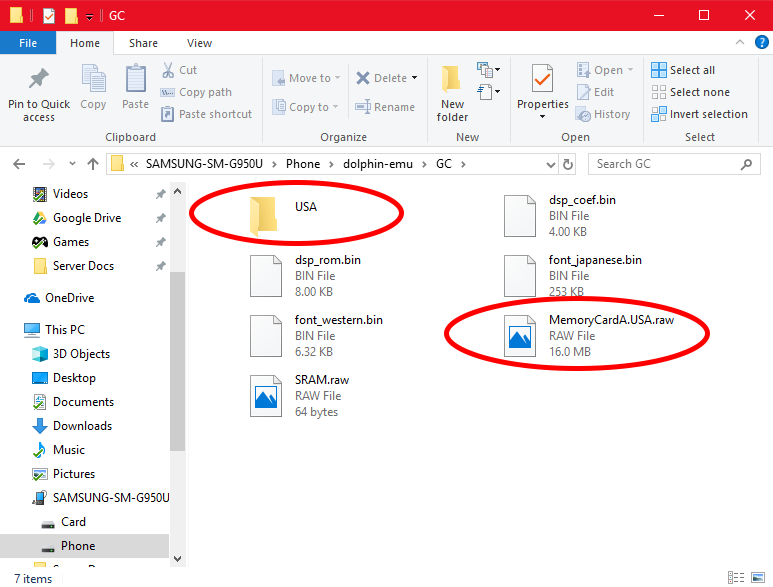
3. Open the "Dolphin Emulator" folder. Then open the folder named "GC"
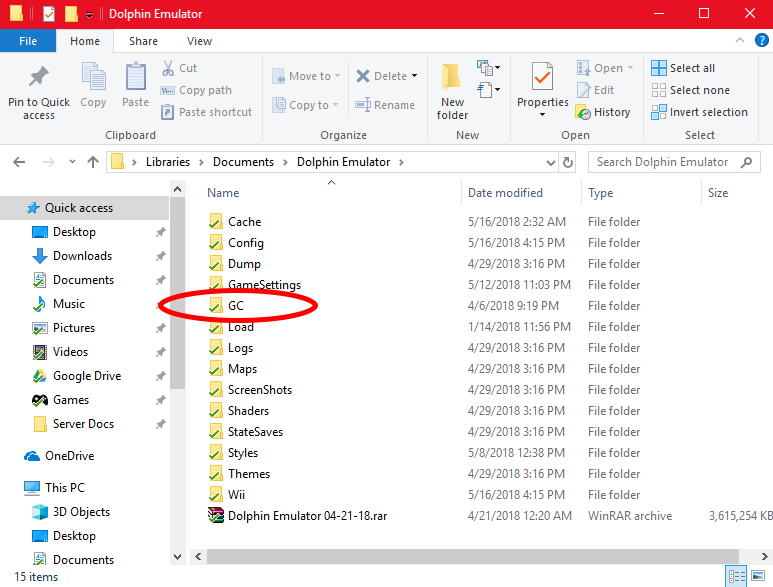
4. If you have your memory card set to "Memory Card" in Dolphin the "GC" folder will contain a file called "MemoryCardA.USA.raw" This file contains all of your Gamecube saves for the USA region. If your desired game is from a different region then pick the memory card file with the right region code. If you have your memory card set to "GCI Folder" in Dolphin, the "GC" folder will contain a folder called "USA" This folder contains all of your Gamecube saves for the USA region in the individual save "GCI" format.If your desired game is from a different region then open the folder with the right region code.
5. MAKE A BACKUP OF THIS FILE BEFORE USING OR EDITING IT WITH ANY SAVE EDITORS.
Dolphin (Android):
1. Either plug your Android device into your computer or open a file browser on your Android device
2. Navigate to the "dolphin-emu" folder on your Android device (normally located on the device memory not the SD-Card)
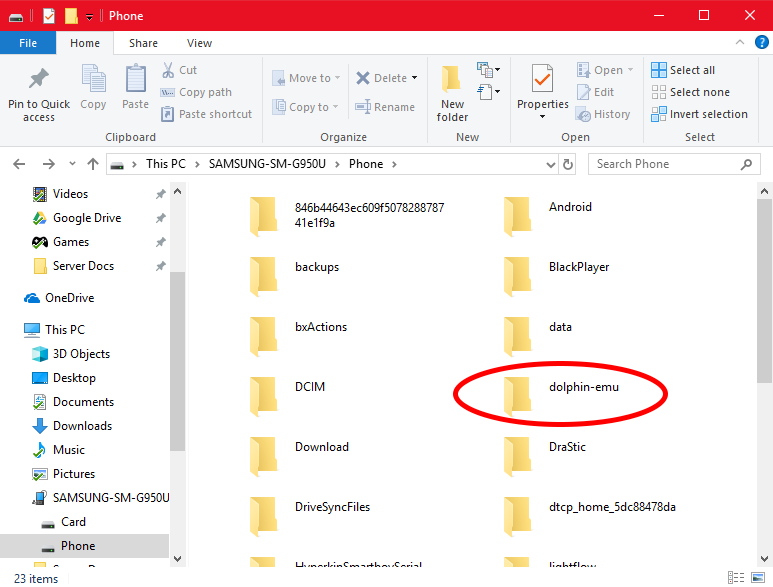
3. Open the "dolphin-emu" folder. Then open the "GC" folder
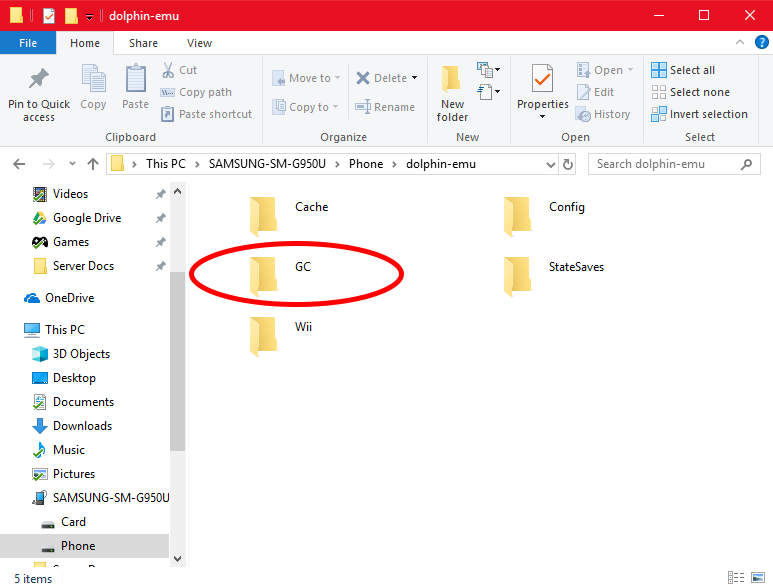
4. If you have your memory card set to "Memory Card" in Dolphin the "GC" folder will contain a file called "MemoryCardA.USA.raw" This file contains all of your Gamecube saves for the USA region. If your desired game is from a different region then pick the memory card file with the right region code. If you have your memory card set to "GCI Folder" in Dolphin, the "GC" folder will contain a folder called "USA" This folder contains all of your Gamecube saves for the USA region in the individual save "GCI" format.If your desired game is from a different region then open the folder with the right region code.
5. MAKE A BACKUP OF THIS FILE BEFORE USING OR EDITING IT WITH ANY SAVE EDITORS.
-
This tutorial will show you how and where to access your save files while using a GB/GBC emulator. This guide will cover 2 of the most popular emulators for running GB/GBC games: Visual Boy Advance (Computer), and My OldBoy! (Android). This guide assumes that you have already set up and played one of these emulators at least once. Scroll down to your emulator of choice.
This is not a setup guide. This guide is meant to show where to find or inject your save files.
Visual Boy Advance:
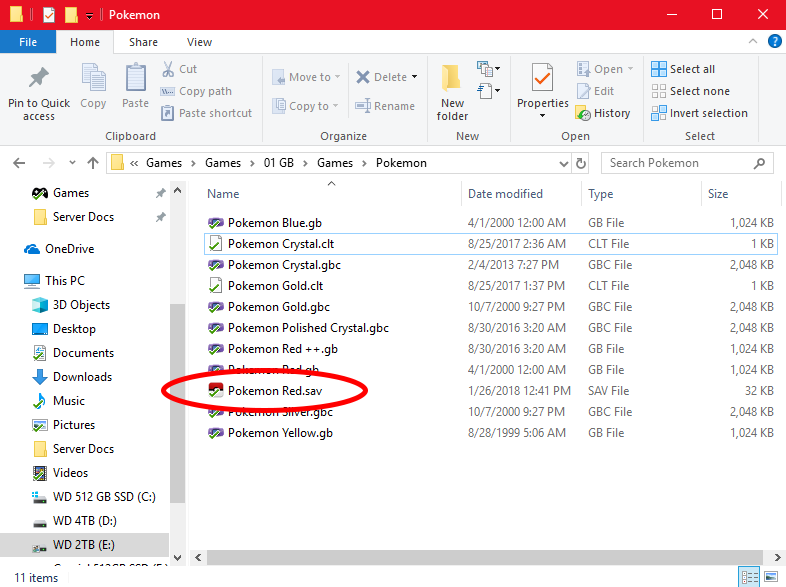
1. Navigate to the folder that your games are located in.
2. Open the folder and your save should be inside with the same name as your desired game with the file extension (.SAV) instead of the file extension (.GB) or (.GBC)
3. MAKE A BACKUP OF THIS FILE BEFORE USING OR EDITING IT WITH ANY SAVE EDITORS.
My OldBoy!:
1. Either plug your Android device into your computer or open a file browser on your Android device
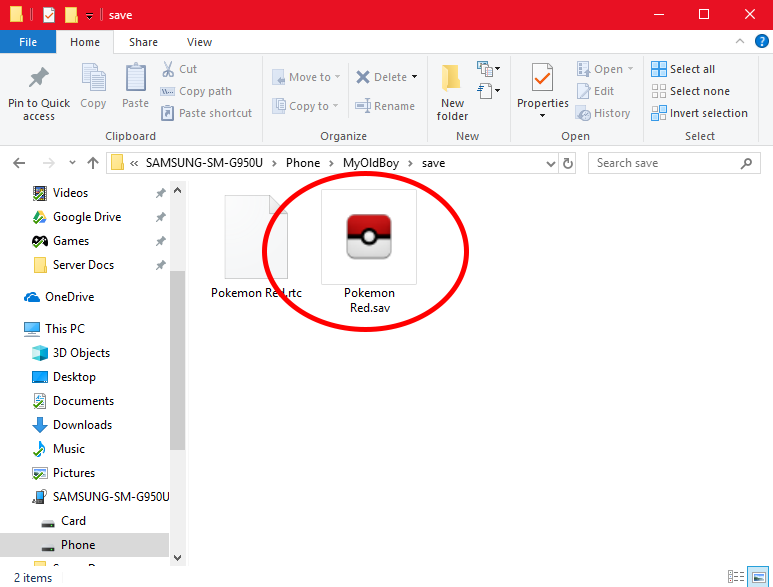
2. Navigate to the "MyOldBoy" folder on your Android device (normally located on the device memory not the SD-Card)

3. Open the "MyOldBoy" folder. Then open the "save" folder

4. Inside the "save" folder should be your save files.
5. MAKE A BACKUP OF THIS FILE BEFORE USING OR EDITING IT WITH ANY SAVE EDITORS.


Any idea when transferring all to SWSH be allowed?
in PKM
Posted
I'm pretty sure that every pokemon can be transferred to pokemon home, but then they will have to sit in limbo until probably the next remakes or games. I am hoping that they could patch the games later on to support the other pokemon. One reason they might do this is because unlike all of the previous games, the save is on the console and not on the cartridge. The cartridge only contains the game data so it would be pretty easy to patch the game and not have to worry about someone trying to load their 1.2 save for example on a 1.0 copy of the game. I'm really annoyed about this though, I would have rather waited another 6 months or whatever it would take.