


NinFanBoyFTW
-
Posts
202 -
Joined
-
Last visited
-
Days Won
4
Content Type
Profiles
Pokédex
Portal
Technical Documentation
Pages
Tutorials
Forums
Events
Downloads
Gallery
Blogs
Posts posted by NinFanBoyFTW
-
-
Hey not sure if you ever got that save but here is mine. Just fly to golden rod city, enter the pokemon center, go upstairs, then go to exit the pokemon center and the event will begin. I edited the OT info so I would suggest you change it to your own. Then just inject it into the VC.
-
Hey @Regnum Im not sure if you ever figured this out but I was able to get it working. I think it was a combination of where you were on the map (a Pokemon center) and maybe some of the conversion I just did with VBA. Anyway here is your save. I just injected it into my VC Red and it is working. So make any changes you want to this save file and then inject it and it should work.

-
Hey if you still need this let me know.
-
 1
1
-
-
If you still havent figured it out. @theSLAYER made a tool a few weeks ago to help with this problem
-
On 2/23/2017 at 4:35 AM, theSLAYER said:
On my version of Citra, my save for Pokemon sun is:
citra\app-0.1.114\user\sdmc\Nintendo 3DS\00000000000000000000000000000000\00000000000000000000000000000000\title\00040000\00164800\data\00000001
I would imagine for X/Y just change 00164800 to the relevant game.I know this is an old post but for future reference, all you need to do is right click the game you have a save for and click "Open Save Data Location"
-
1
-
-
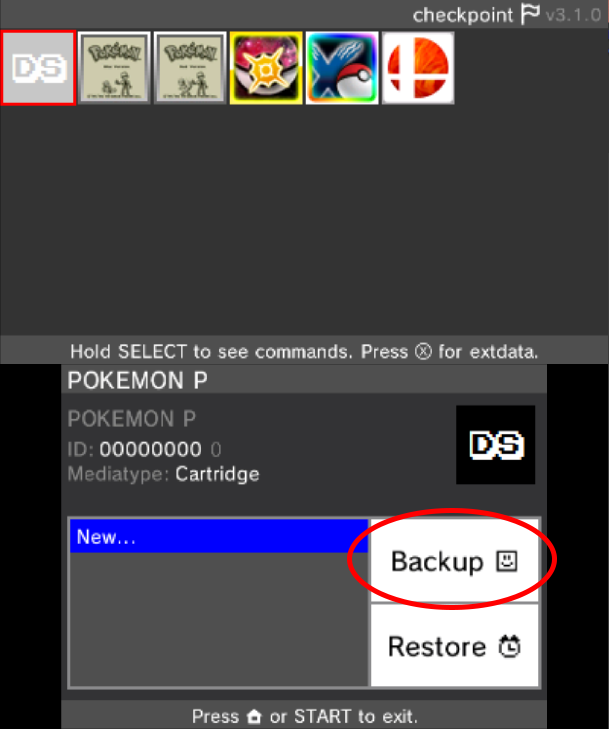
This tutorial will show you how to backup your DS cartridge save using a 3ds homebrew program called Checkpoint.
1. Insert your cartridge, and make sure the 3DS menu can see it. This is important because sometimes the system can't read the cartridge unless it's inserted just right.
2. Launch Checkpoint.
3. Use the DPad to select the game with the "DS" logo on it. Then press A to select the game.

4. Use the DPad to select the save slot you wish to use (the selected slot has a blue background). If backing up the save, you can select "New..." to create a new slot. Be careful not to overwrite anything important.
5. Press either the Backup or Restore button on the touch screen.
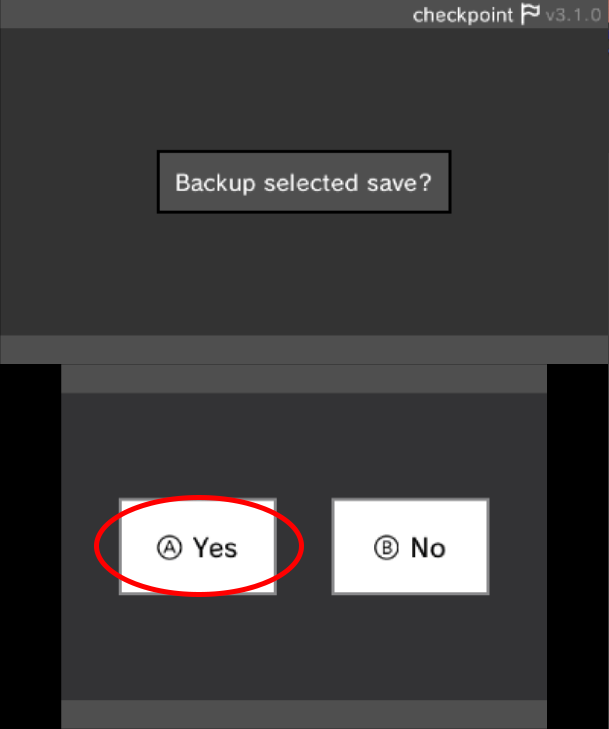
6. Press "A" to confirm
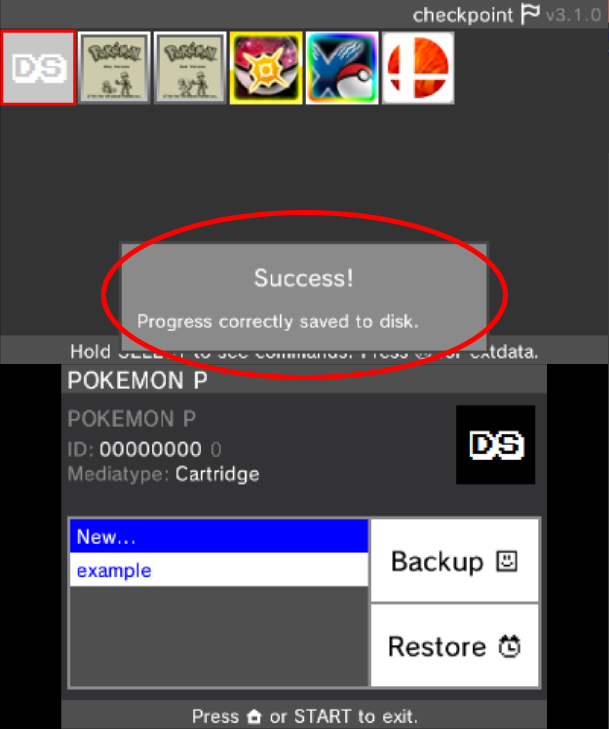
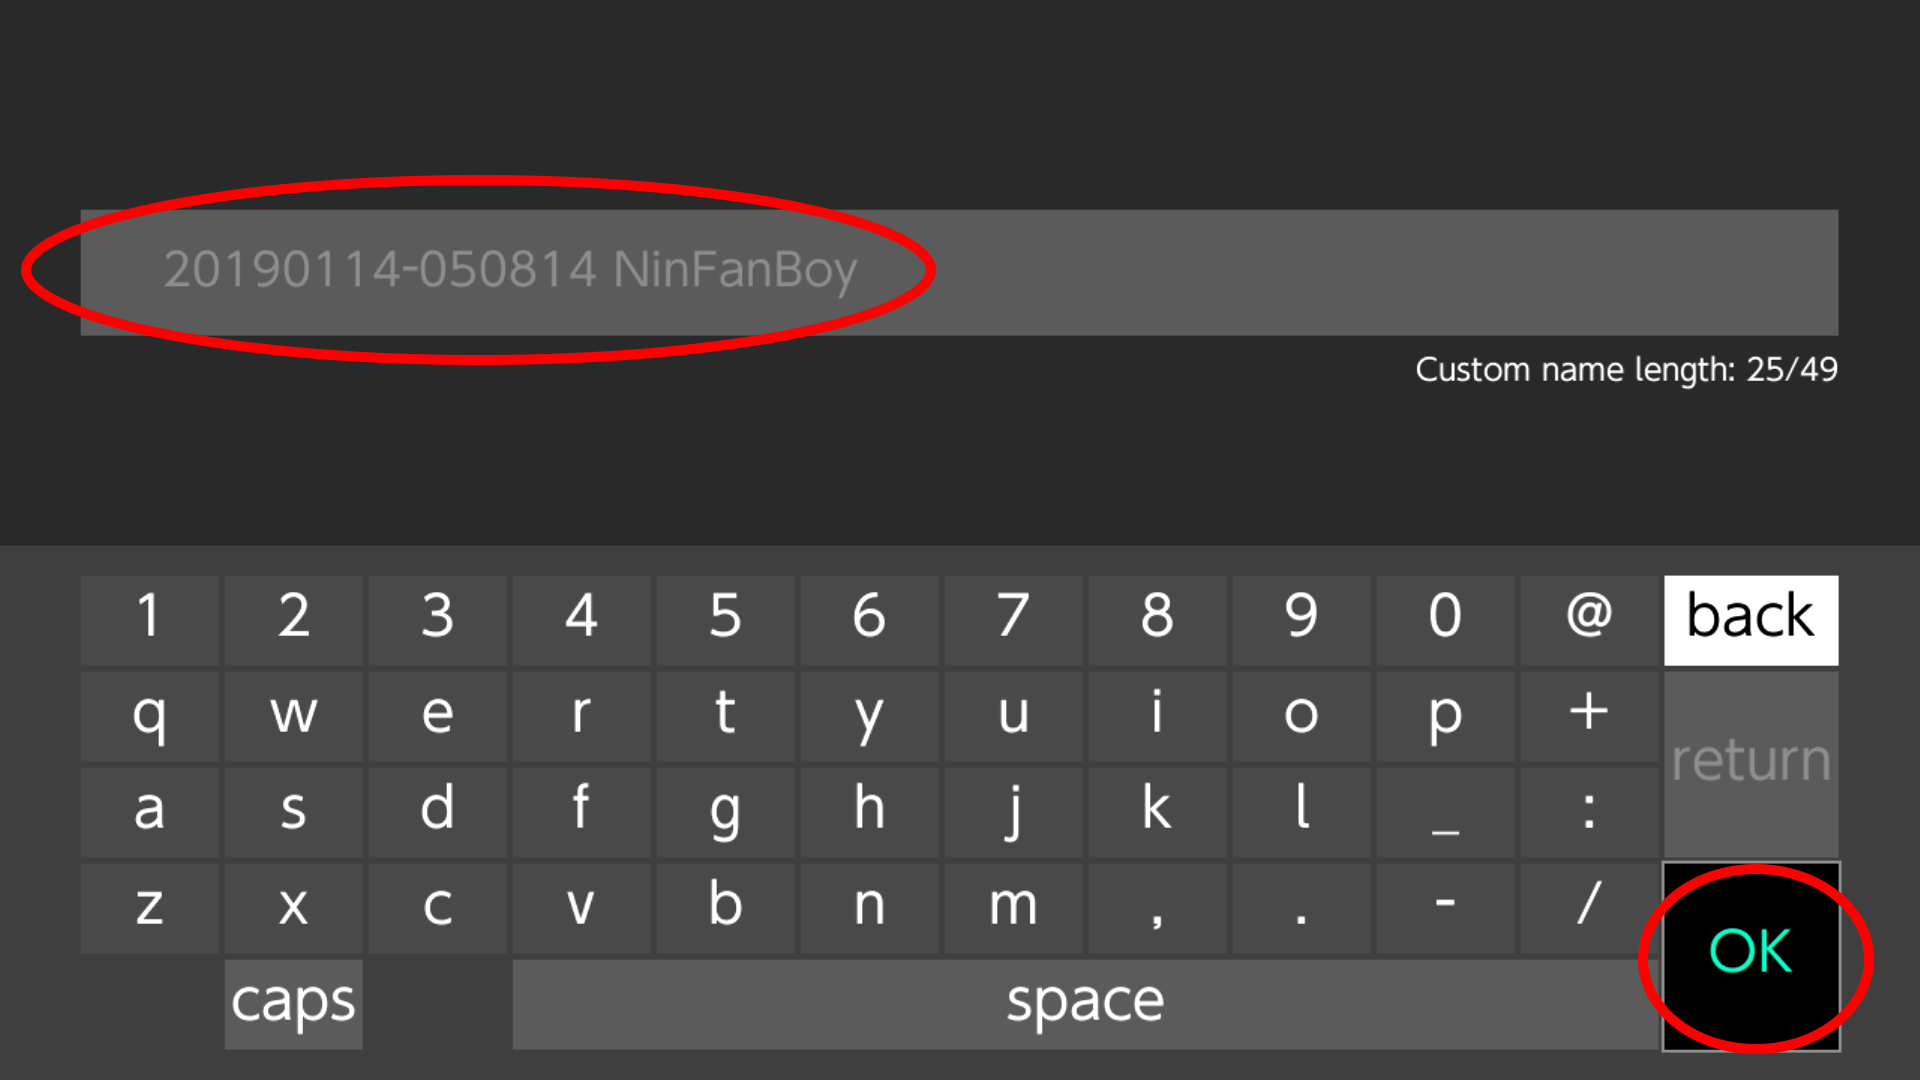
7. If you chose to create a new save slot, use the on-screen keyboard to give it a name, then press "OK".

8. If the save was exported correctly you should see a success message appear.
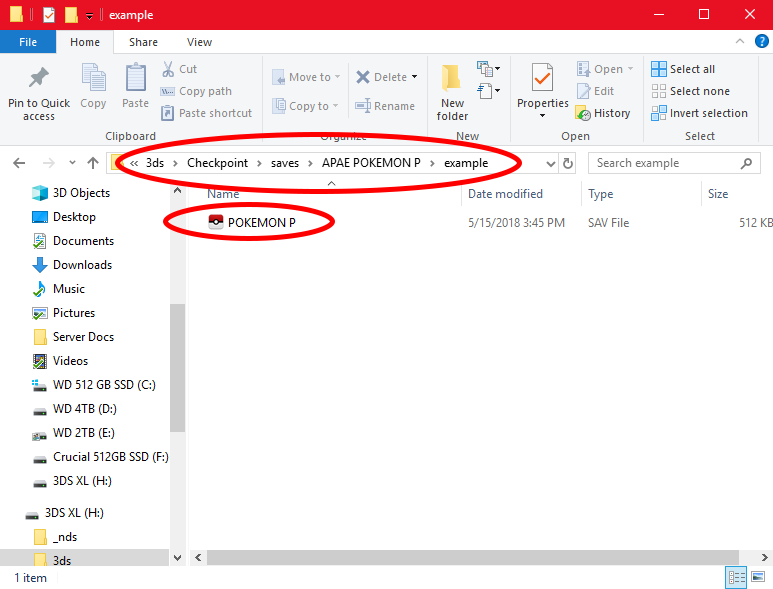
10. Your backup or restore is complete. Exit Checkpoint, and your save should be located on your SD card under /3ds/Checkpoint/saves/(your game)/(your save slot).
11. MAKE A BACKUP OF THIS FILE BEFORE USING OR EDITING IT WITH ANY SAVE EDITORS.
-
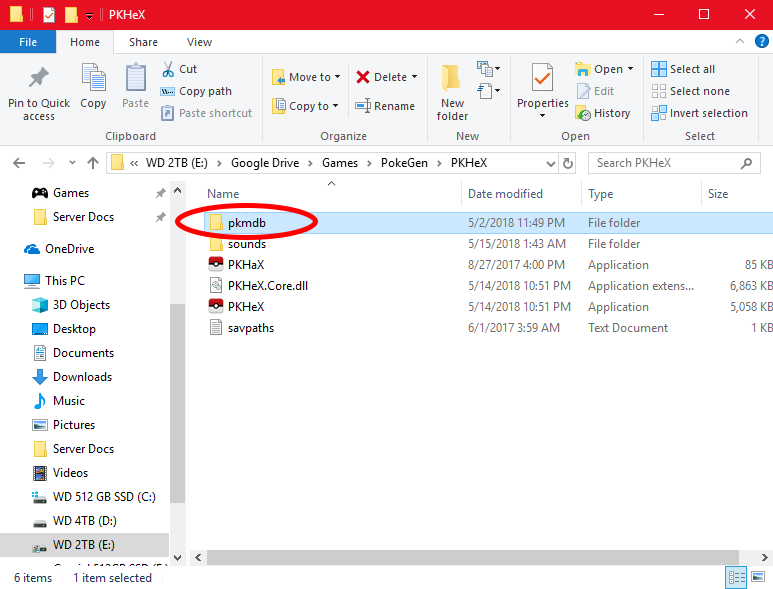
This tutorial will teach you the basics of creating as well as managing a Pokemon database in PKHeX. Using a Pokemon database streamlines the process of backing up, preserving, and organizing any size of Pokemon collection making it a very useful and powerful feature to take advantage of.
1. In the same folder that PKHeX is located, create a new folder called "pkmdb"
2. There are 2 ways of organizing your Pokemon database. The first way is to Place all of the pk files into the database folder without folders. This is useful for seeing all Pokemon with the same species grouped together by default Note:Because the Database sorts the default view by A-Z, files will not be in generational order (Gen 1-7) but instead file A-Z order. This may cause inconsistencies in the order of Pokemon.

The second way of organizing your Pokemon database is by organizing your Pokemon into certain folders with other criteria. This is useful for collections like living dexes or shiny Pokemon vs non shiny since with this method, Pokemon are grouped by folder A-Z instead of File A-Z.

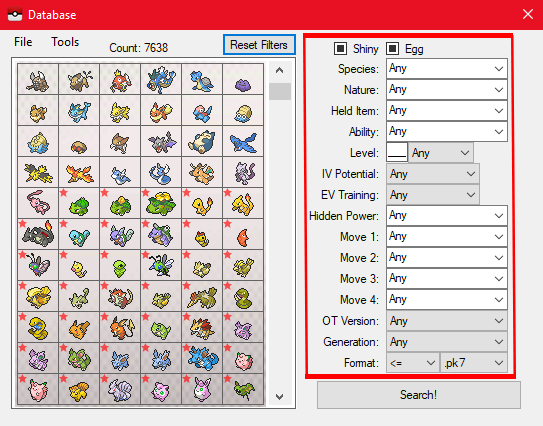
3. Once your Pokemon are organized in your preferred style, your Pokemon database is ready to use. On the side of the database are search criteria to narrow your search of Pokemon.
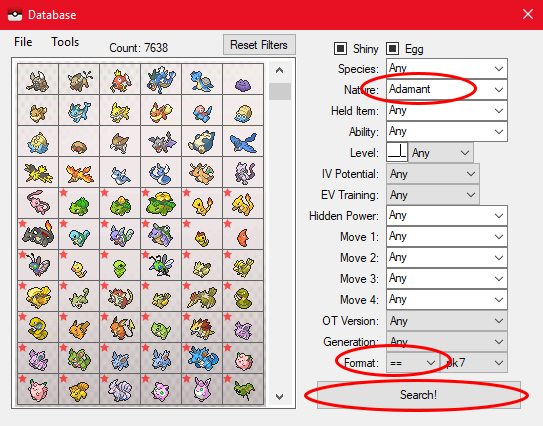
Enter in your search criteria and click the "Search" Button. In this test search I have selected to only show Adamant Nature Pokemon that are in the pk7 format.
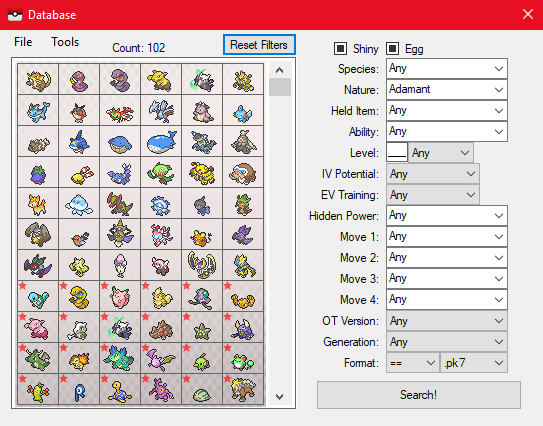
After you click "Search" your filtered results should appear.
4. Once you are satisfied with your search results, you can click on "Tools" to either export the results of your search to a folder of your choosing on your computer, or you can import the results of your search into the current box of the save you have loaded. For this demonstration I will be showing the import feature. The export feature is very easy to use and self explanatory.

5. Follow the prompts (Most likely you will only need to click "yes" for all of the prompts) and an alert will pop up confirming that the Pokemon have been loaded into your save.
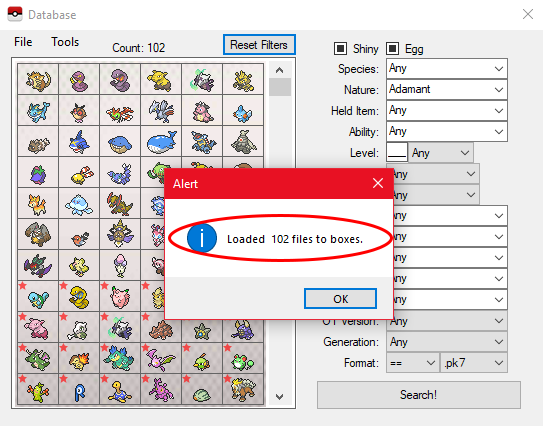
6. Close all prompts and close the database window. Once you are back in PKHeX, you should see your results that you exported in your PC boxes like normal.
7. For more advance search criteria, open the Pokemon database and navigate to "Tools/Search Settings" and click on the "Advanced Search" Option. You will see a text box appear next to the simple search criteria.
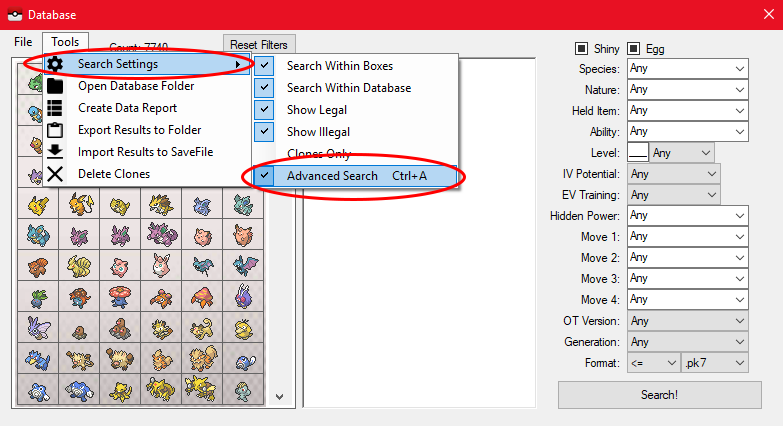
After you have enabled the "Advanced Search" box, you can input whatever search criteria you want. Note: the search criteria format is the same as the "Batch Editor". You can find an in-depth tutorial on the Batch Editor Here. Once you are satisfied with your search criteria, you can click "search" the same way as with the simple criteria.
-
This guide will show you how to add the Pokemon cry sounds into PKHeX. With this feature, every time you hover over a Pokemon in PKHeX, it's cry will play.
1. In the same folder that PKHeX is located, create a new folder called "sounds"

2. Place your Pokemon cries into the "sounds" folder. Make sure the cries are in the ".wav" format with the following naming format.
1.wav = Bulbasaur
649.wav = Genesect
Pokemon with different cries for alternate forms are
492.wav = Shaymin
492-1.wav = Shaymin Sky Form

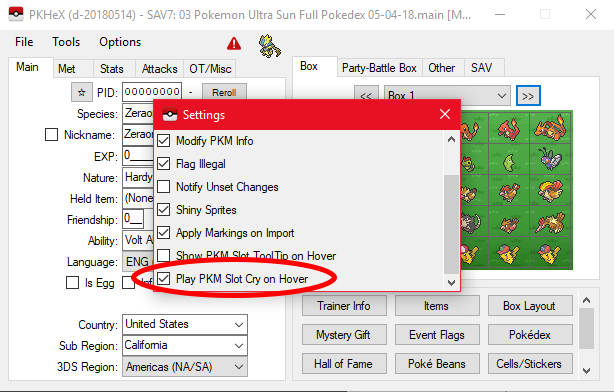
3. Open PKHeX and verify that the cries are being played properly by hovering your mouse cursor over a Pokemon in any box. If the cry does not play, verify that you are running the latest build of PKHeX. Also verify that the "Play PKM Slot Cry on Hover" setting is turned on by going to "Options>>Settings"

-
Works great Thanks. Just to make clear for future reference
1.wav = Bulbasaur
649.wav = Genesect
pokemon with different cries for alternate forms are
492.wav = Shaymin
492-1.wav = Shaymin Sky Form
-
I just tried and I wasnt able to get it to work. Im not sure but I also saw this on the new change
resource = $"{pk.Species}";
- path = Path.Combine("sounds", $"{resource}.wav")
So does that mean that the cry needs to be called
pk.Species 1.wav or
pk.Bulbasaur.wav
I tried both and what you said but nothing is working.
-
Hi. I just wanted to know how to use the new pokemon cries feature. I have all of the wav files and I know you need to make a "sounds" folder but what is the naming structure for the pokemon cries.
-
This tutorial is still here, in case people have Checkpoint, are on the lower firmwares, and Pokémon is on a lower game version. If you have any of the newer firmware and/or game version, use JKSV instead.
In this tutorial you will learn how to back up your Nintendo switch saves using a homebrew program called Checkpoint. The latest version of Checkpoint can be downloaded from here.
Note: This guide is meant for CFW emuNAND extracting from/importing to CFW emuNAND, or CFW sysNAND extracting from/importing to CFW sysNAND.
It's not meant for CFW emuNAND extracting from/importing to Stock sysNAND. In this unintended case, it may work for some of the readers,
but note that the sysNAND and emuNAND may unlink at any time, causing this unintended consequence to stop working.
The only real fix that we know thus far, is creating a new emuNAND using the present sysNAND.
0. Download Checkpoint.nro from their Github page, from the latest release.
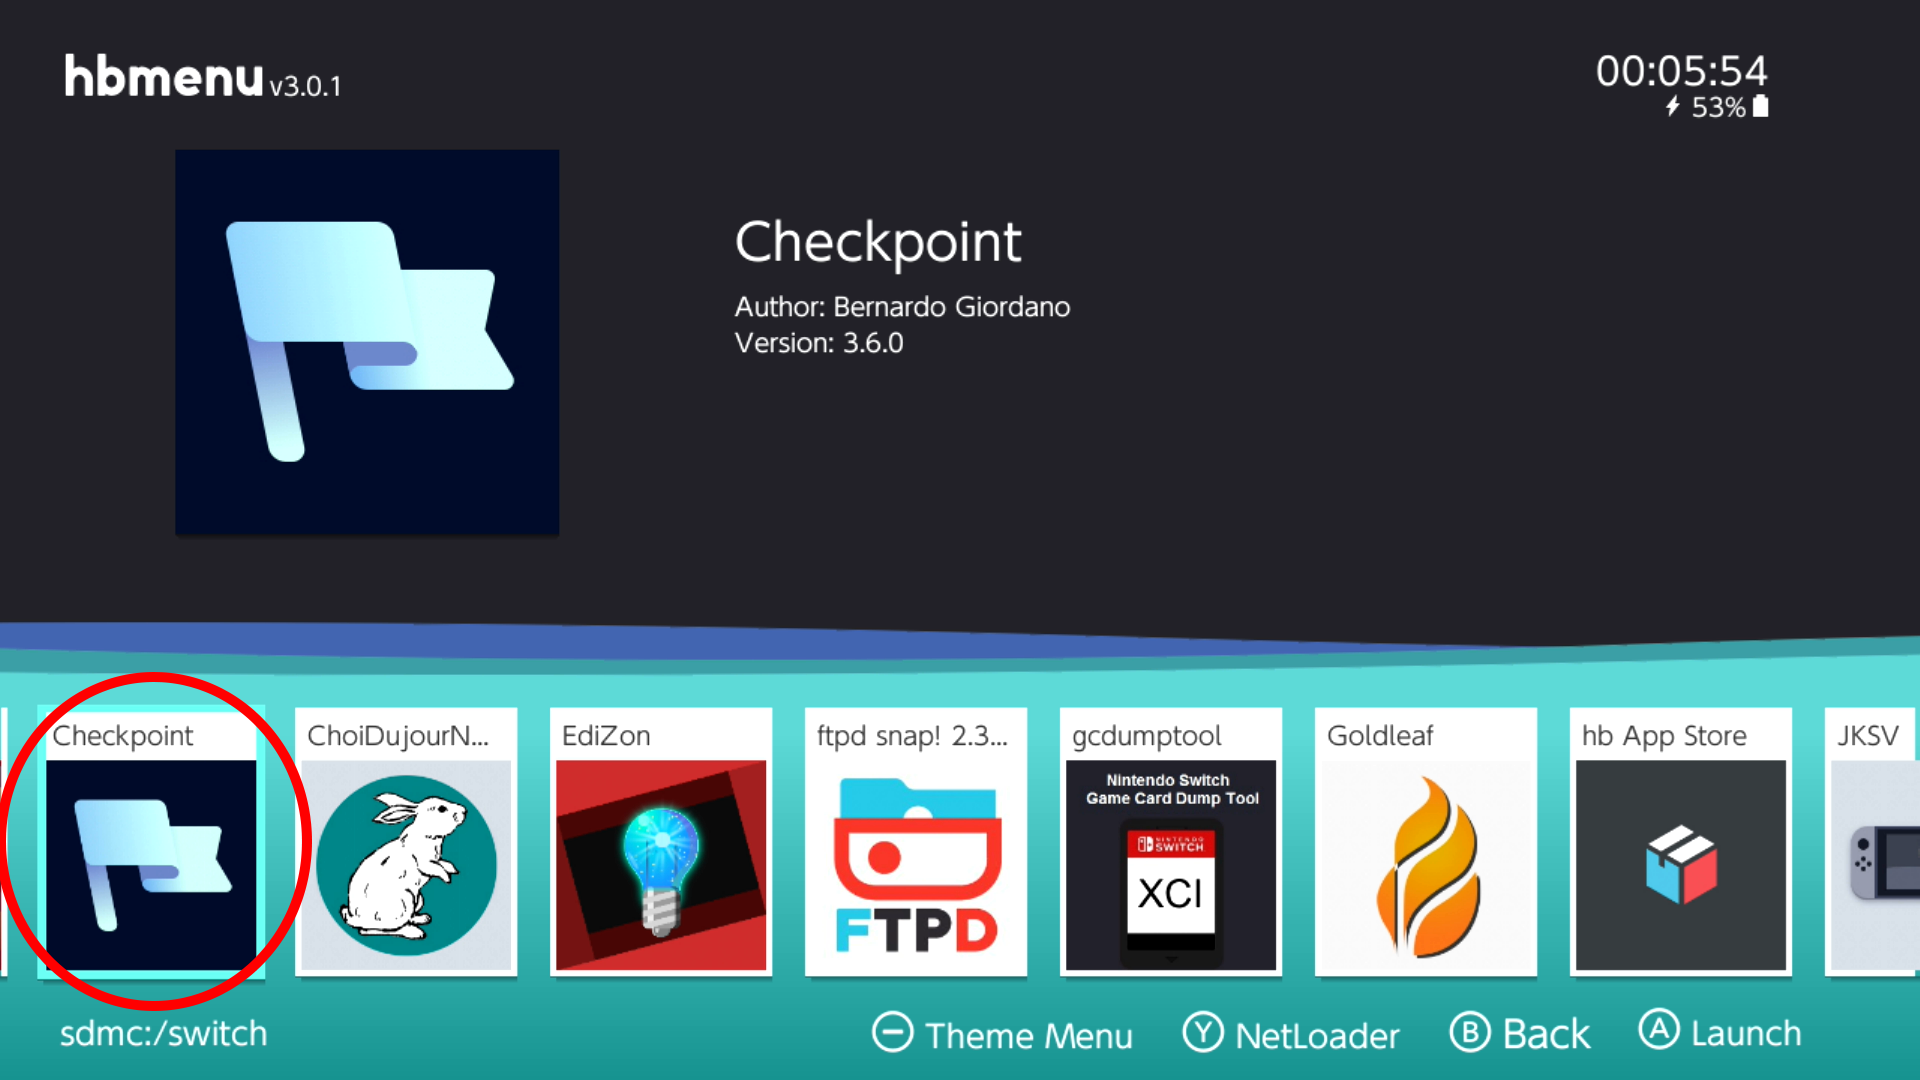
Then place it into the Switch folder of your SD card.1. Launch the Homebrew Menu from your Switch and look for Checkpoint. Then launch Checkpoint by pressing "A"

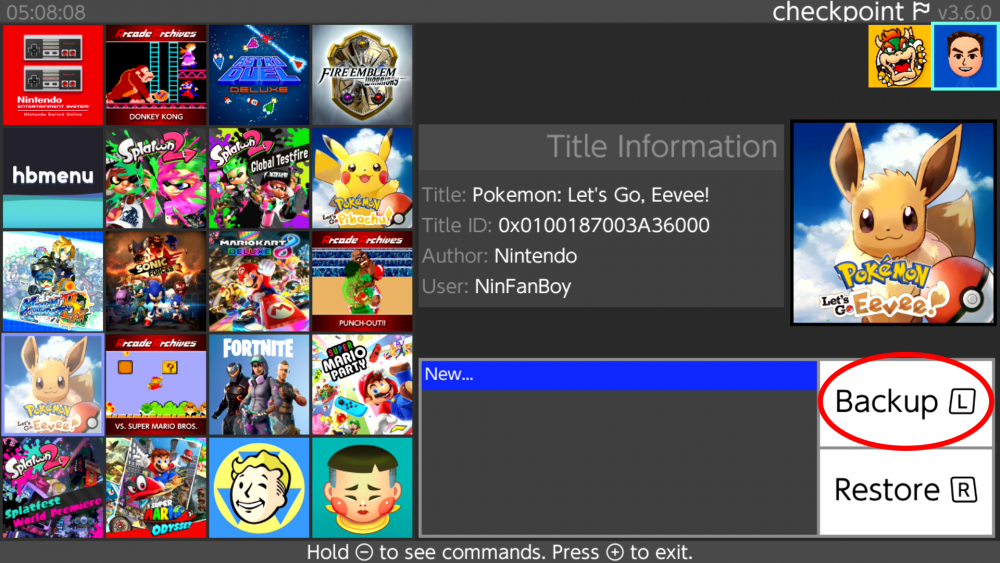
2. Navigate to your desired game
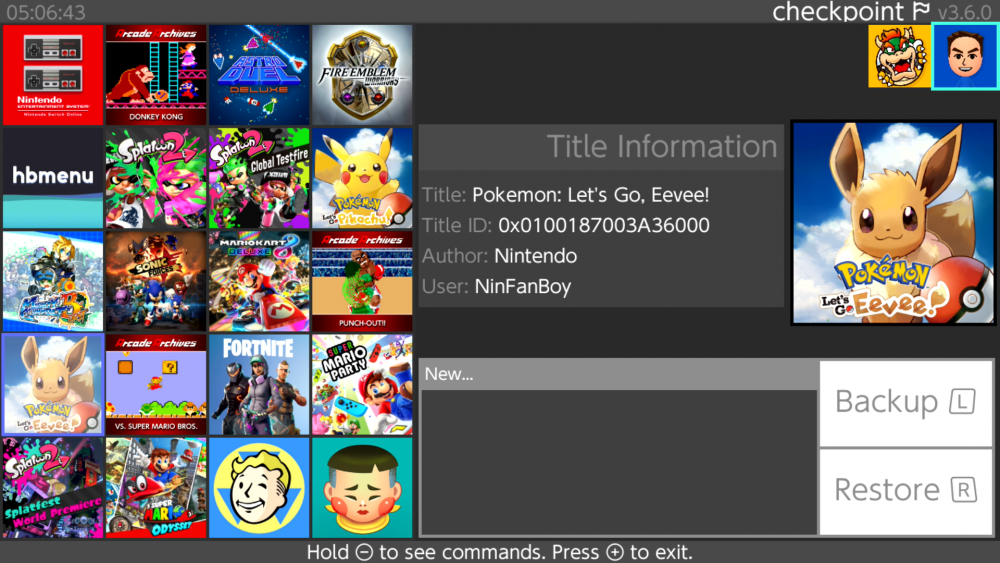
3. Press "A" to select your desired game. If you are in docked mode click "L" to start the backup process. If you are in handheld mode either click "L" or click on the "Backup" button on the touch screen.
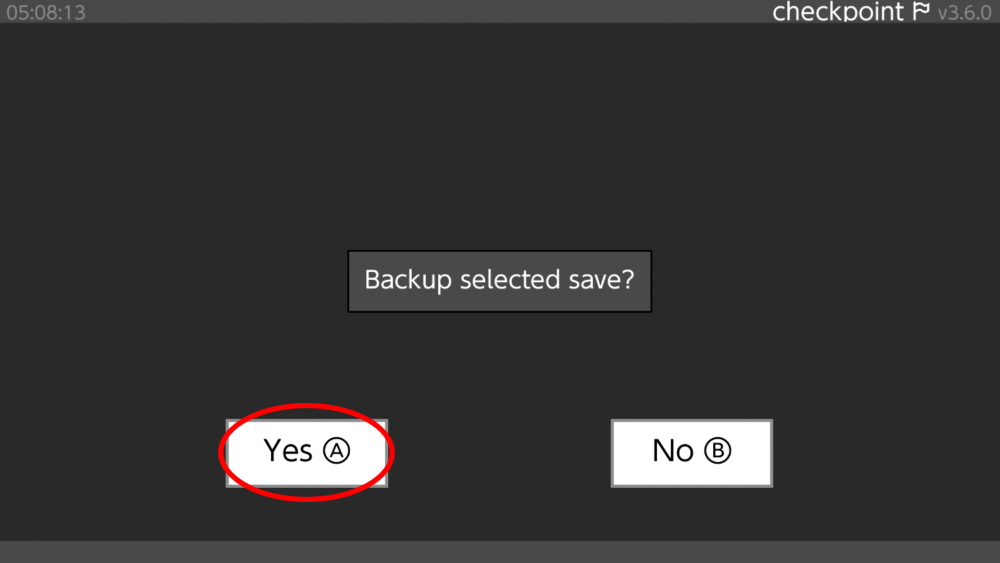
4. If you are in docked mode click "A" to confirm the backup. If you are in handheld mode either click "A" or click on the "Yes" button on the touch screen.
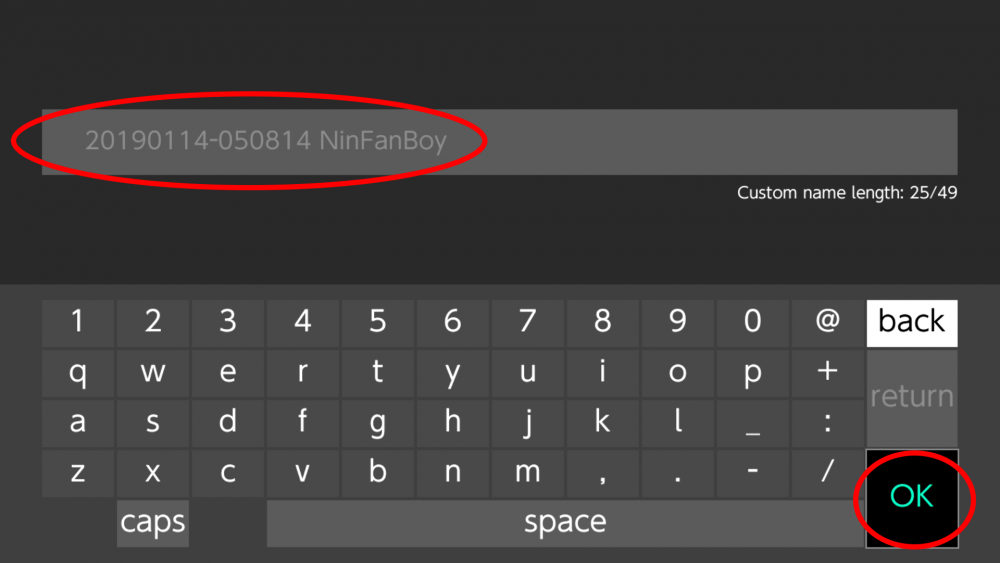
5. Enter a name for your new save. Then click on the "OK" button to complete the backup process.
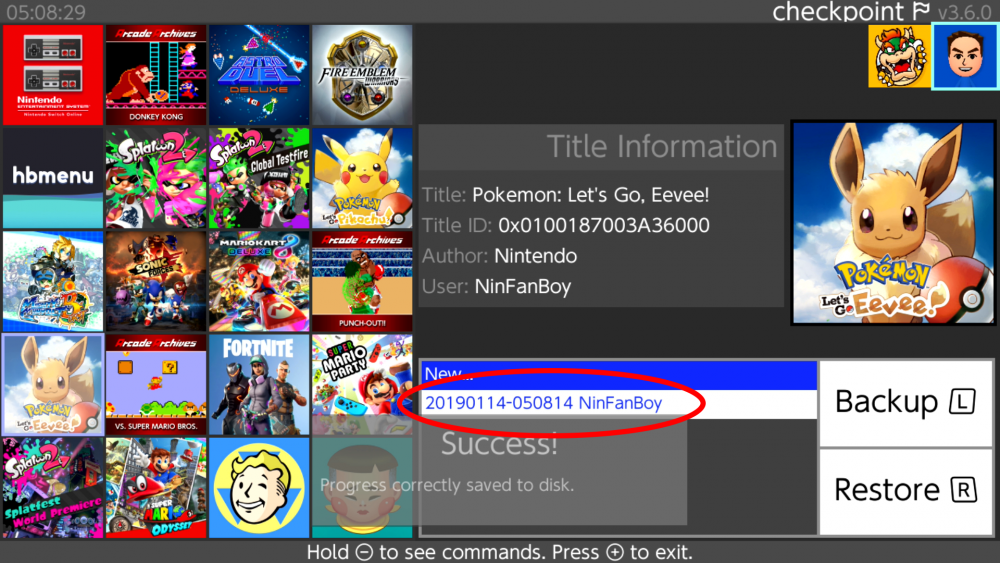
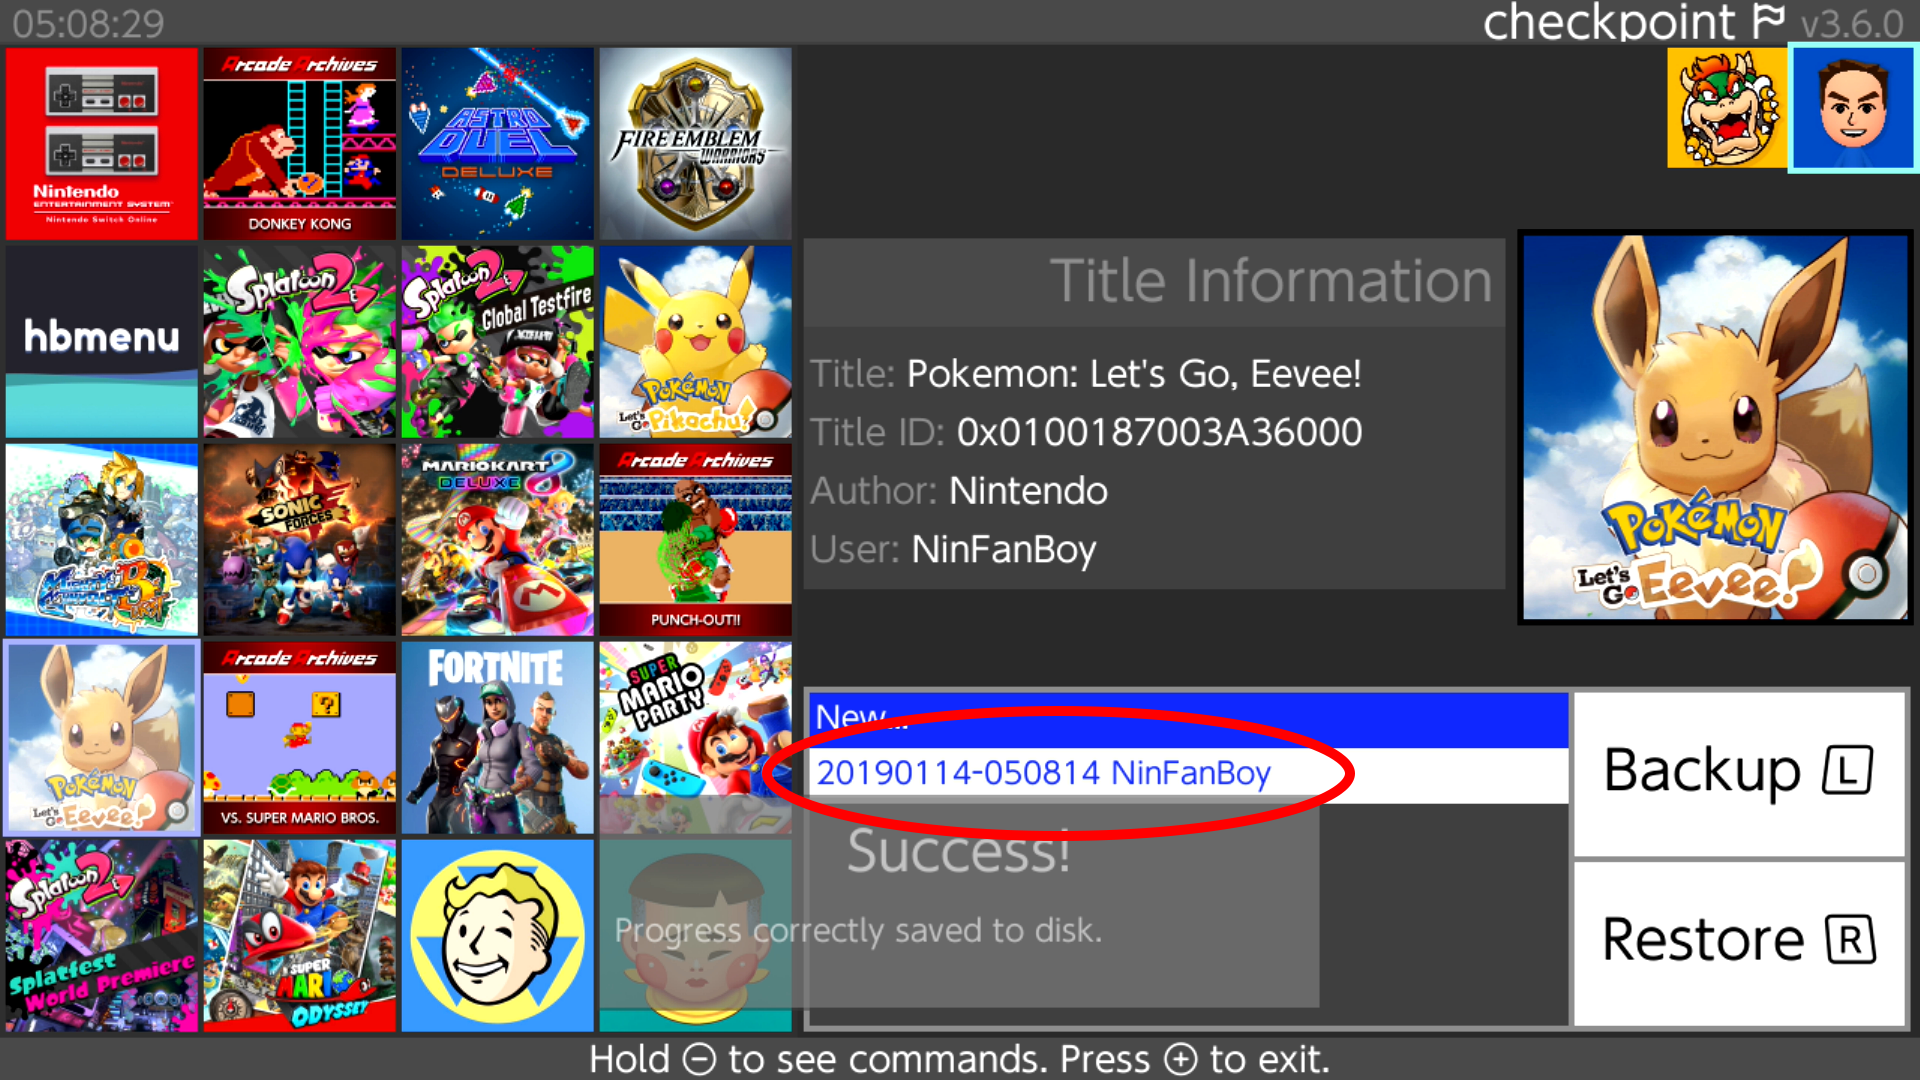
6. If the backup has completed you will see a success message appear as well as a new save with the name you chose under your desired game.
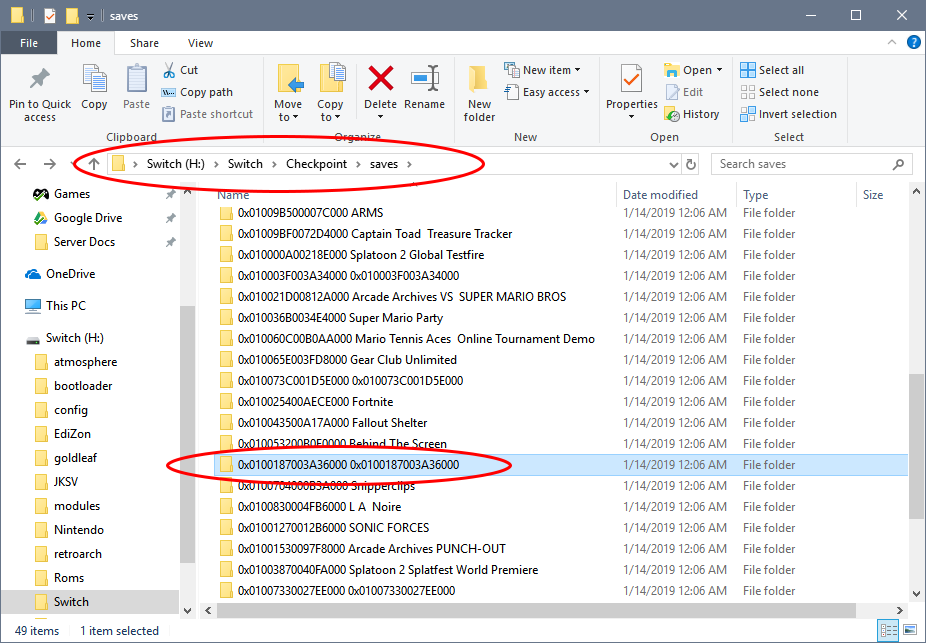
7. Turn your Switch off, insert your SD card into your computer and Navigate to "Switch//Checkpoint//saves". Then find your desired game in the list of games.
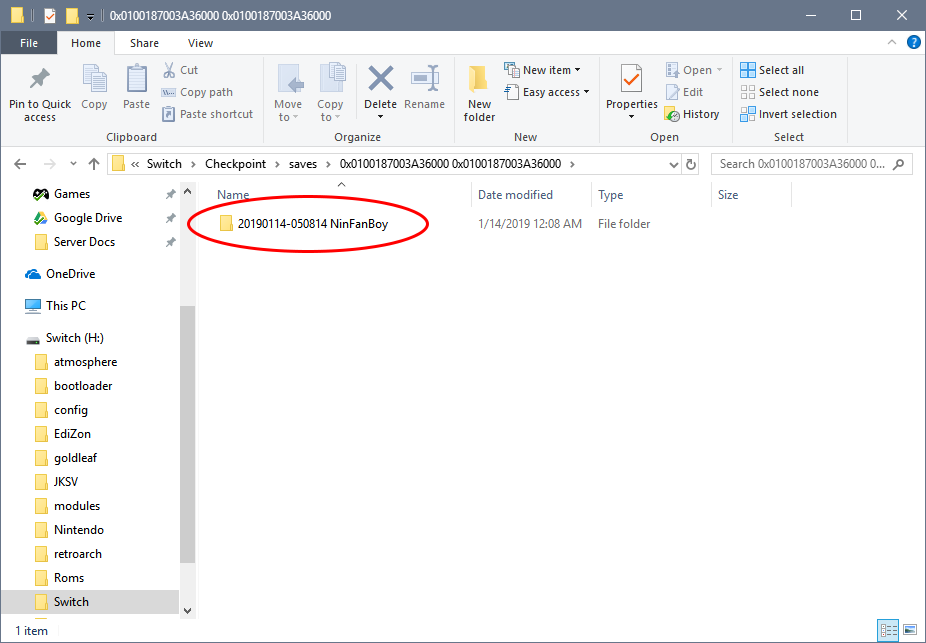
8. Open your desired game's folder. Inside will be the folder you named in step 5. Note: this folder will contain all of the subsequent backups you make of this game.
9. Navigate through the folder of the backup you created and eventually you will get to your save file. Note: this step may be different and the resulting save file may be different depending on the game you have chosen.
10. MAKE A BACKUP OF THIS FILE BEFORE USING OR EDITING IT WITH ANY SAVE EDITORS.
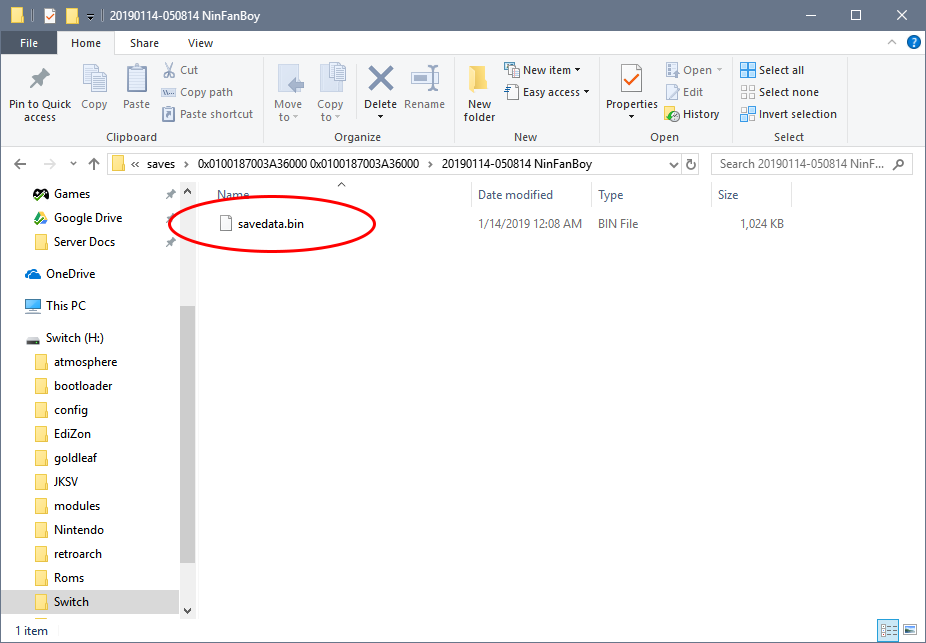
Note:
LGPE -> savedata.bin
SWSH -> main, backup and poke_trade. Use main with PKHeX.
Note: Switch Cartridges do not store saves. So whether physical or digital copy, the saves all goes into your Switch, and that is what this tool is dumping.
-
This method of backing up your GB/GBC cartridges saves involves a device called the Hyperkin SmartBoy. This is a relatively inexpensive device that allows you to play your cartridge Gameboy and Gameboy Color games on your Android Smart Phone. Because of this, the SmartBoy can be used to Backup your saves from your GB/GBC games.
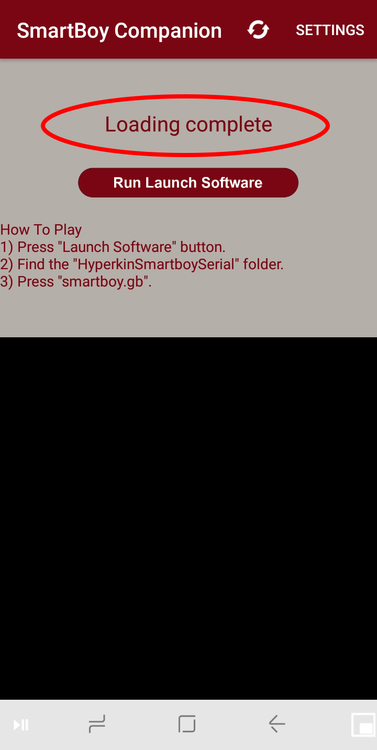
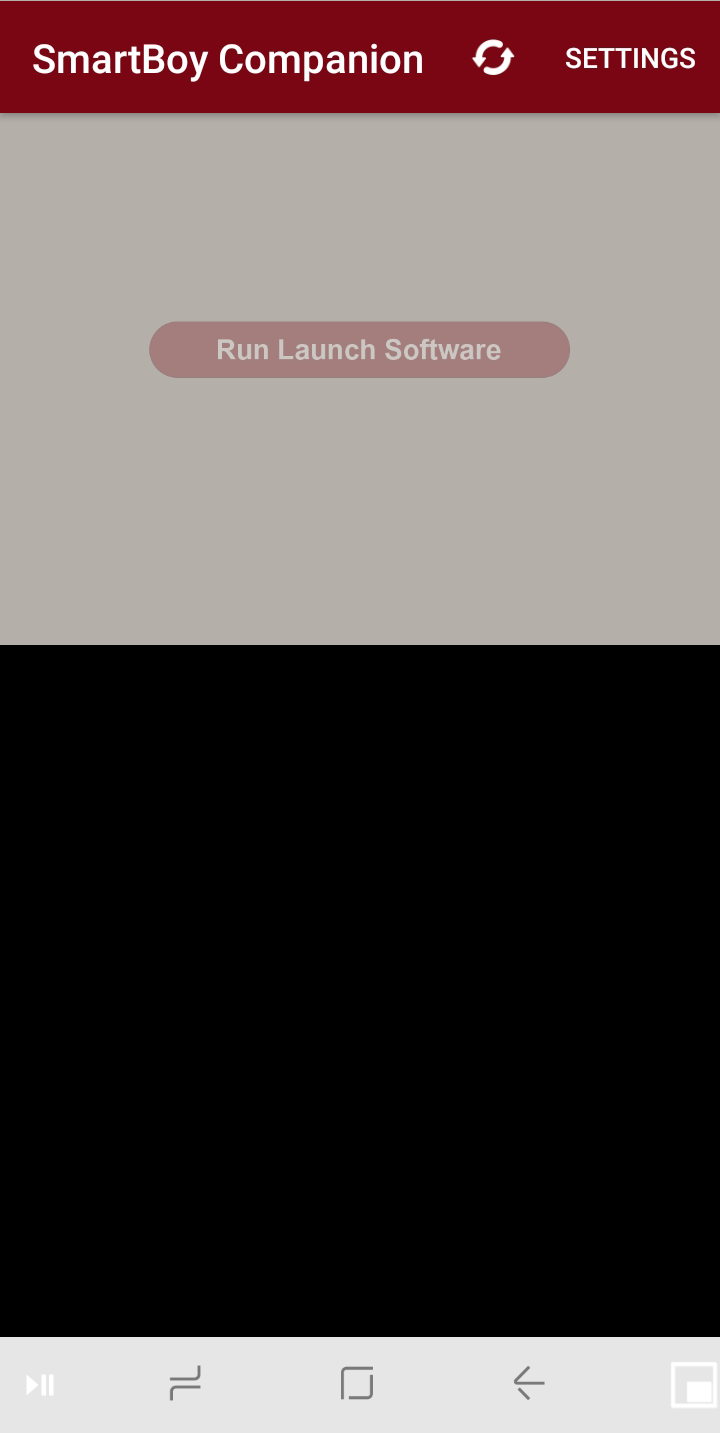
1. Install the SmartBoy app from the Google Play store and plug your device into the SmartBoy. If the SmartBoy app does not automatically open, open the app manually (it should look like this).

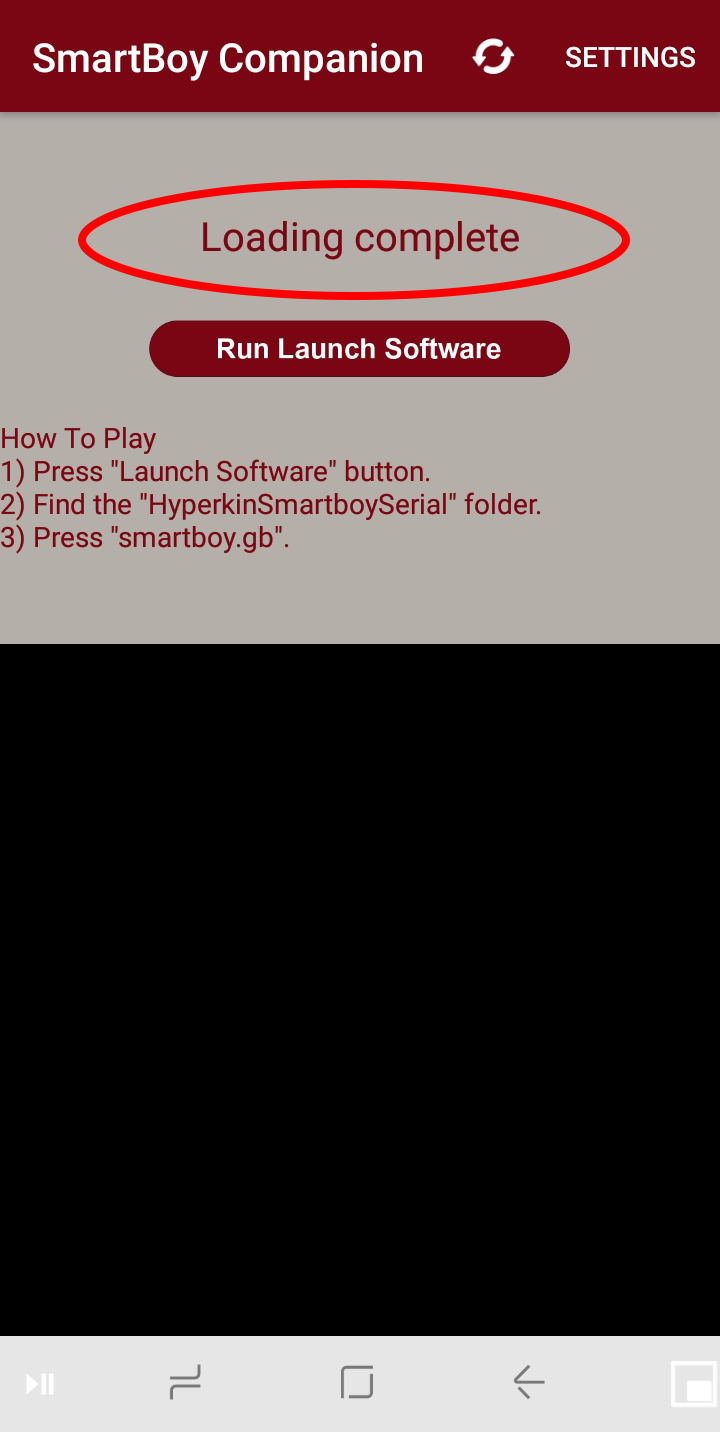
2. Insert your GB/GBC game into the cartridge slot on the back of the SmartBoy and wait for the "Loading complete" text to appear.
3. Take your device out of the SmartBoy and either plug your device into a computer or navigate through the device's file browser to the "HyperkinSmartboySerial" folder.
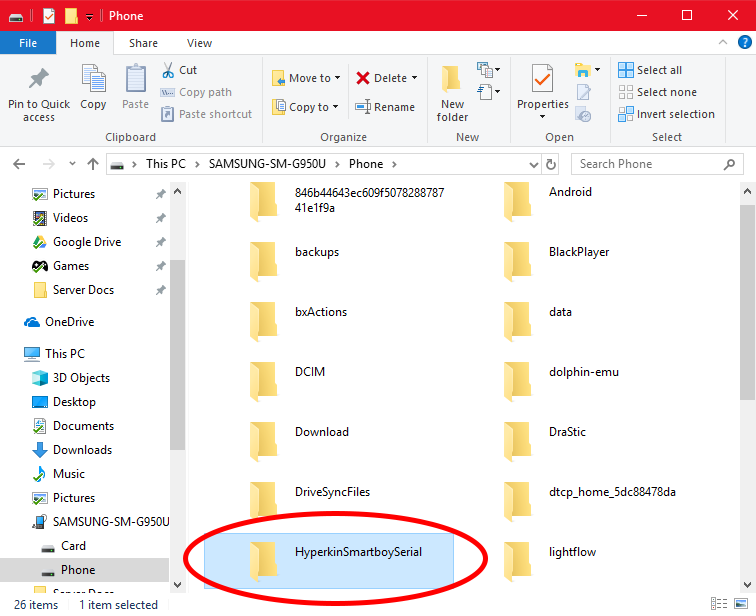
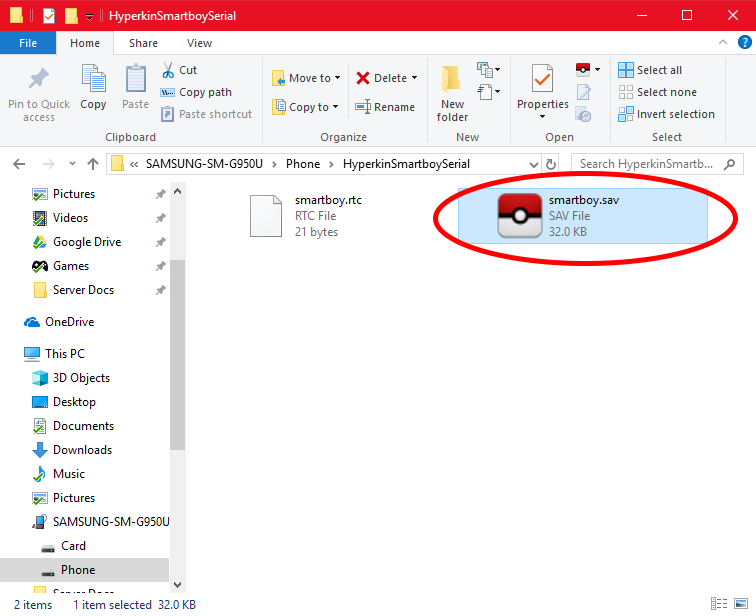
4. Open the "HyperkinSmartboySerial" folder and inside should be your save labeled "smartboy.sav".
5. MAKE A BACKUP OF THIS FILE BEFORE USING OR EDITING IT WITH ANY SAVE EDITORS.
-
This is a very outdated method involving an Action Replay with a Micro-SD slot on the side. This method should only be used if you do not have access to a hacked or homebrew 3DS, as it is not as reliable and requires an original DS, DS Lite, or DSi (This will not work with a 3DS or any variant, and it will not work with IR games such as Pokémon HeartGold, Soul Silver, Black, White, Black 2, or White 2.)
1. Make sure that your desired game and Micro-SD Card are inserted properly into your Action Replay and boot into your Action Replay's main menu.
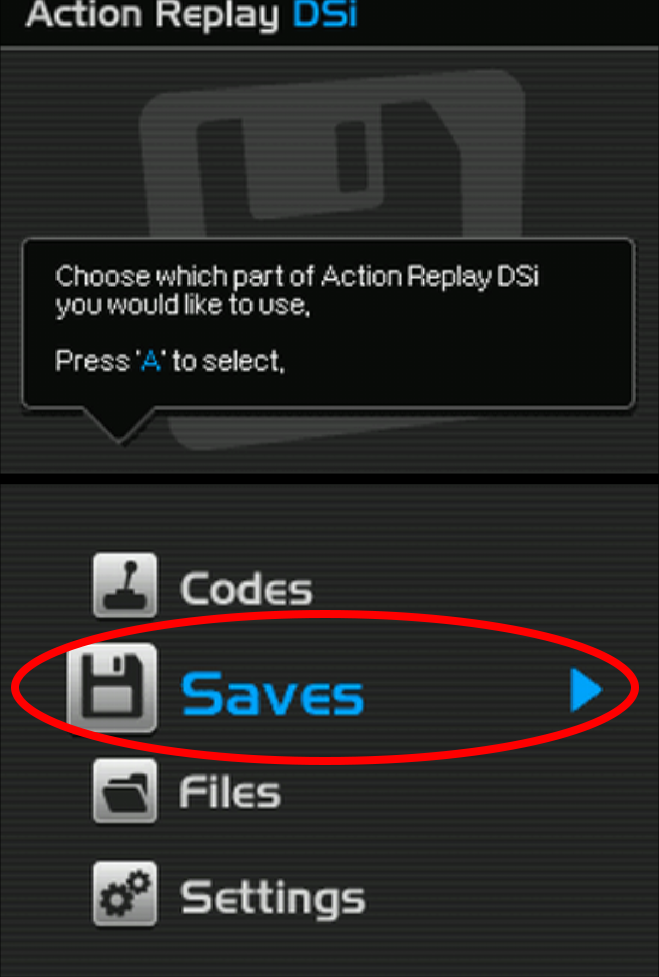
2. Select and Click on "Saves"

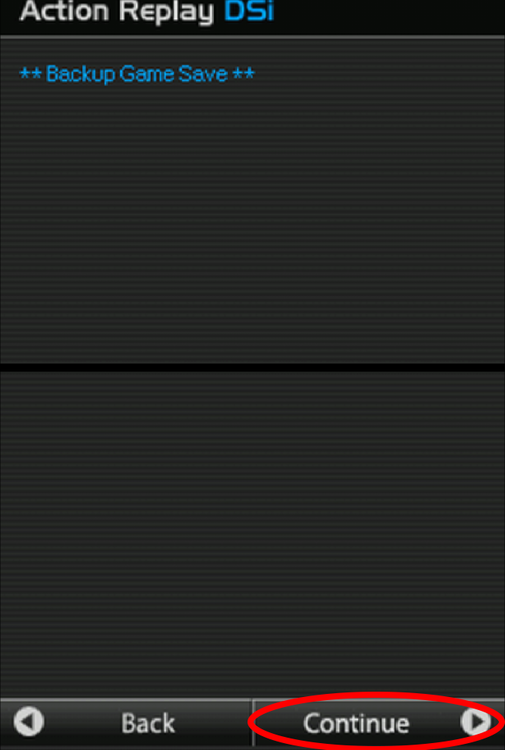
3. Make sure that "**Backup Game Save**" is Selected. Then click "Continue" on your touch screen (Note: You may also need to click the start button for the Action Replay to continue.)
4. Type a name for the folder your game's save will be exported to. Then click "Continue" on your touch screen (Note: You may also need to click the start button for the Action Replay to continue.)
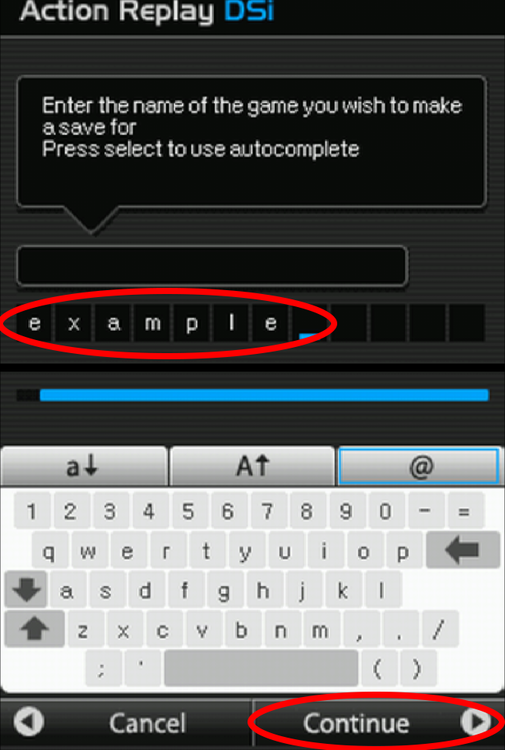
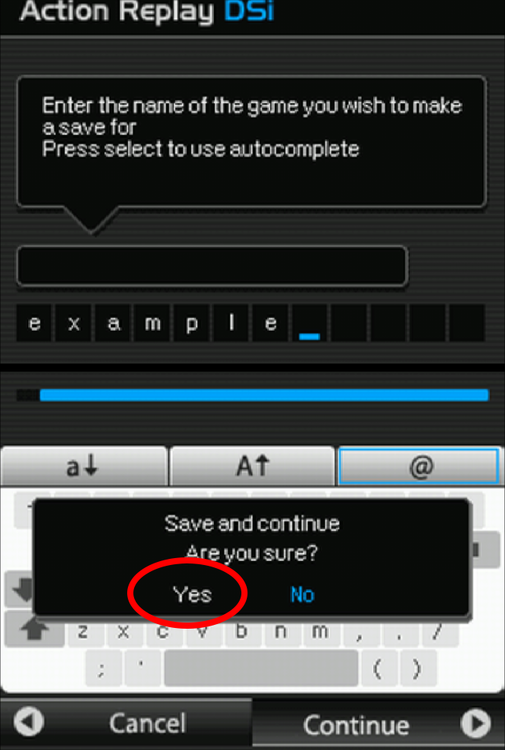
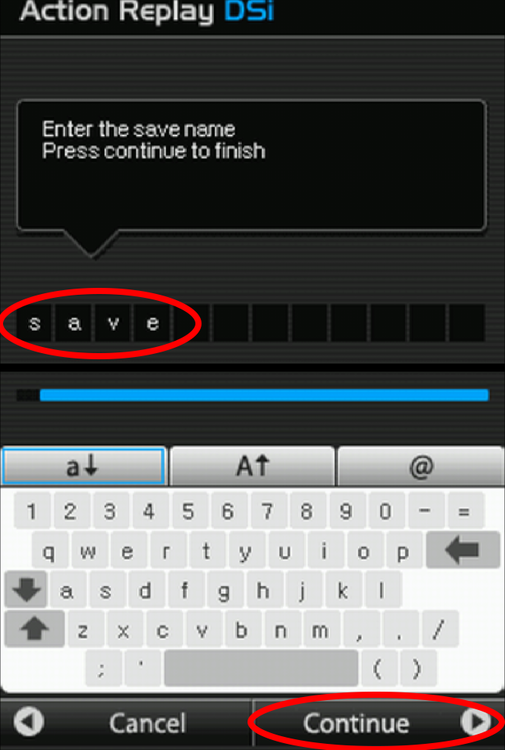
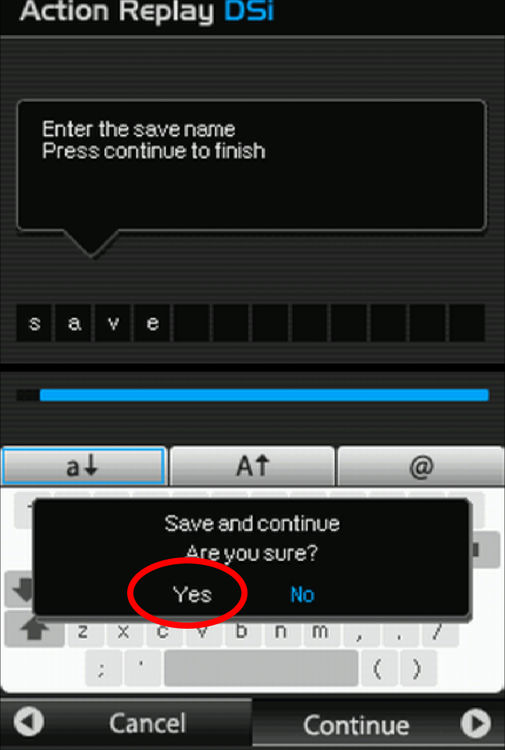
5. Type a name for your game's save. Then click "Continue" on your touch screen (Note: You may also need to click the start button for the Action Replay to continue.)
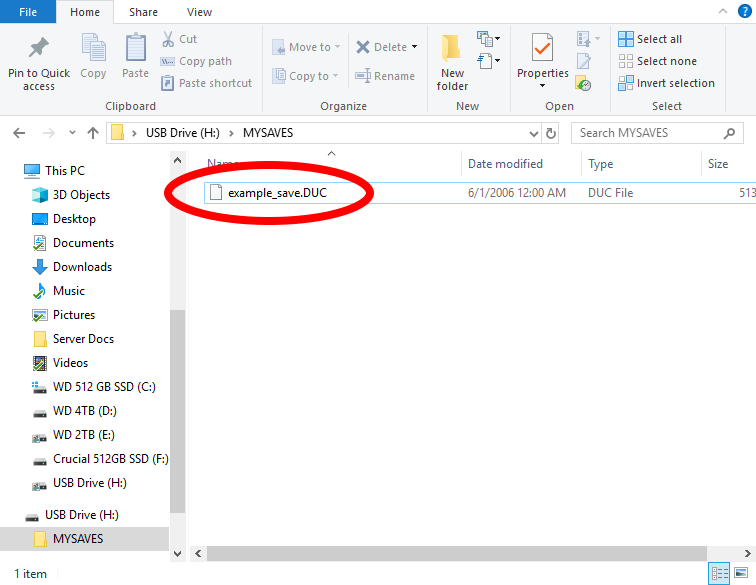
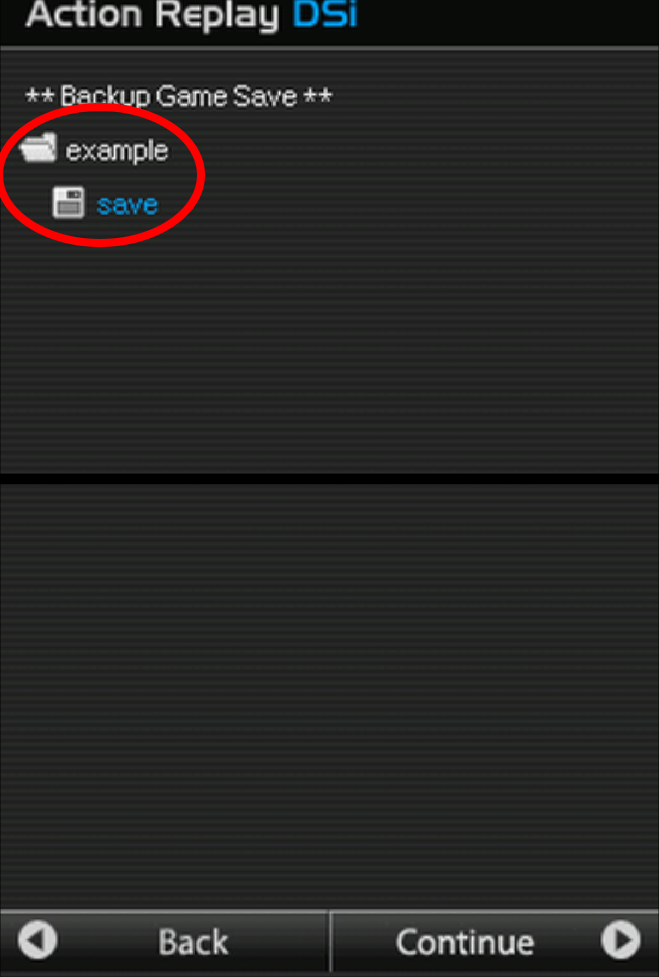
6. After the Action Replay exports your save, verify that the save is in your Action Replay as shown below.

7. Turn your DS off and put the Micro-SD Card from your Action Replay into your computer. Navigate to "MYSAVES" and find your save you just exported.
8. MAKE A BACKUP OF THIS FILE BEFORE USING OR EDITING IT WITH ANY SAVE EDITORS.
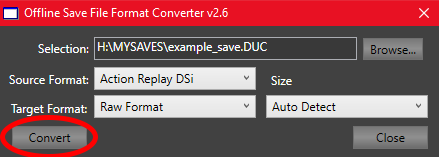
9. While this type of save file (.DUC) is supported by PKHeX, it is highly recommended to convert your save to the standard (.SAV) file type to maximize compatibility with emulators and reduce possible errors you may encounter. You can convert your save file using the save converter tool found here.
10. Once you have either converted your save file or you are using the Action Replay save type, you should see the save in the folder you exported it to.
11. MAKE A BACKUP OF THIS FILE BEFORE USING OR EDITING IT WITH ANY SAVE EDITORS.

-
When I open the save file you sent me, everything shows up fine. Maybe its the version of PKHex you are using.
Here is the latest build of PKHex with your save you sent me
-
The save file you sent seems to be fine. I dont see anything coming up corrupted unless you had pokemon in the pc boxes
-
can you upload the corrupted file please
-
This is a very outdated method involving a device called an NDS Adaptor Plus. This method should only be used if you do not have access to a hacked 3DS, as it is not as reliable, and only works on Windows XP and Windows 7 (with some tweaks to your operating system NOT RECOMENDED). There are other alternatives to this device (R4i Save Dongle) but all of the alternatives suffer from some of the same problems or even worse. I recommend that if you really want to use the NDS adaptor Plus instead of a hacked 3DS, you either use a really old (Windows XP) computer, or use a windows XP virtual machine with USB pass-through (what I will be using in this tutorial). Please don't ask how to set up a virtual machine. There are plenty of tutorials on the internet.
1. Download the latest drivers and program for the NDS Adapter Plus from here.
2. Open device manager and find the device with the Yellow "!" as shown below (Note: you may have multiple items without proper drivers, so look for something similar to what is shown in the picture). Next, right click on the device and click "update driver".

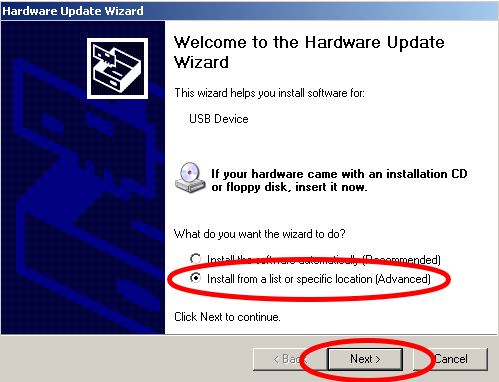
3. Click on "install from a list or specific location". Then click next.
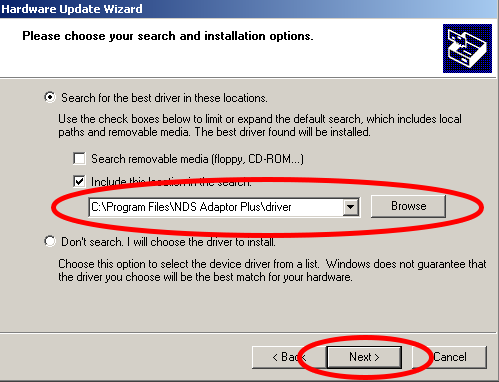
4. Point the box shown below to where the "driver" folder that came in the NDS Adaptor Plus Zip is. (Note: you will need to keep these driver files in the same spot or the device may stop working. I recommend moving the contents of the zip you downloaded to the location shown in the picture. You can then make a shortcut to the program on your desktop and not have to touch this folder again.)
5. Click "Continue Anyway".
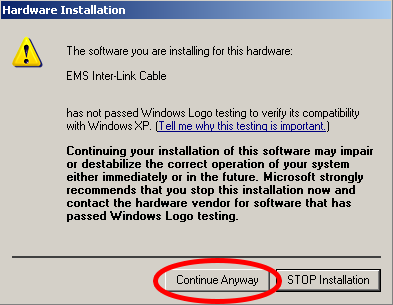
6. Click "Finish" (Note: Please make sure that the screen says "The wizard has finished installing the software for: EMS Inter-Link Cable" as shown in the picture below.)

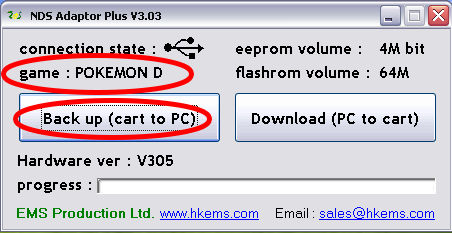
7. Launch the NDS Adaptor Plus software and if you installed the drivers correctly, you should see that your game is detected in the program. If your game is correctly recognized then click "Back up (cart to PC)". To restore your save after editing it, click "Download (PC to cart)" instead.
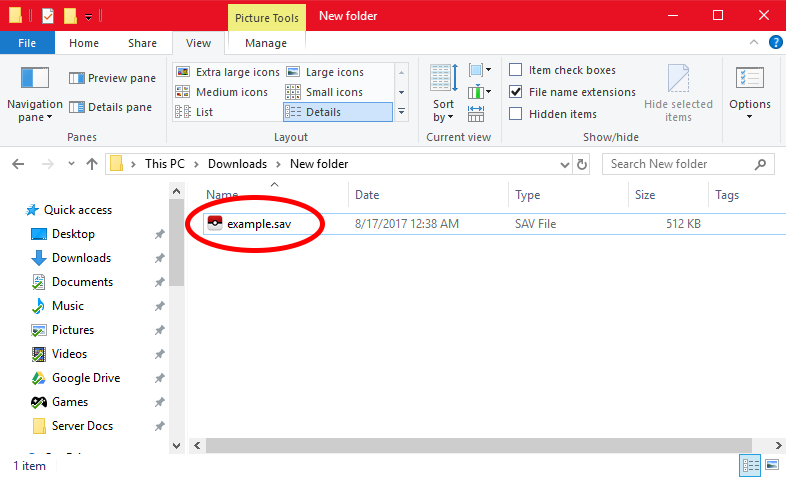
8. Point where you would like your save to go, name your save whatever you would like, If your save was successfully exported, you should see it in the folder you exported it to.
9. MAKE A BACKUP OF THIS FILE BEFORE USING OR EDITING IT WITH ANY SAVE EDITORS.
-
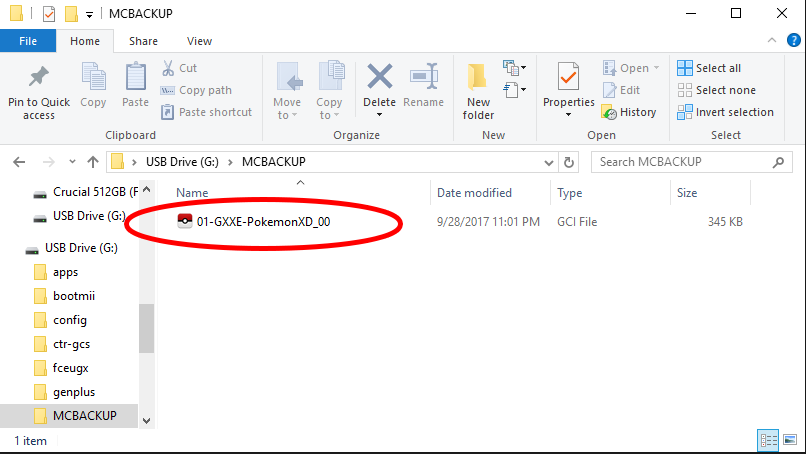
This is the exact same method as the previous guide, but instead of backup up the entire memory card, we will be backing up a single save file (gci) that you can inject back into your memory card later instead of overwriting the entire memory card.
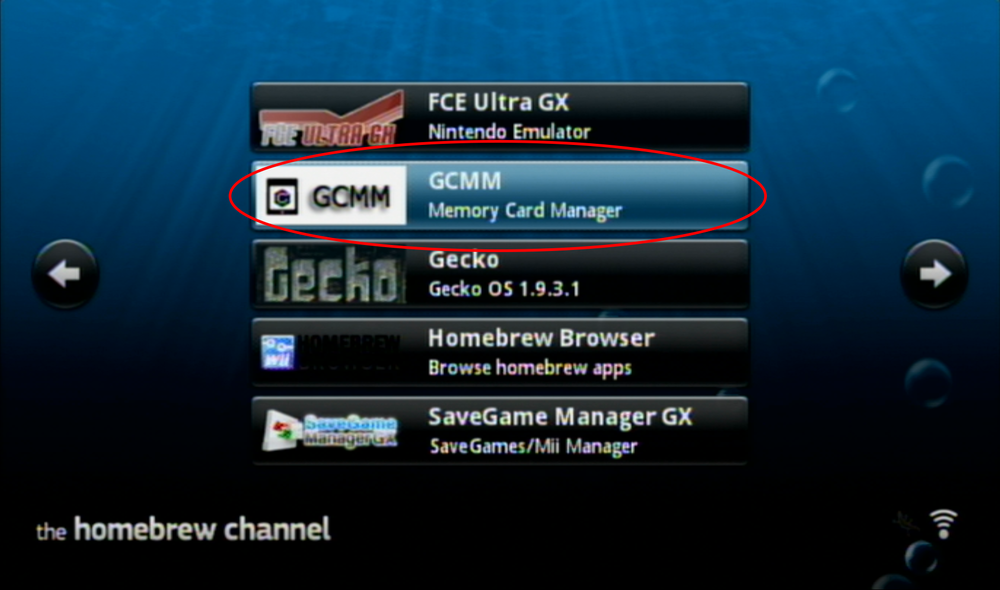
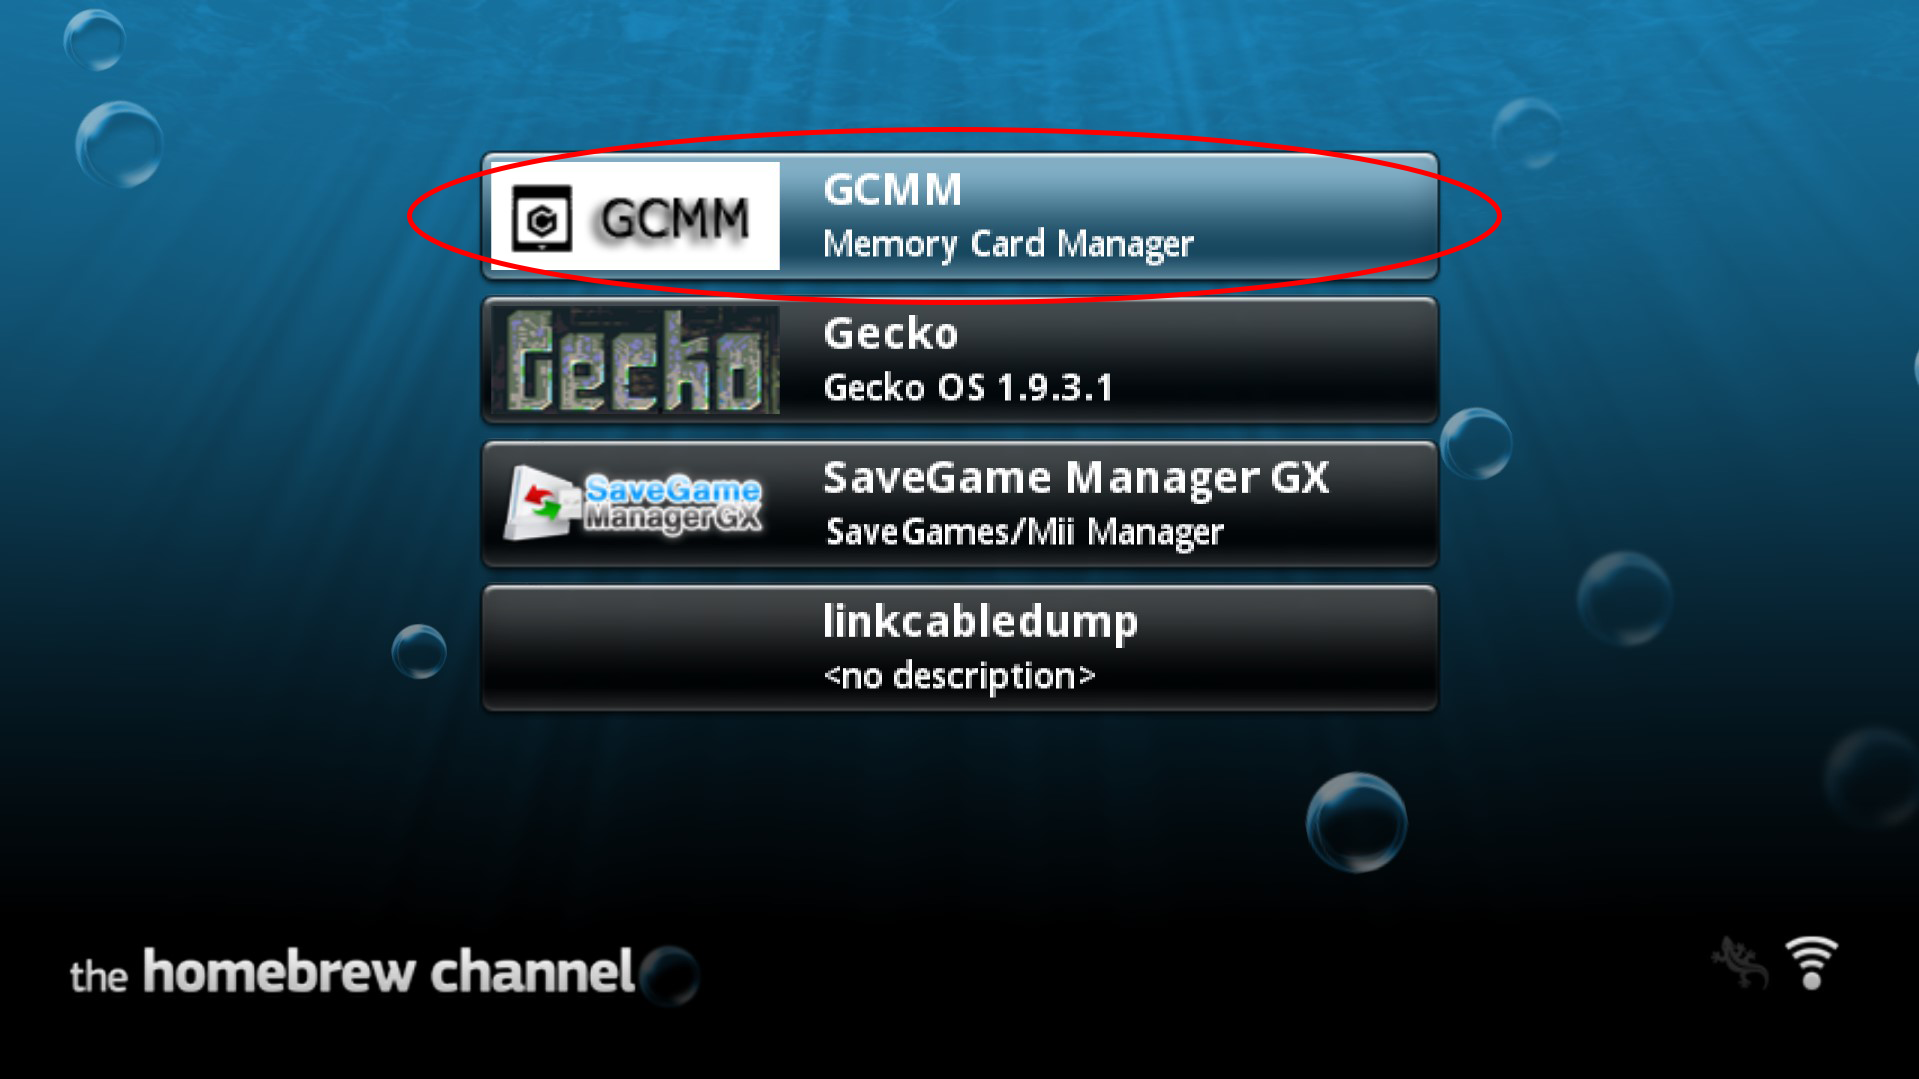
1. Open the homebrew channel on your Wii and launch GCMM.

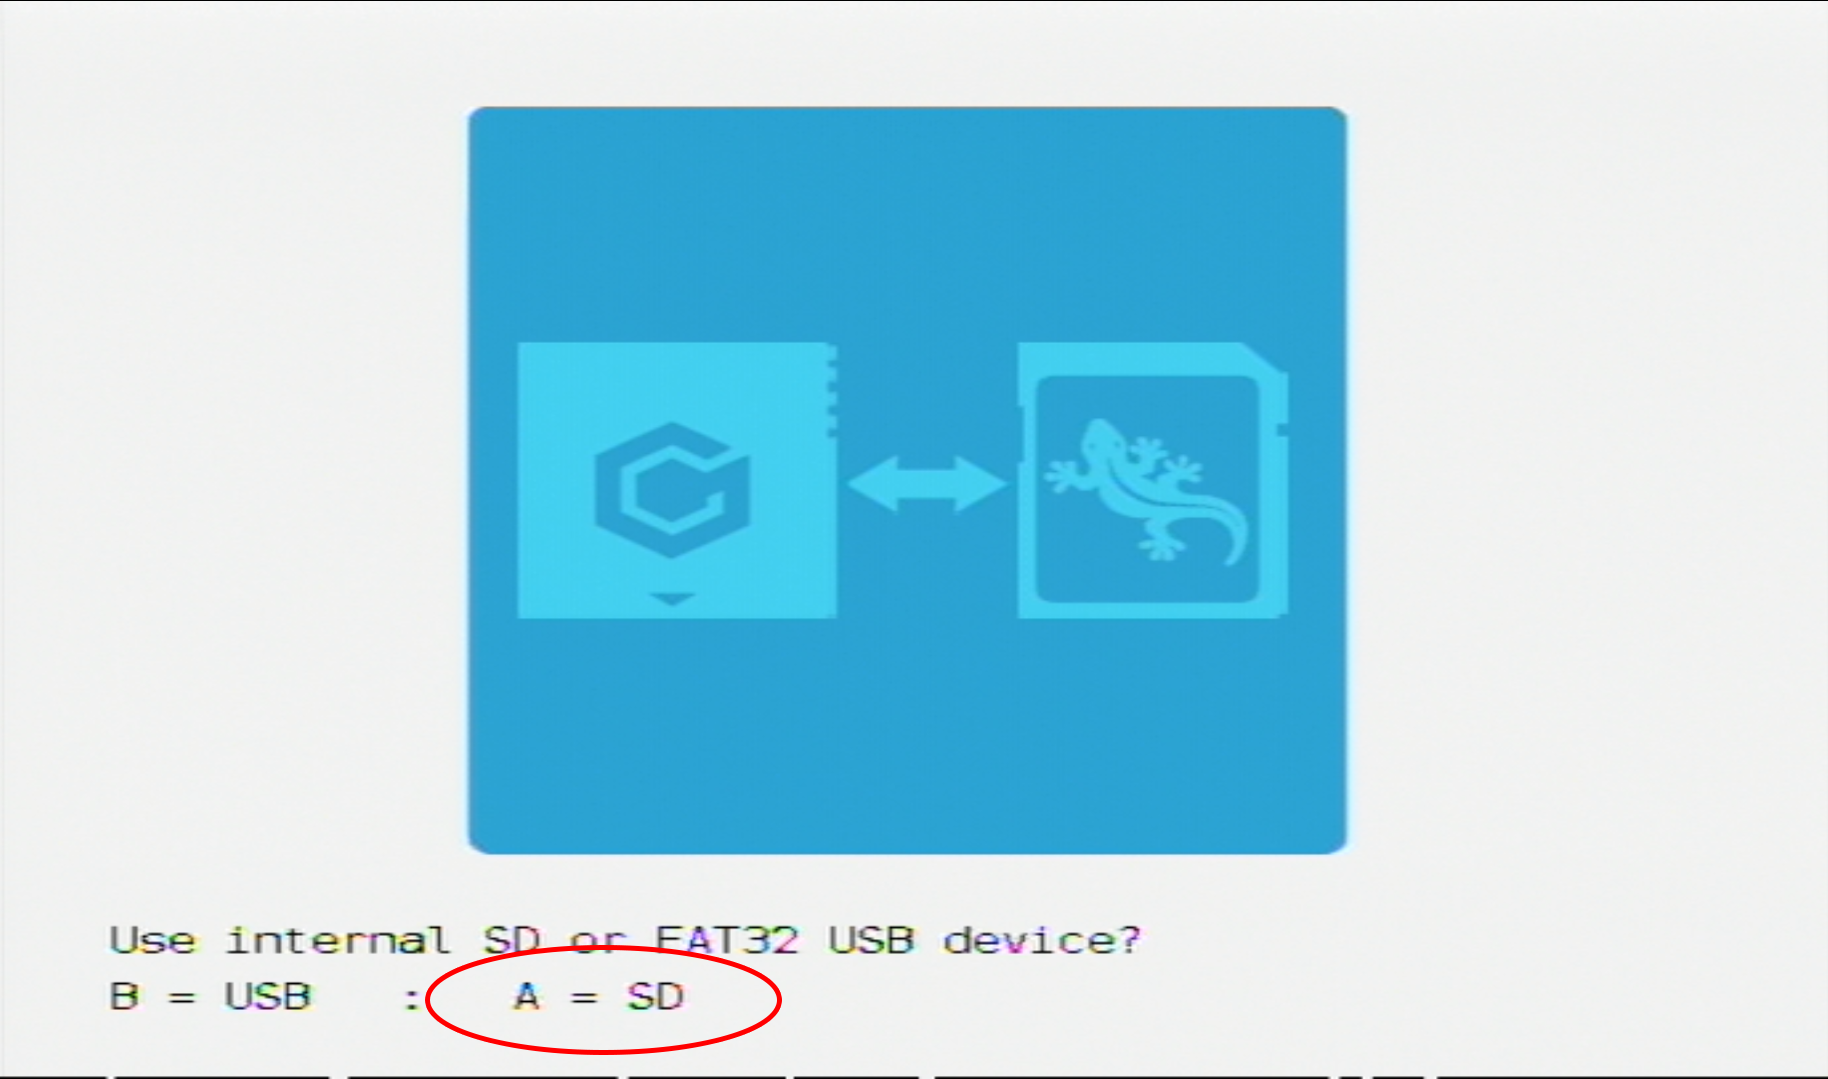
2. Click "A" to use your SD card as the destination for the save backup.

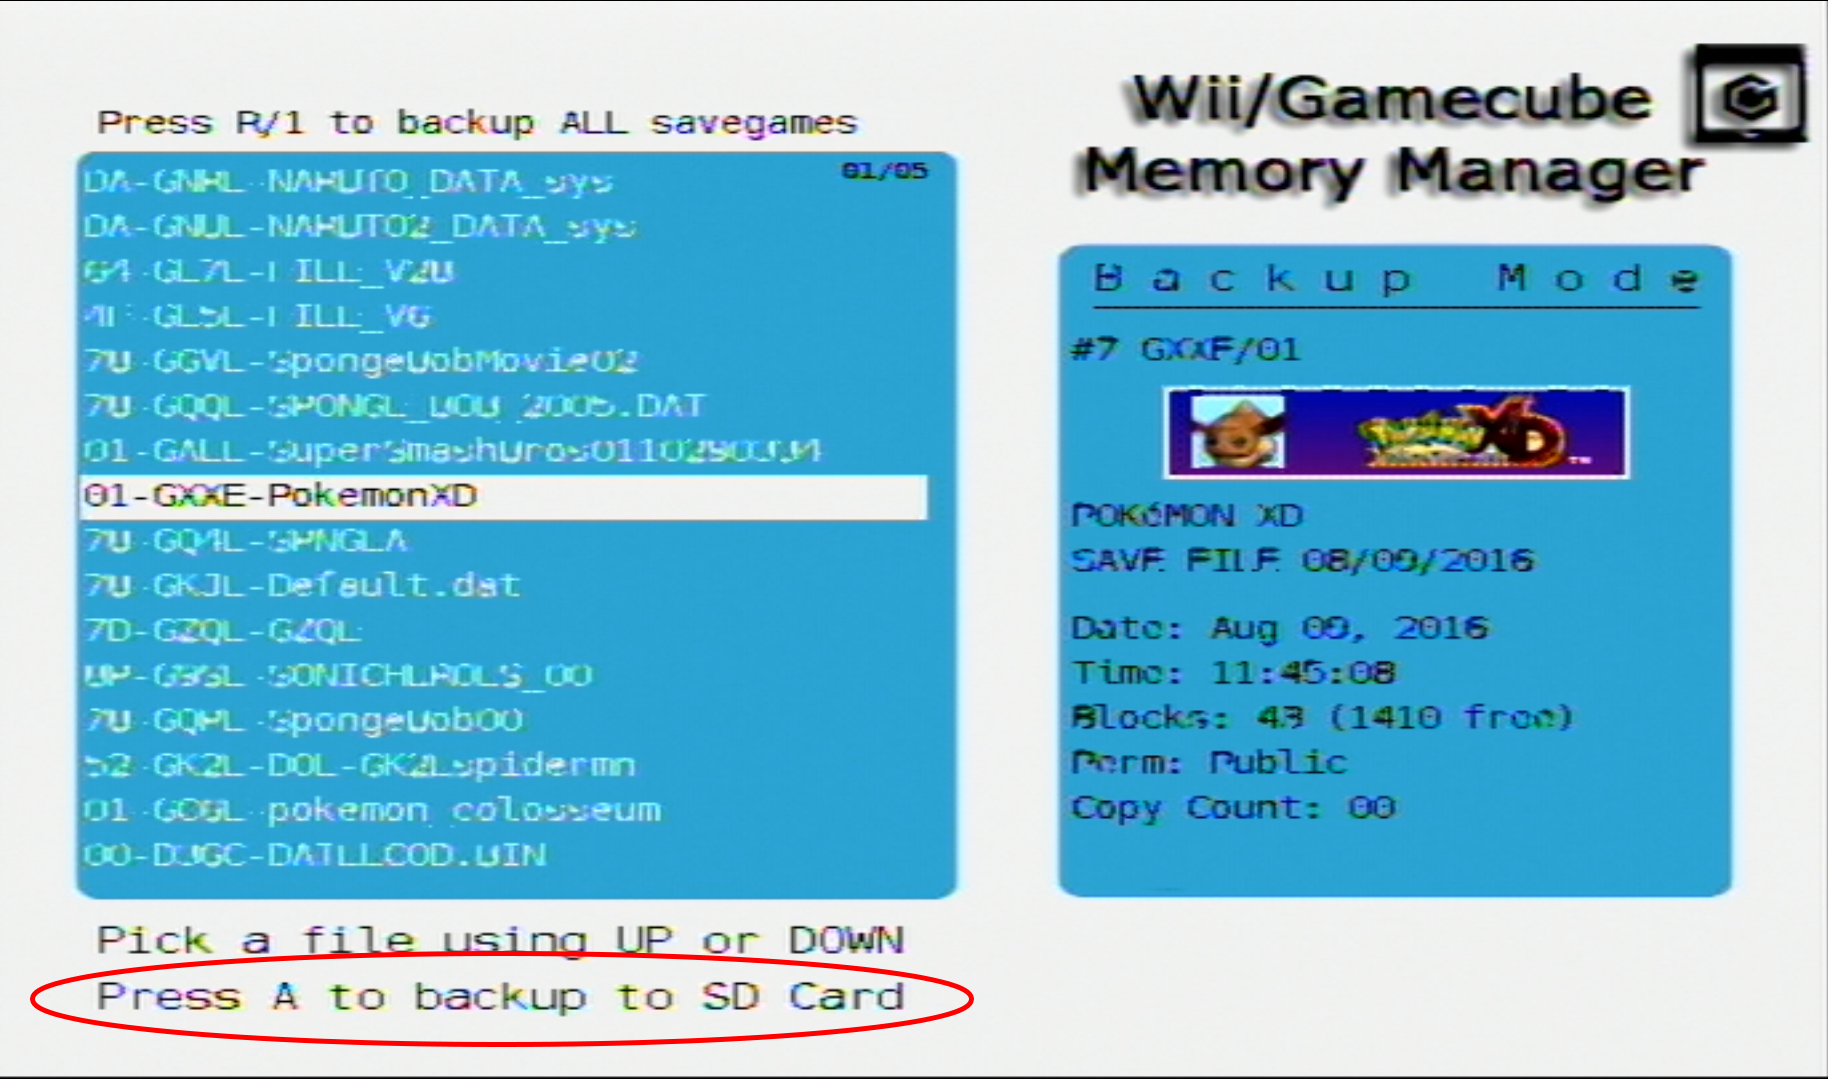
3. Click "-" to Enter "Backup Mode". To restore your save after editing it, you will need to press "+".

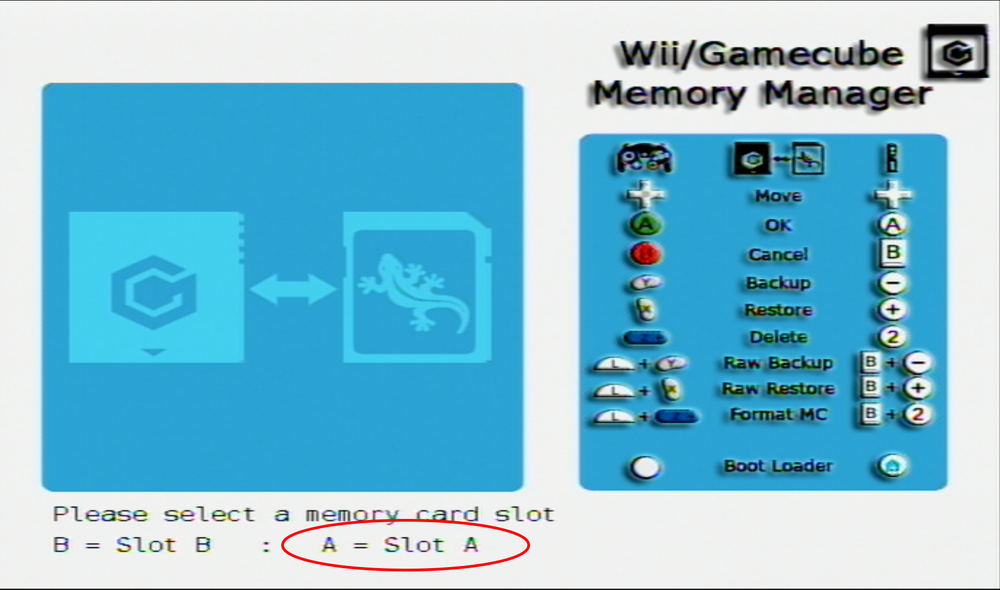
4. Choose what memory card you would like to backup and click the corresponding button. In my case, my memory card is in Slot A so I will click "A".
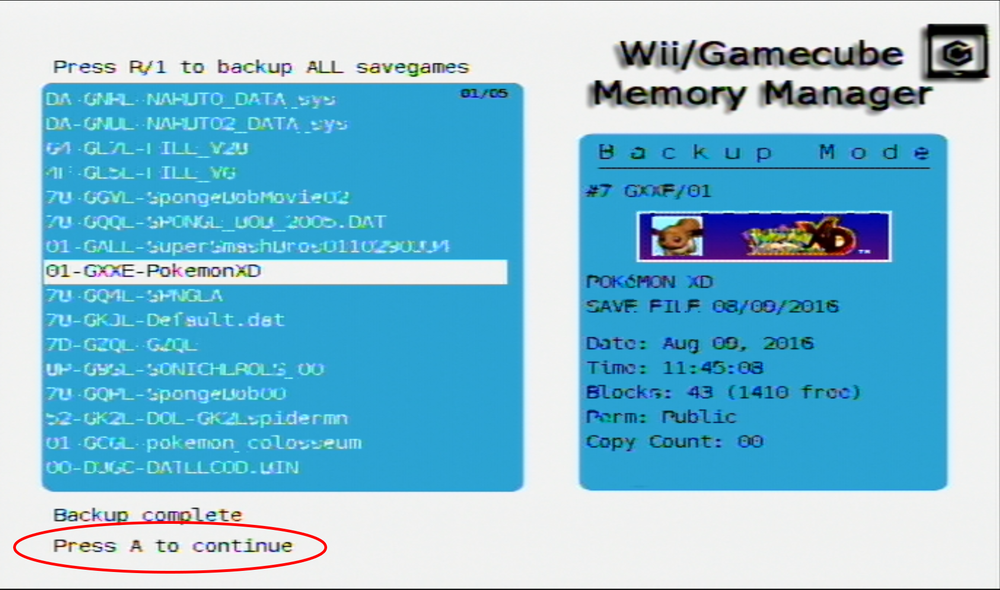
5. Find the game you want to backup. Then click "A".

6. Wait for your save to be backed up to your SD card. Then click "A".
7. Eject your SD card from your Wii and insert it into your computer. Then navigate to "MCBACKUP". Inside this folder will be your save file.
8. MAKE A BACKUP OF THIS FILE BEFORE USING OR EDITING IT WITH ANY SAVE EDITORS.
-
1
-
 1
1
-
-
If you are trying to back up your save for Gen 3 Gamecube games there are a few things you will need. The main device I will be using in this tutorial is a hacked Wii with homebrew installed. Note: with this method you will be able to make an exact clone of your gamecube memory card which is extremely useful for emulators, and makes transferring to a new memory card a breeze.
1. Open the homebrew channel on your Wii and launch GCMM.

2. Click "A" to use your SD card as the destination for the save backup.

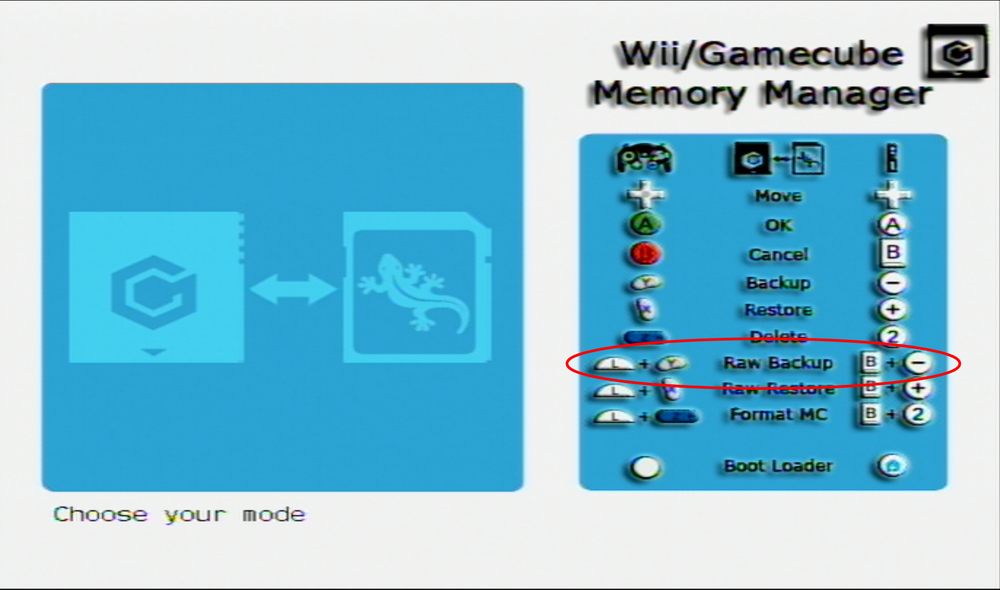
3. Click "B" and "-" at the same time to enter "Raw Backup Mode". To restore your memory card file after editing it you will need to press "B" and "+" at the same time.
4. Choose what memory card you would like to backup and click the corresponding button. In my case, my memory card is in Slot A so I will click "A".

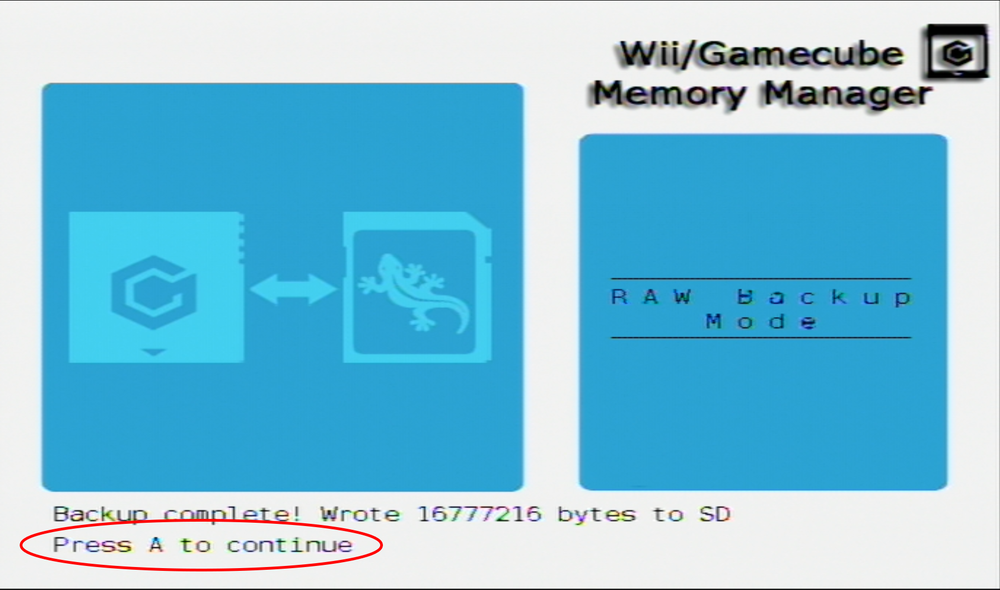
5. Wait for your memory card to be backed up to your SD card. Then click "A".
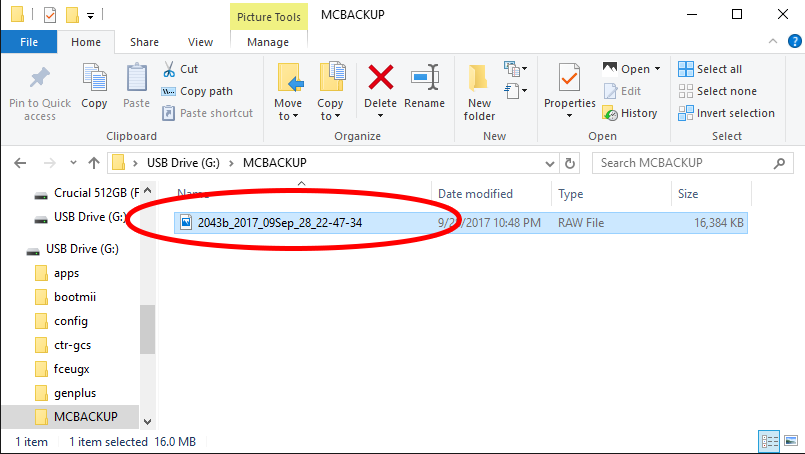
6. Eject your SD card from your Wii and insert it into your computer. Then navigate to "MCBACKUP". Inside this folder will be your memory card file.
7. MAKE A BACKUP OF THIS FILE BEFORE USING OR EDITING IT WITH ANY SAVE EDITORS.
-
These tutorials will guide you through backing up and restoring saves for your Gamecube games. These saves can be used with emulators, save editors, and as general save backups.
Using a Console
Requirements
- A Wii with Homebrew installed
- The latest release of GCMM. A mirror of version 1.4f can be found here.
Instructions
You have two choices regarding how you want to back up your save data. The first method will make an exact clone of your entire memory card, which is extremely useful for emulators and makes it far easier to transfer the data to a new memory card:
The second way will only backup a particular save:
Using Emulators
If you're playing on an emulator instead of a console, getting your save data is far easier and requires no hardware except for a compatible computer. Read here to learn how to get your saves from certain emulators:
-
@Kaphotics was showing the misc edits for Emerald not Leaf green. The best way to inject all of the events as other people have said is
If your antivirus is deleting it (which mine was too) then just try to disable the anti virus, download the file, put it in a folder, and find out how to white list the folder so that the anti virus does not delete the program. This program is definitely the best tool hands down. I was able to inject all of the events "officially" and its much more satisfying than just editing it in triggers pc.
-
1
-
-
i used the DS GBA save converting tool. you can find it on the downloads section
-
 1
1
-
-
-
 1
1
-


Managing NDS Saves: Using Emulators
in Saves - Guides and Other Resources
Posted
This tutorial will show you how and where to access your save files while using a DS emulator. This guide will cover 3 of the most popular emulators for running DS games: DeSmuME and No$GBA (Computer), and DraStic (Android). This guide assumes that you have already set up and played one of these emulators at least once. Scroll down to your emulator of choice.
This is not a setup guide. This guide is meant to show where to find or inject your save files.
DeSmuME:
1. Navigate to the folder that DeSmuME is located in. Then open the folder called "Saves"
Edit as of Aug-2019: Depending on which version of DeSmuME you may have, you may have to navigate to a folder called "Battery" instead.
Go to the one that your version supports.
2. Inside the "Saves"/"Battery" folder should be your save files.
3. MAKE A BACKUP OF THIS FILE BEFORE USING OR EDITING IT WITH ANY SAVE EDITORS.
4. While this type of save file (.DSV) is supported by PKHeX, it is highly recommended to convert your save to the standard (.SAV) file type to maximize compatibility and reduce possible errors you may encounter. You can convert your save file using the save converter tool found here.
NO$GBA:
1. Navigate to the folder that NO$GBA is located in. Then open the folder called "BATTERY"
2. Inside the "BATTERY" folder should be your save files.
3. MAKE A BACKUP OF THIS FILE BEFORE USING OR EDITING IT WITH ANY SAVE EDITORS
4. Although the save type given by NO$GBA appears to be the standard (.SAV) file type, all saves created and used by NO$GBA will need to be converted to the proper (.SAV) file type to maximize compatibility with emulators, programs such as PKHeX, and reduce possible errors you may encounter. You can convert your save file using the save converter tool found here.
DraStic:
1. Either plug your Android device into your computer or open a file browser on your Android device
2. Navigate to the "DraStic" folder on your Android device (normally located on the device memory not the SD-Card)
3. Open the "DraStic" folder. Then open the "backup" folder
4. Inside the "backup" folder should be your save files.
5. MAKE A BACKUP OF THIS FILE BEFORE USING OR EDITING IT WITH ANY SAVE EDITORS.
4. While this type of save file (.DSV) is supported by PKHeX, it is highly recommended to convert your save to the standard (.SAV) file type to maximize compatibility and reduce possible errors you may encounter. You can convert your save file using the save converter tool found here.
View full tutorial