


NinFanBoyFTW
-
Posts
202 -
Joined
-
Last visited
-
Days Won
4
Content Type
Profiles
Pokédex
Portal
Technical Documentation
Pages
Tutorials
Forums
Events
Downloads
Gallery
Blogs
Posts posted by NinFanBoyFTW
-
-
If your only using homebrew and not a fully boot9strap hacked 3ds then there isnt anything to worry about. The banwaves for sun and moon were mostly from using illegal pokemon, people trying to play the game online early or because in general, their 3DS was fully hacked and they either had many hack programs installed on their 3DS or had the games from freeshop or some other non legitimate method. Also, obviously JKSM will only work for gen 6-7 and you said you wanted to backup all of your saves from gen 3 and up so here is a guide I recently made if you need any help.
-
-
can you link the save file. Maybe I can convert it for you if that is the problem
-
14 minutes ago, NekoSabrina said:
Okay, how would I use RNGReporter to fix the PID on that Genesect? A lot of the instructions I've seen for using it are focused on Gens 3 and 4 rather than Gen 5 (not to mention the fact it's an event Pokémon, which probably adds an extra factor to it). Also, again, strange that these Pokémon (among some others) were listed as just fine until the most recent updates (and PIDs don't cover as much in Gen 5 as they do in 3 and 4).
You would have to ask someone else or find a guide on it. I've never been good with RNG reporter. Also I dont know how old your other version of PKHeX was but they changed a bunch of the legality perameters so its much better with legality issues.
edit: I was actually able to fix your genesect by the way lol. I already had the same genesect and the PID worked fine for your genesect so here you go.
-
Here you go. I fixed your Zebstrika. The genesect you would need to use RNGReporter like the person before me said. The way I usually use to make these pokemon legal, is just hit "reroll" a bunch of times until it lands on a legal PID. Also I really wouldnt recomend editing wild pokemon and giving them perfect IVs, its basically impossible in the wild and is a tell-tale sign of hacking. I would recomend if you want to gen pokemon (except for legendaries, and events) to set their info so that they were hatched from an egg. Then it looks like you bred them where it is possible to have perfect IVs
-
1 hour ago, 420 BlazeGaming said:
I just noticed that transferred pokemon are not working properly from gen 2 vc games. Here is a scizor from generation 2 vc, the legality check says it is legal, but when I try and use it online, it says "there is a problem with one or more of your pokemon" even though it says it's legal.
Gen 2 VC transfer has not officially come out yet. Dont try to use those pokes online or you could get into trouble. They will probably be releasing an update to the poketransporter in a few months. Then you can use those online.
-
 1
1
-
-
1 hour ago, Selliato said:
Are you sure for the server-side verification ?
I started a new game last week, i backuped my save just before entering the PIKACHU20 code ... And i can restore the save without problem to claim a new Pikachu. ( Currently having 3 original and 3 hoenn ).
Maybe a region difference ?1 hour ago, King Impoleon said:If you start a new game, your Sync ID is automatically full of 'Zeros'
I'm pretty sure its because you just started the game and tried to get the event instead of going online at least once. That's probably why
-
8 hours ago, Kaphotics said:
The offsets won't be the same in the two files; the donor has block 0xC as the first block, thus 0x3000 is block 0 and block 1 is at 0x4000.
Copy 0x4298-0x4577 from donor to 0x18298-0x18577, then copy 0x3AF8 to 0x17AF8, then re-save in PKHeX.
I got closer but it still didn't work. This is what I got in PKHeX and I thought it was a good sign but whenever I add an item in game it shows up as a huge number in PKHeX. Also my money pouch is also corrupted so this wouldn't fix that (not a big issue) Like Sabresite said, if its possible to add the feature to PKHeX that would be awesome. I know a bunch of people who experimented with action replay way before PKHeX was out and messed up their bags too who would love to use that. If not that's fine. The bag is functional and I guess its mainly ascetic but I don't know if it could lead to worse problems since the bag is literally corrupted.

edit: also if you were considering it, here is a brand new save file as a donor if that helps. Thanks
-
1 hour ago, Kaphotics said:
PKHeX reads the security key from the 0th save chunk for FRLG at the following offset:
case GameVersion.FRLG: return BitConverter.ToUInt32(Data, BlockOfs[0] + 0xAF8);
For inventory items, PKHeX reads them as follows from BLOCK 1:
OFS_PCItem = BlockOfs[1] + 0x0298;
OFS_PouchHeldItem = BlockOfs[1] + 0x0310;
OFS_PouchKeyItem = BlockOfs[1] + 0x03B8;
OFS_PouchBalls = BlockOfs[1] + 0x0430;
OFS_PouchTMHM = BlockOfs[1] + 0x0464;
OFS_PouchBerry = BlockOfs[1] + 0x054C;
You can probably copy a donor save file from block1 [0x298-0x577] into your own block 1, and then re-save to fix checksums. Copy the Security Key too.
Be sure to grab from block 0, and write to block 0. Each block is 0x1000 bytes, and the block number is at 0x*FF4 (being 2 bytes). In the OP save file, block 6 is the first block in the binary. Block 0 is at 0x17000. Block 1 is at 0x18000.
Would you be able to take a look at my save for me. I cant tell im doing something wrong or if this save is pretty corrupted, but almost nothing lines up between my 2 saves at the exact same offsets (leaf green donor, corrupted save). Thanks.
-
2 minutes ago, wejhvabewjty said:
Does trying to store them in the PC and then deleting them from there work? It may do.
No it didn't work. I think that the item pouch (and I guess the money pouch) is literally corrupted. I probably have to manually fix it in a hex editor. But I dont know what to fix
-
Just now, HaxAras said:
When I opened it in Triggers PC, it had an eevee in the party.
Oh I didnt see that. Is there a way to export it from triggers pc as the normal save size
-
Just now, HaxAras said:
It works in triggers pc just fine.
Well im not sure exactly how he got this save file. I couldn't even use it in dolphin. Also it sounds like this was his main save file (with pokemon in it) and there arent any pokemon when I open it up in TriggersPC so I dont know.
-
Yeah. This was the closest I got to fixing it. https://www.gamefaqs.com/boards/918916-pokemon-leafgreen-version/65509374 There isnt any good documentation on it. I know it probably needs a certain hex edit or action replay code
-
So I just was able to delete all of the items but whenever I edit anything in PKHeX it comes back as the corrupted bag. Also apparently my money is corrupted too. it shows up as
?56689
-
I think I did but it didn't work, or it does that thing where it just adds more items to your pouch. Also that would help to fix stuff like the TM pouch since you cant toss TMs. Ill try again now and see about the rest of the items.
-
Hi. I wanted to know if someone would be able to help me and make better documentation here on how to fix an item pouch for Fire Red and Leaf Green after messing around with action replay. More specifically, I believe this was 8+ years ago, and I was trying out an action replay with my leaf green save. I didn't have any anti DMA codes or any of the other protection you are supposed to have so the pouch wont get corrupted.

I thought I could fix this by deleting all of the items from PKHeX and then adding in whatever I needed from PKHeX, but the problem keeps happening. Also just as a note, all areas of the pouch have been corrupted like this (TM/HM, Items, Pokeballs). all of the items work fine but it is an eyesore and I didnt want to leave it like this. I also think it would be good to get proper documentation on how to fix this. I have only been able to find half decent guides that dont really explain how to fix this. Ill leave my save too so anyone can look at it:Pokemon Leaf Green.sav
Thanks in advance.
-
Yeah I don't know. I'm pretty sure that the save file you have is an encrypted save or at least not the right format. I'm making a guide on how to properly dump your GC save but the main method everyone uses is a Wii with homebrew so you would need that. Here is the link. I should be adding the GC part later, so maybe try this out. https://projectpokemon.org/home/forums/topic/41730-work-in-progress-how-to-back-up-your-cartridge-save-file-gen-3-for-use-with-pkhex-or-emulators-tutorial/
-
JKSM is a 3DS homebrew application that can backup and restore save files for 3DS cartridges, and 3DS eShop titles (including GB and GBC virtual console). This tutorial will walk you through its installation and usage.
Prerequisites
In order to use JKSM, you will first need access to CFW or Homebrew. A comprehensive guide on how to set up CFW can be found here. If you do not have what you need, you can still use JKSM with homebrew access
Additionally, you will need to possess the patience and ability to read sentences.
Note: Options on screens may look different based on the version of JKSM you're using. I've tried to provide different screenshots, but if it's still slightly different, you're going to have to be flexible and adapt according and choose the most relevant option at that step.
Downloads
The latest version of JKSM can be downloaded from here.
Using CFWCFW is the preferred way to use JKSM. Install the .cia using your favorite installer.
Then, launch the JKSM app.
Using Homebrew
- Download JKSM.zip, and create a 3ds folder to the root of your 3DS's SD Card (if the 3ds folder doesn't already exist).
- Paste the .3dsx file into the 3ds folder
- Open the homebrew menu using your favorite homebrew entrypoint.
The Steps
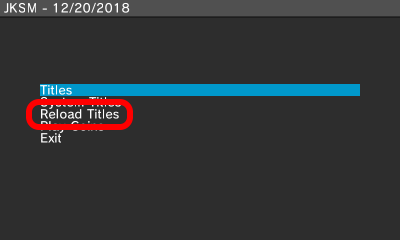
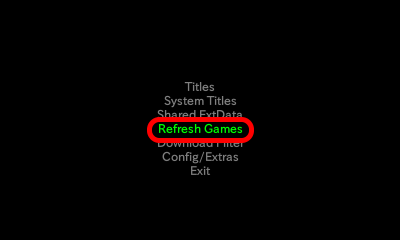
0. You only need to perform this step, if you are trying to dump the save of a newly installed game, or if you have never used JKSM before.
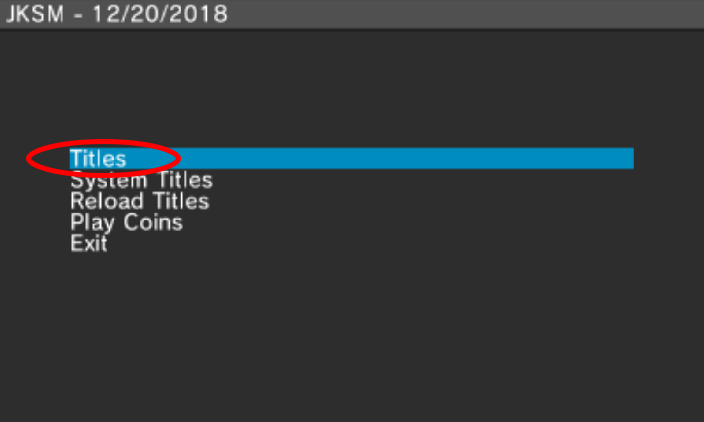
Open JKSM and Select Reload Titles / Refresh Games.
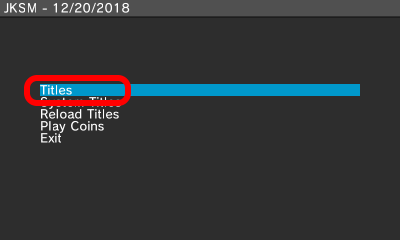
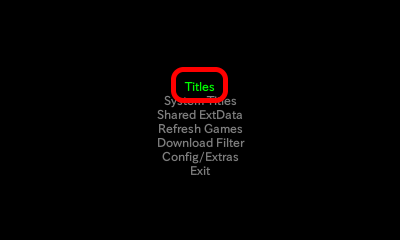
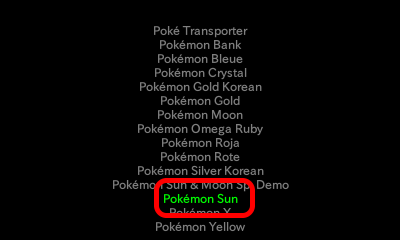
1. Open JKSM on your 3DS and click on Titles.
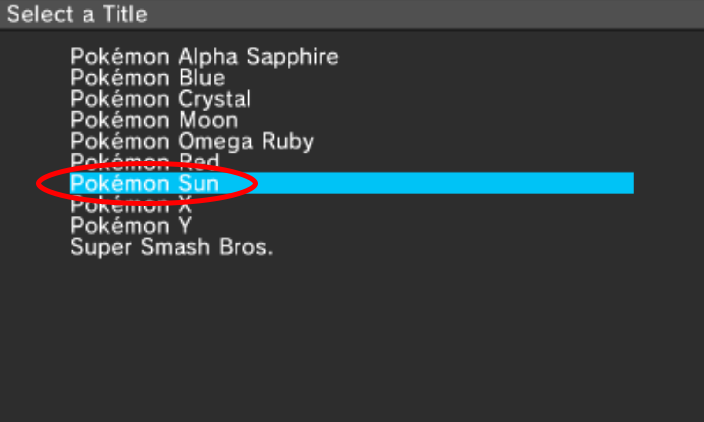
2. Scroll down to and click on your desired game.
Note: You may need to perform Step 0 if you don't see your desired title listed.
In this example, we'll be selecting Pokémon Sun

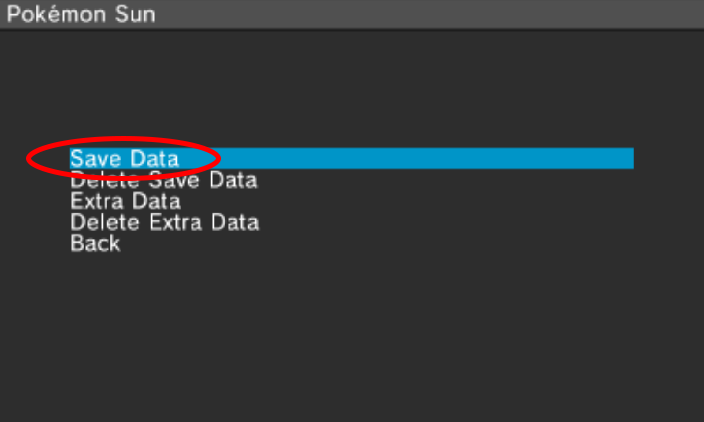
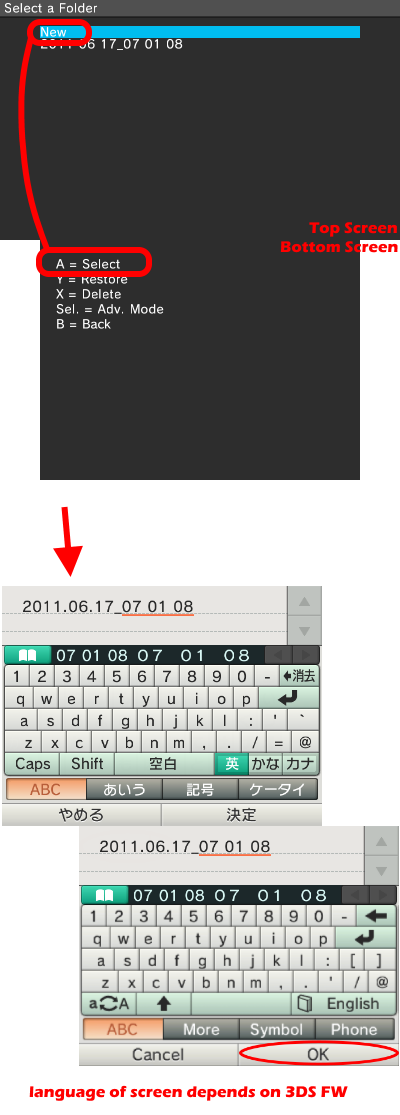
3. Importing/Exporting
FOR EXPORTS:Spoiler
This step slightly differs depending on what JKSM version you're using.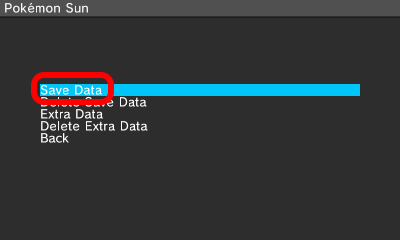

Select Save Data.
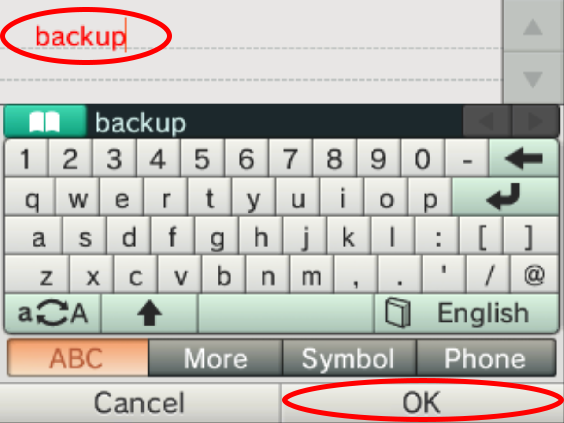
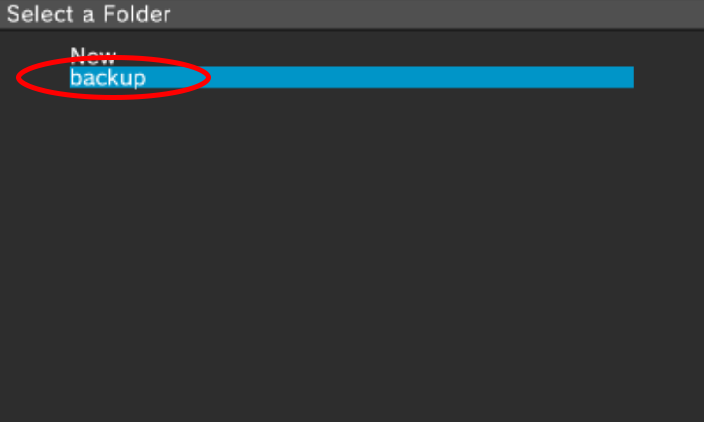
Then, hover over New and press the A button.
It'll lead you to a naming screen.
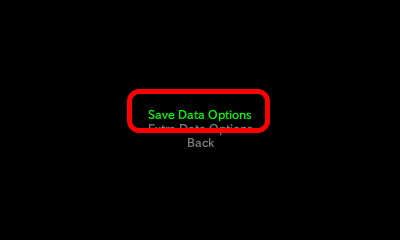
(You're naming the backup)Select Save Data Options,
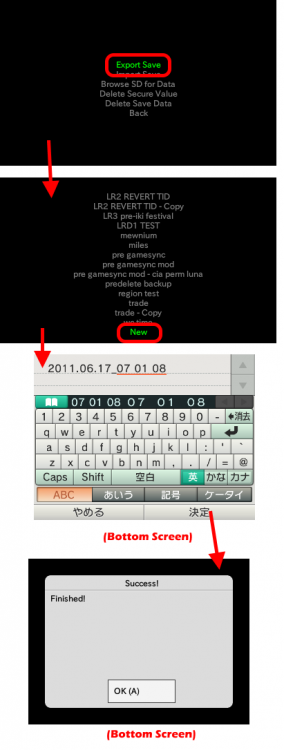
Then select Export Save,
then hover over New and press the A button.
It'll lead you to a naming screen.
(You're naming the backup)FOR IMPORTS:
SpoilerThis step slightly differs depending on what JKSM version you're using.
Before we proceed, do remember:
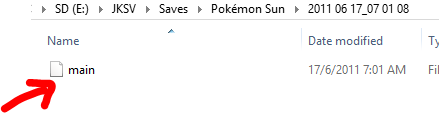
1. Your file in the folder MUST be named main
2. There cannot be other files in the same folder you import from (such as main.bak)
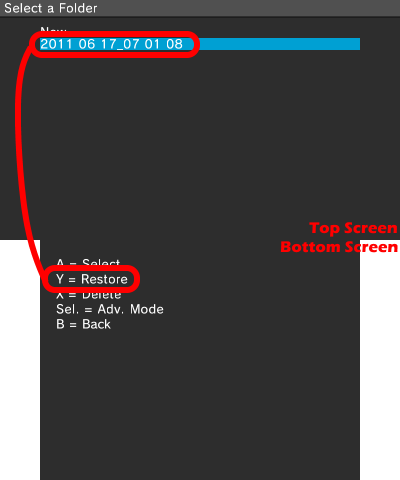
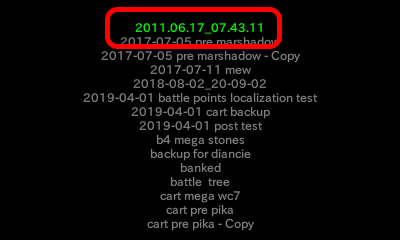
Select Save Data.
Then, hover over any of the named backups,
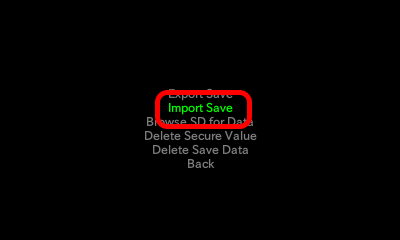
then press the Y button.Select Save Data Options.
Then, select import Save,
then hover over any of the named backups,
then press the A button.
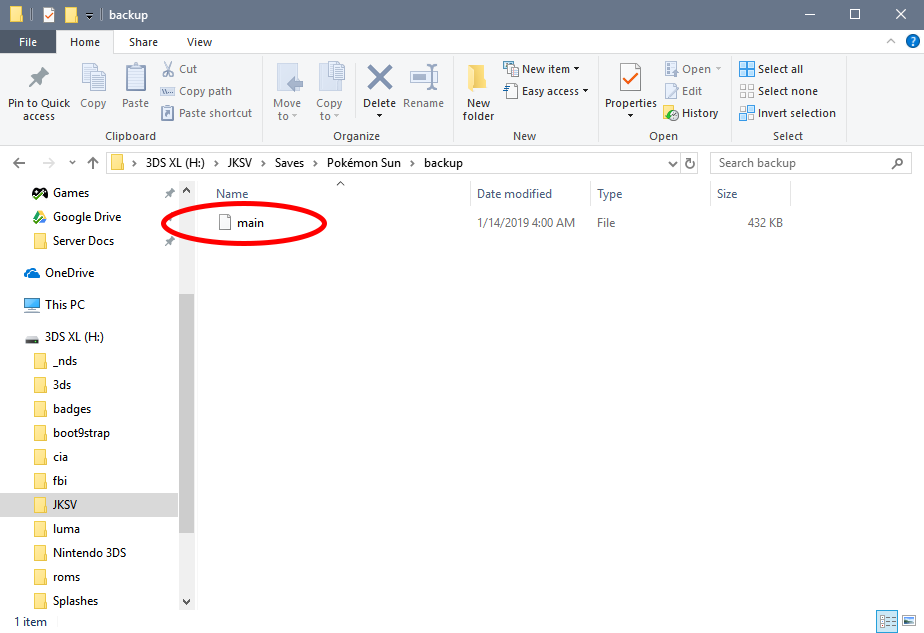
4. Exit JKSM, Power off your 3DS and put your SD card from your 3DS into your computer (if you use an FTP client on 3DS you can alternatively launch it instead). Then navigate to (JKSV/Saves/"your desired game"/"your folder name") Inside should be your save file.[example of the folder names seen in image below. Notice how the folder matches the name given above]
5. MAKE A BACKUP OF THIS FILE BEFORE USING OR EDITING IT WITH ANY SAVE EDITORS.
EXTRA. Things to take note:
1. Your file in the folder MUST be named main
2. There cannot be other files in the same folder you import from (such as main.bak)
3. If you don't see any titles/games, from the main menu of JKSM, select Refresh Titles/Refresh Games/Reload Titles (differs based on JKSM version, but same function)
Old version of JKSM CFW Guide below (ignore this, if you understand the content above)
Spoiler1. After installing JKSM with your favorite CIA installer, open JKSM on your 3DS and click on "Titles".
2. Scroll down to and click on your desired game. You may need to click "Reload Tiles" on the previous Screen if you don't see your desired title listed.
3. Click on "Save Data Options" then click on "Export Save". Click on "Import Save" instead if you are trying to restore your edited save file back to your VC Game.
4. Click "New" and create a new folder to put your save file in.
5. If the backup has completed you will see a new save with the name you chose under your desired game.
6. Exit JKSM, Power off your 3DS and put your SD card from your 3DS into your computer (if you use an FTP client on 3DS you can alternatively launch it instead). Then navigate to (JKSV/Saves/"your desired game"/"your folder name") Inside should be your save file.
7. MAKE A BACKUP OF THIS FILE BEFORE USING OR EDITING IT WITH ANY SAVE EDITORS.
-
If you are trying to back up your cartridge save for Gen 4-5 using TWL Save Tool, there are a few things you will need. The main device I will be using in this tutorial is a hacked 3DS. You must either have CFW or Homebrew. If you use the Homebrew version, you must have either PokéTransporter or Pokémon Dream Radar installed on your 3DS.
1. Install and launch TWL Save Tool from GitHub. Mirrors of v1.2 can be found here (CIA version) or here (homebrew version).
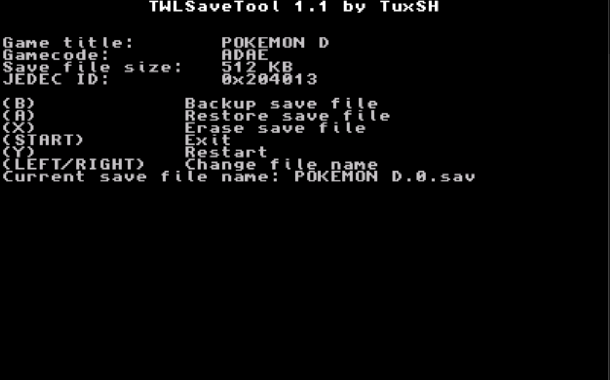
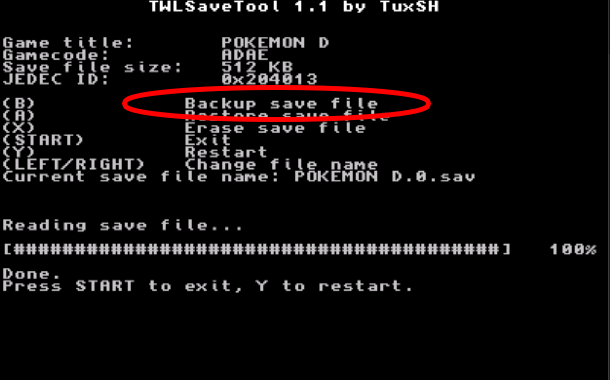
2. Click "B" and wait for the save to be read from the cartridge (Note: if you wish to restore your save after editing in PKHeX, click "A" instead of "B". This will overwrite the save on the cartridge so MAKE SURE YOU HAVE A BACKUP)
3. Turn off your 3DS, eject your SD card and insert it into your computer. If you use an FTP client for the 3DS, you can alternatively launch that instead.
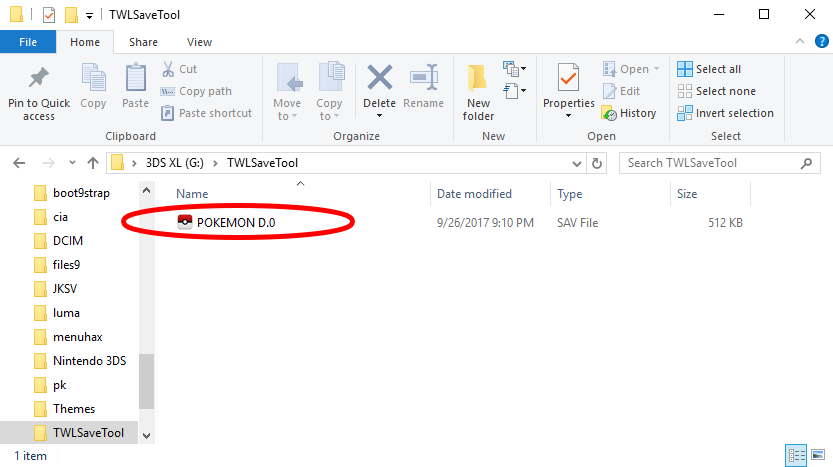
4. Navigate to the "TWLSaveTool" Folder where your newly created save should be.
5. MAKE A BACKUP OF THIS FILE BEFORE USING OR EDITING IT WITH ANY SAVE EDITORS.
-
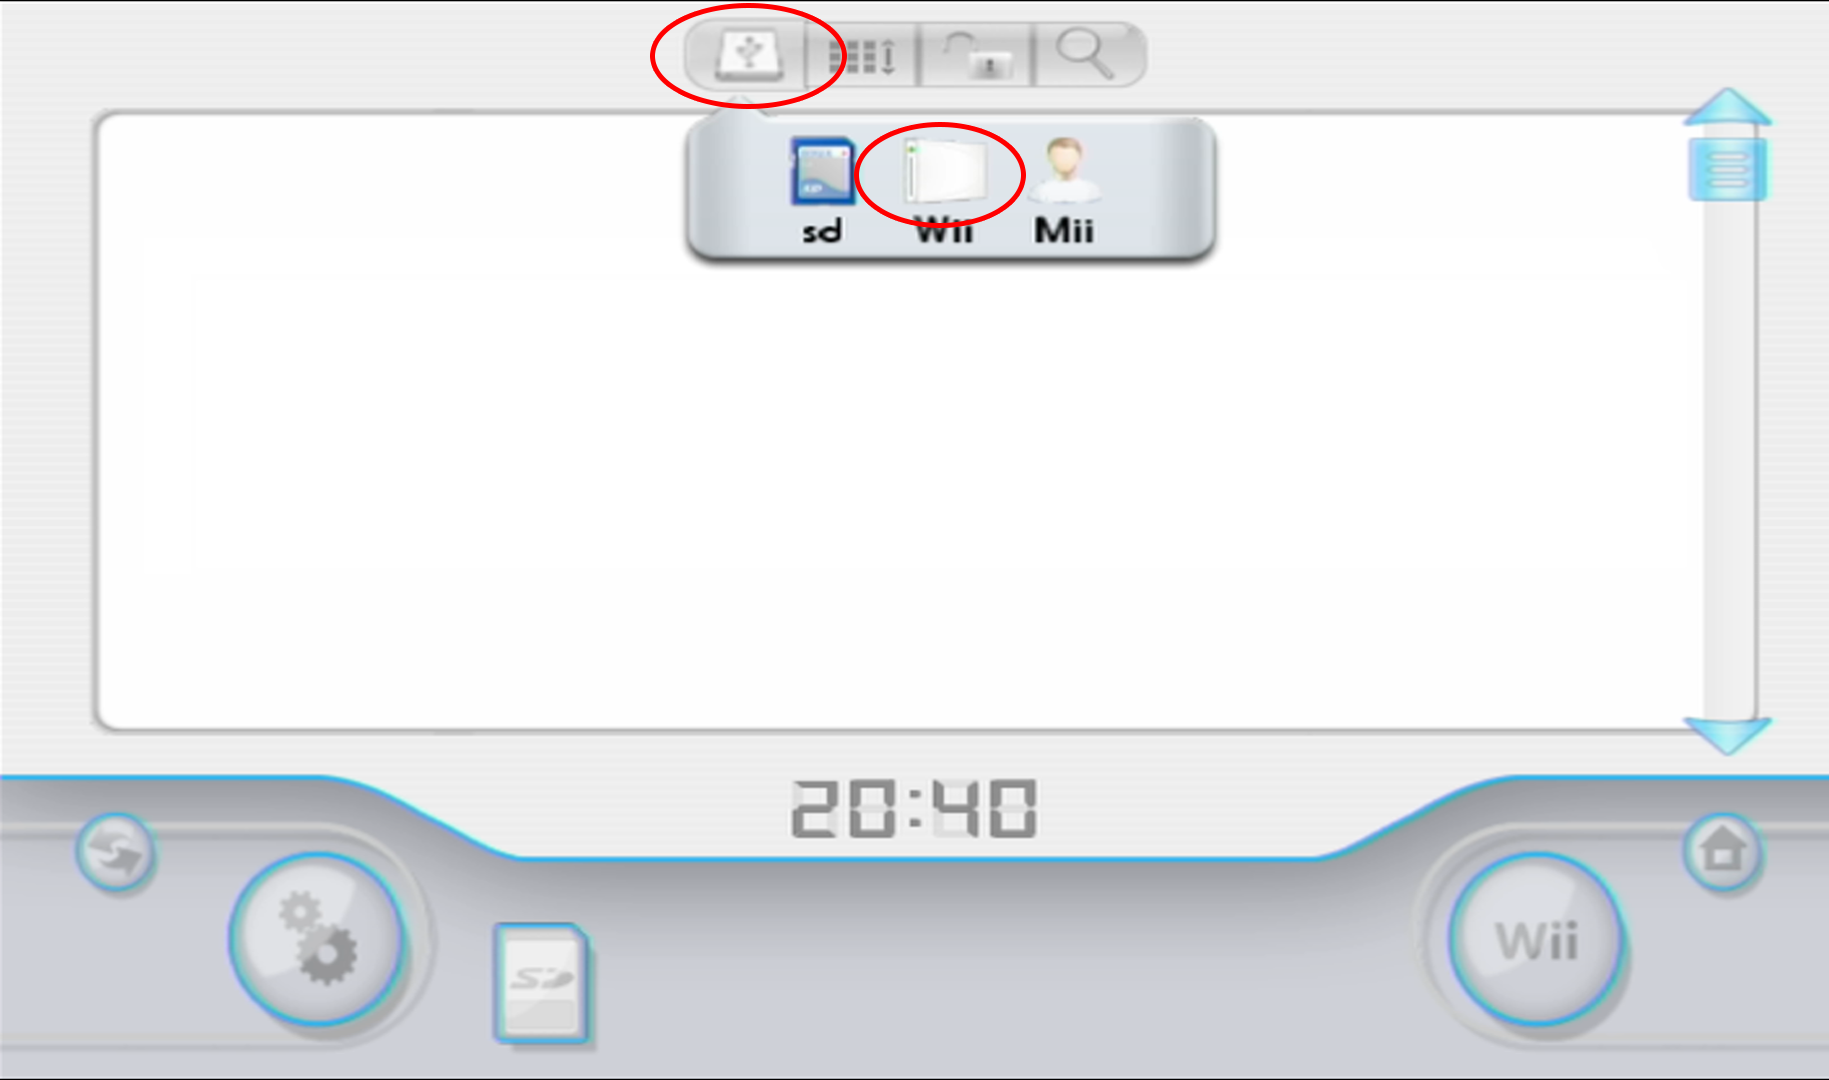
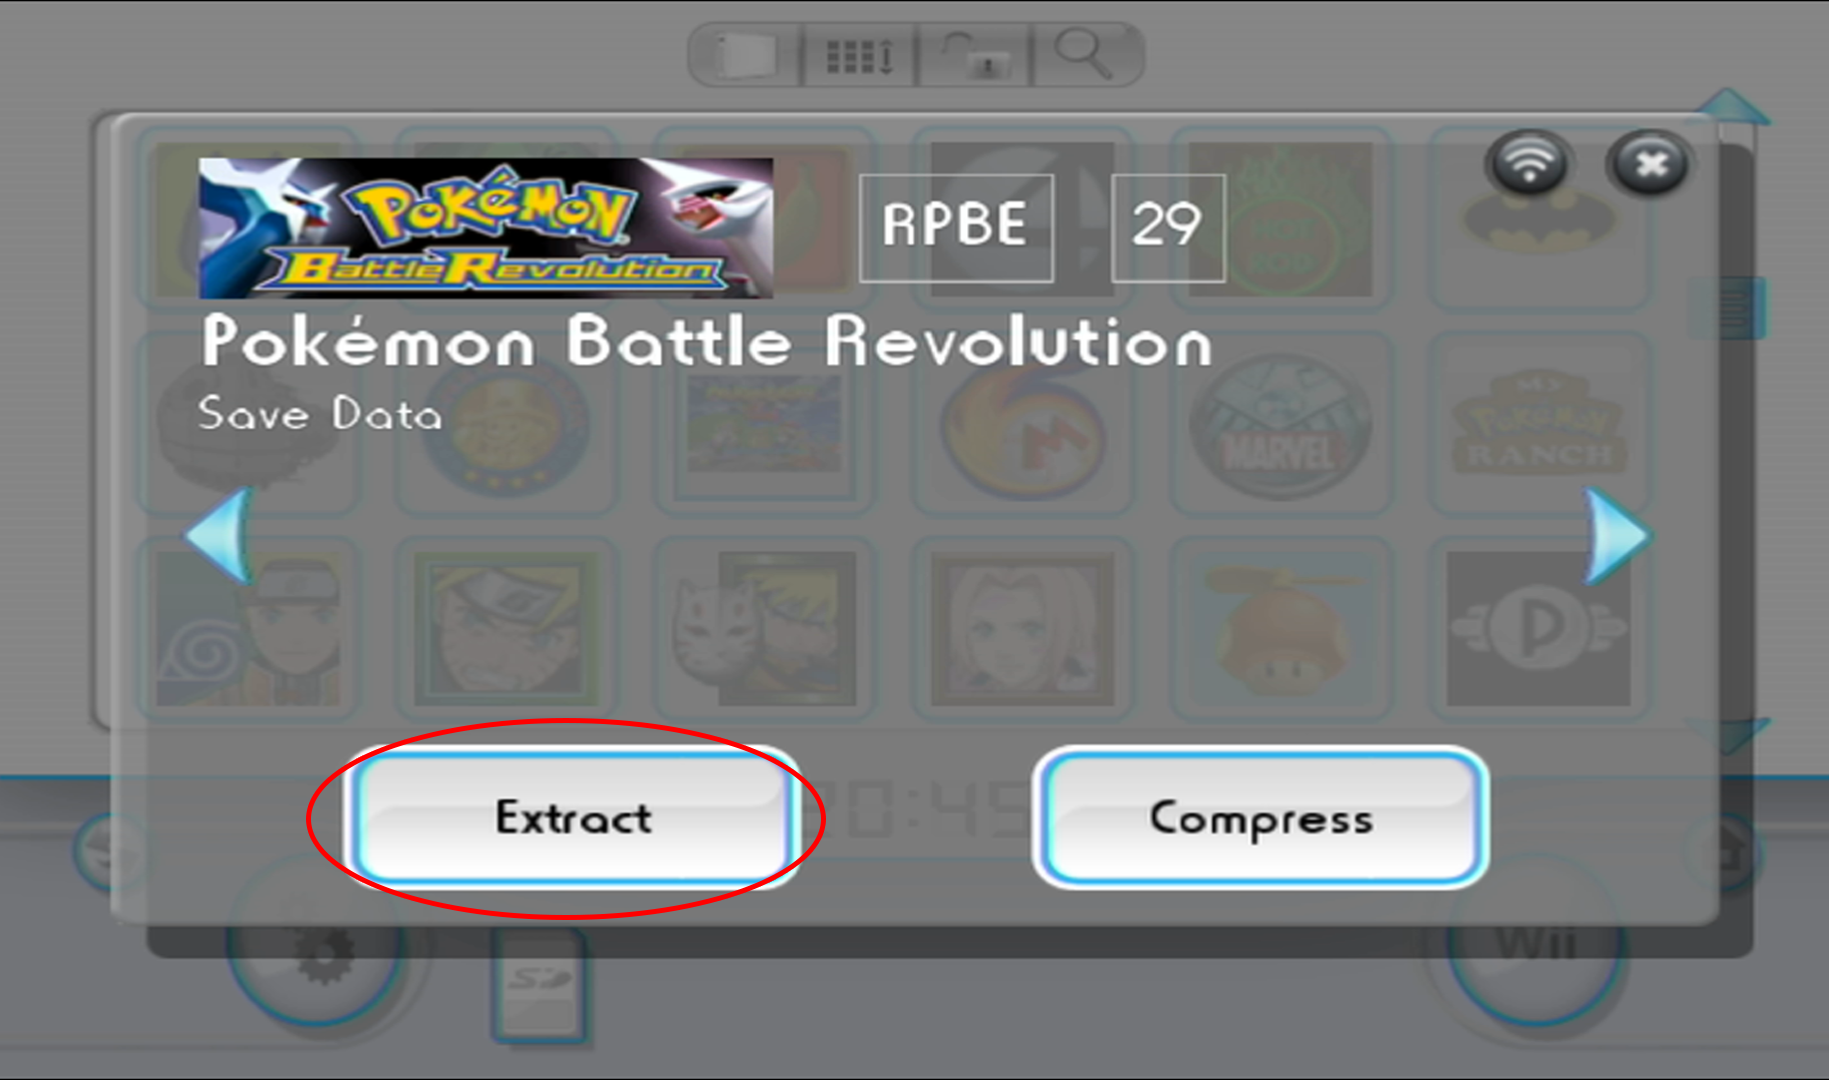
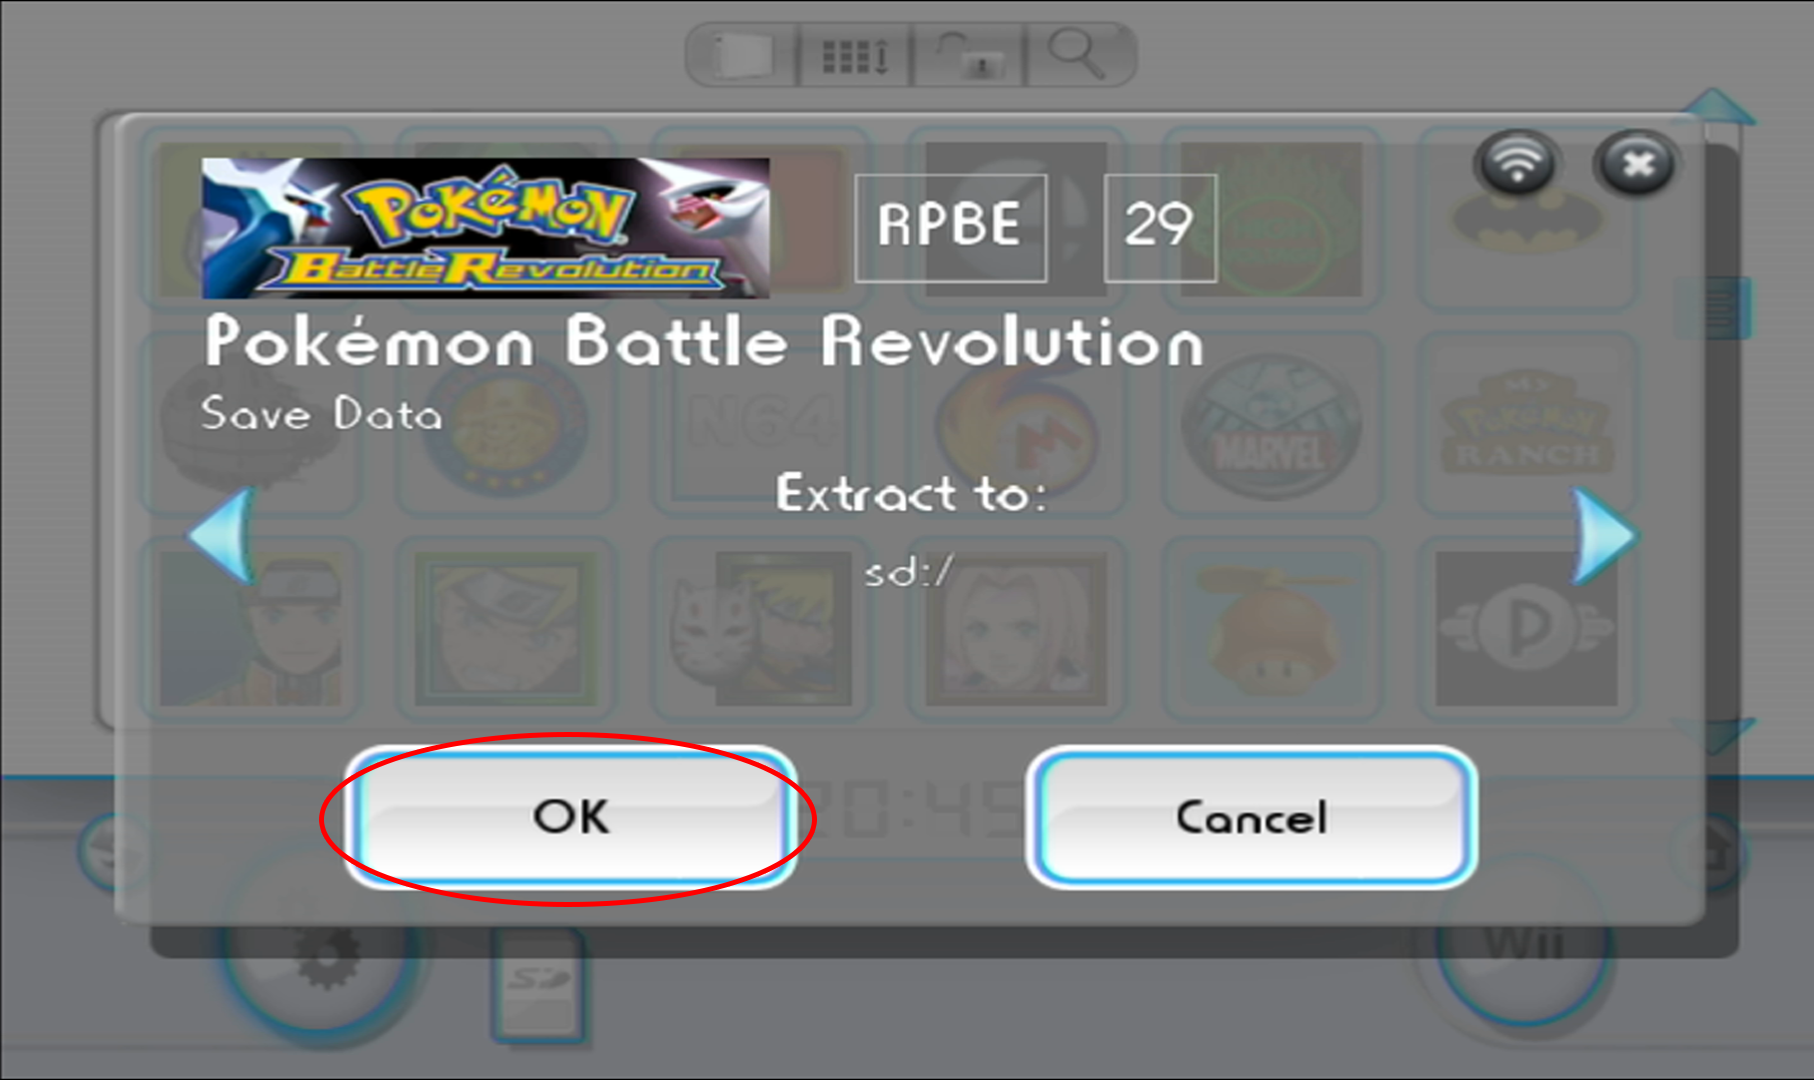
If you are trying to back up your save for a Wii game such as Pokémon Battle Revolution there are a few things you will need. The main device I will be using in this tutorial is a hacked Wii with homebrew installed.
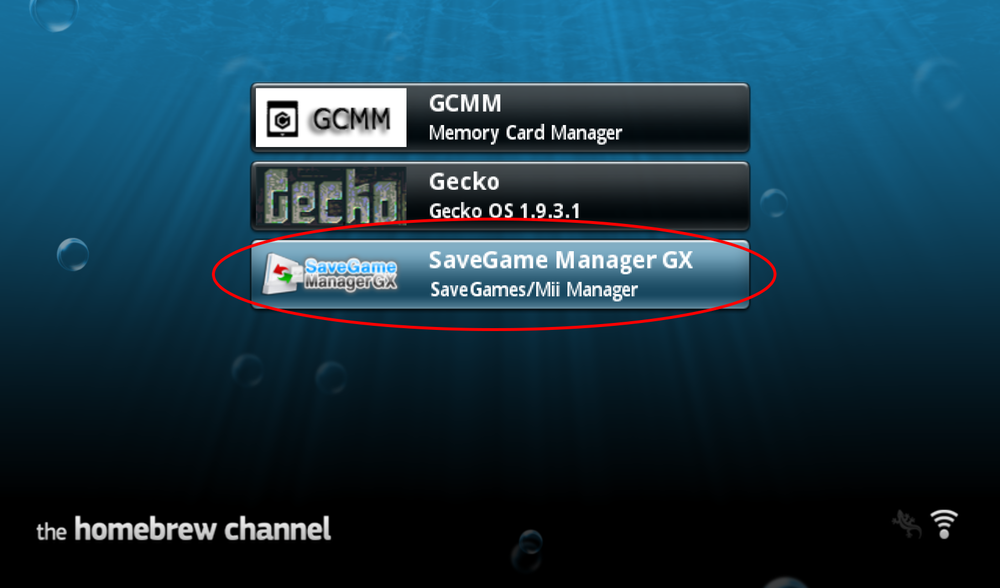
1. Launch the homebrew channel and open "SaveGame Manager GX". SaveGame Manager GX can be downloaded here: SaveGame Manager GX (Original Wii).zip. Note: If you are using a Wii U for this tutorial, please use this version of SaveGame manager GX: SaveGame Manager GX (vWii).zip.
2. Click on the button with the USB symbol on it. Then click on "Wii".
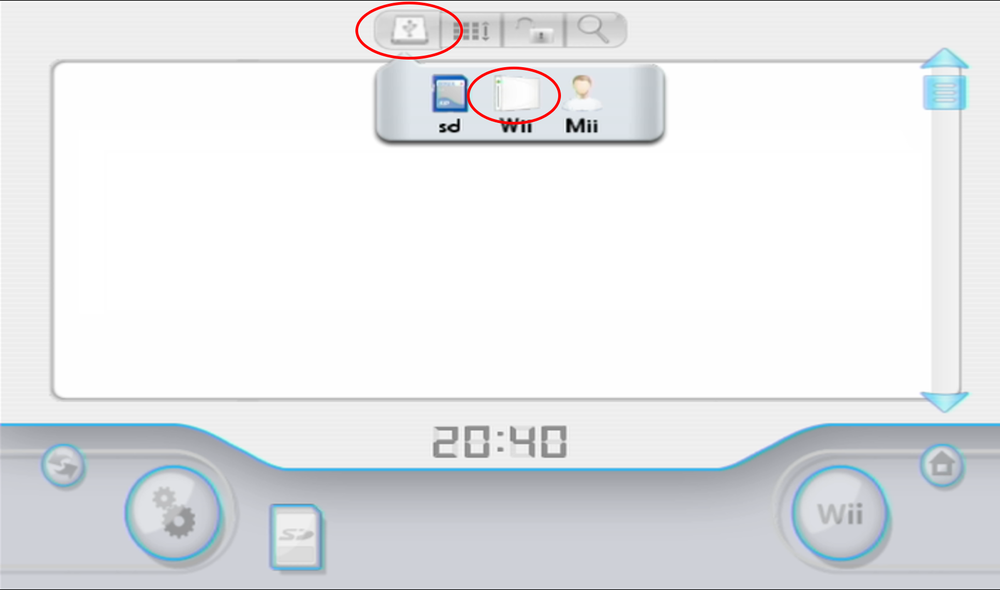
3. Find Pokemon Battle Revolution on the list of your saves. click "Extract".

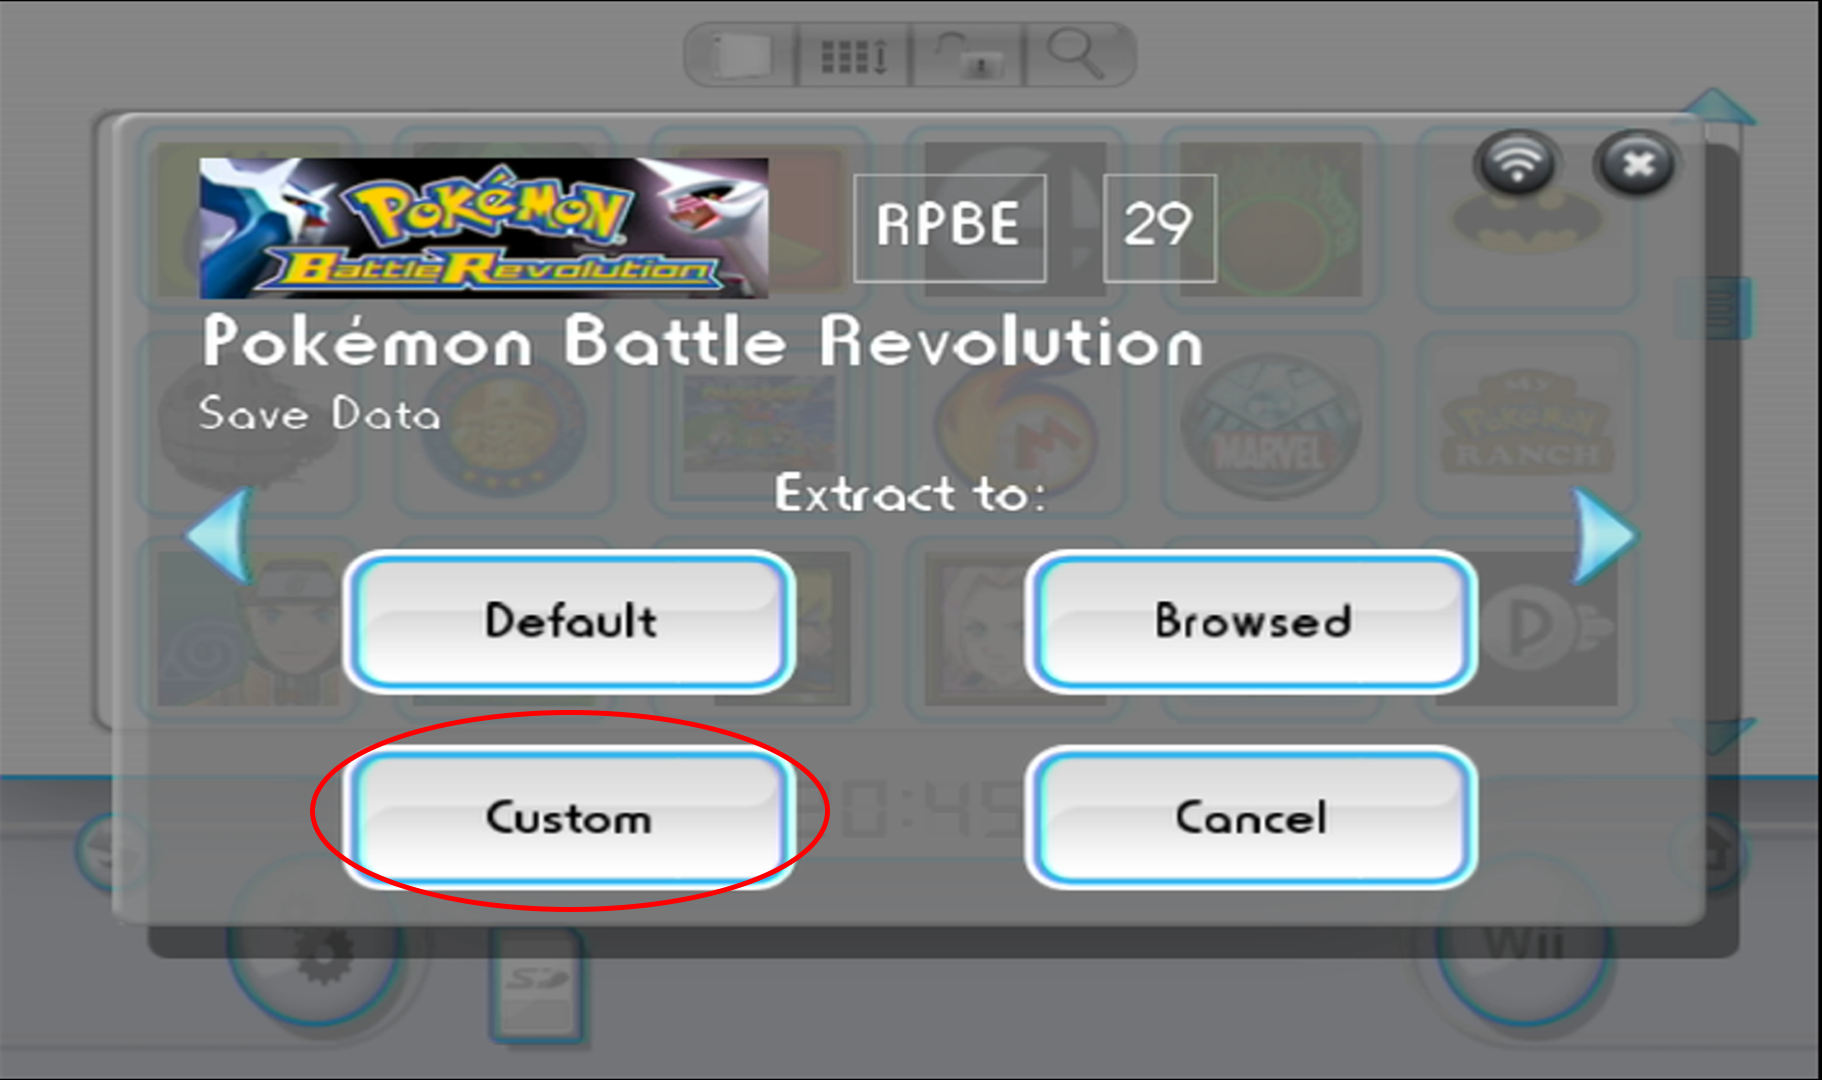
4. Then click "Custom".

5. Click on the little folder icon in the left corner of the screen.
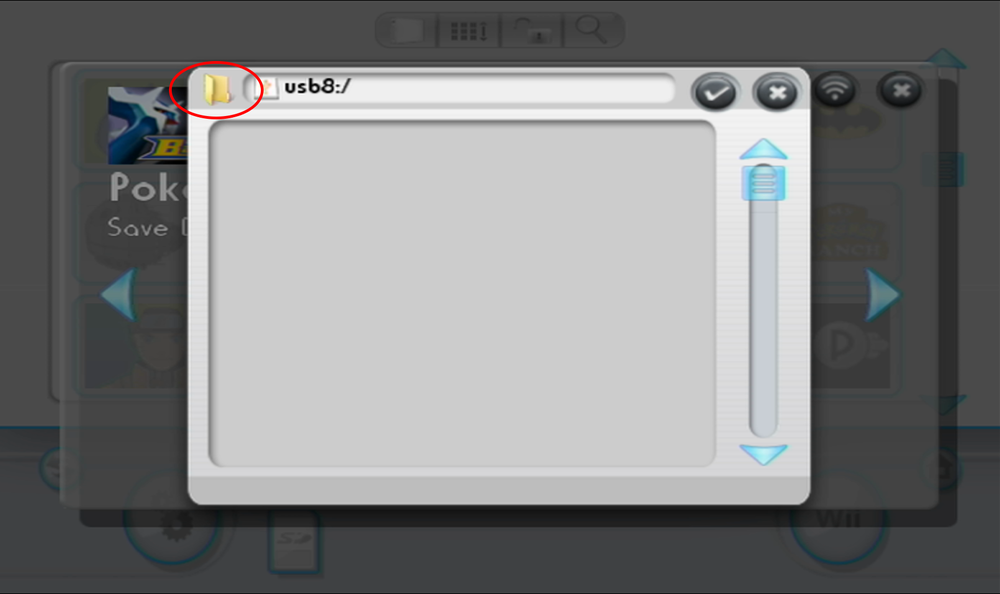
6. Then delete everything in the text box and type in "sd:/". Then click "OK".
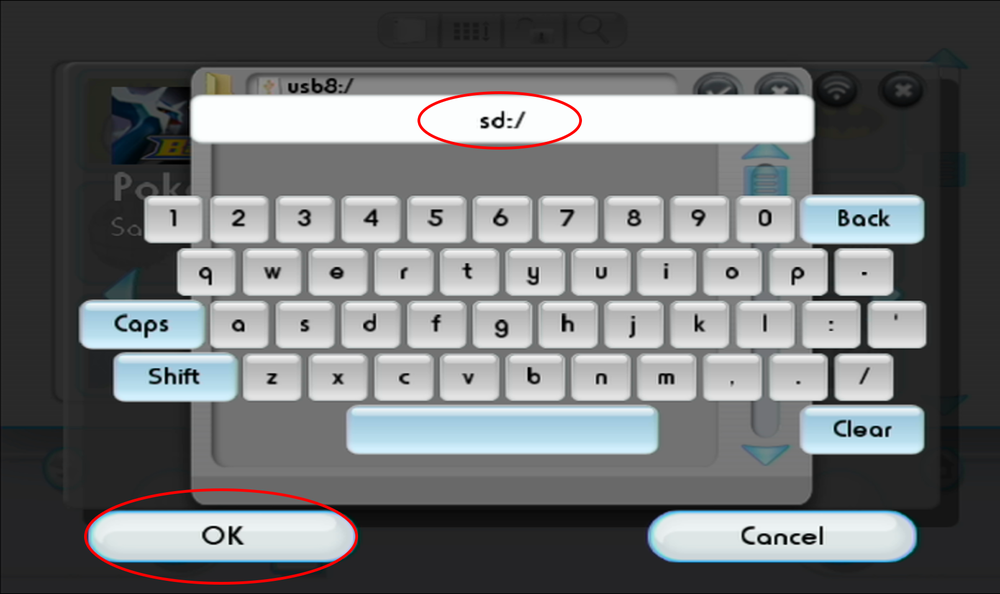
7. Choose where you would like to put the save file on your SD card (for simplicity, I will put it on the root of my SD card) click on the check mark when you are done picking a folder.
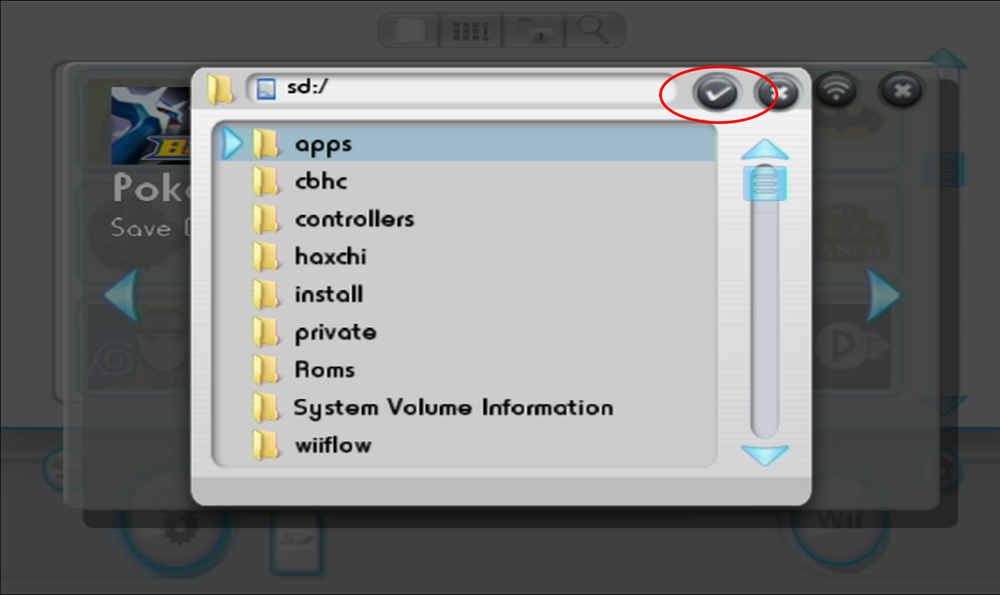
8. Then click "OK".

9. Eject your SD card from your Wii and put it into your computer. Depending on where you exported your save, and what game you chose to backup this step will be different. For me, my save is right on the root of my SD card. Once you find it, You will find your save file in its corresponding folder.
10. MAKE A BACKUP OF THIS FILE BEFORE USING OR EDITING IT WITH ANY SAVE EDITORS.

-
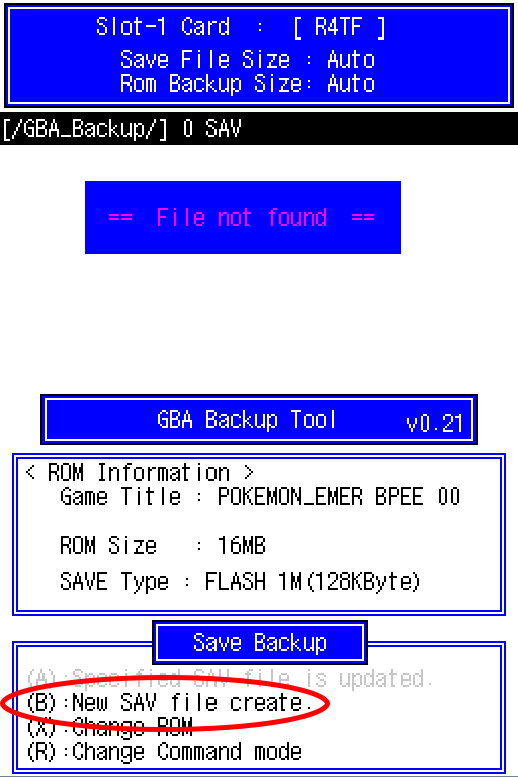
If you are trying to back up your cartridge save for Gen 3 there are a few things you will need. The main devices I will be using in this tutorial are a DS lite (you can also use an original DS) and some sort of a DS Flash Cart (R4, DS Two Plus, AceKard2i). Note: if you do not have a flash cart, you can also use the exact same tutorial method for Gen 1-2 cartridges. This will require a Retron 5.
If you're looking to manage saves for other Gen 3 games on the Gamecube, refer to this tutorial instead.
I have also made a video guide on this topic if you would like more clarification.
1. Download the GBA backup tool. Files at the bottom of the page.
Add the files in the downloaded zip to the root of your flash cart SD card.2. Insert your flash card and GBA game into your DS and make sure that both games are correctly recognized on the home menu (you may need to reinsert the GBA cartridge a few times before it is recognized).
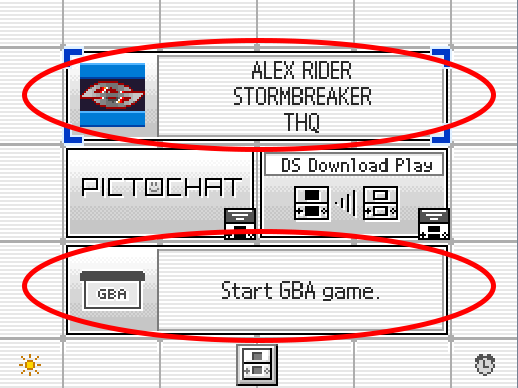
3. Start up your flash card and navigate to where you put the GBA backup tool. (It should look like a normal DS game with a GBA cart as the logo). Launch the GBA backup tool and you should be brought to this screen. Next click "A" to set the target game to your GBA game.
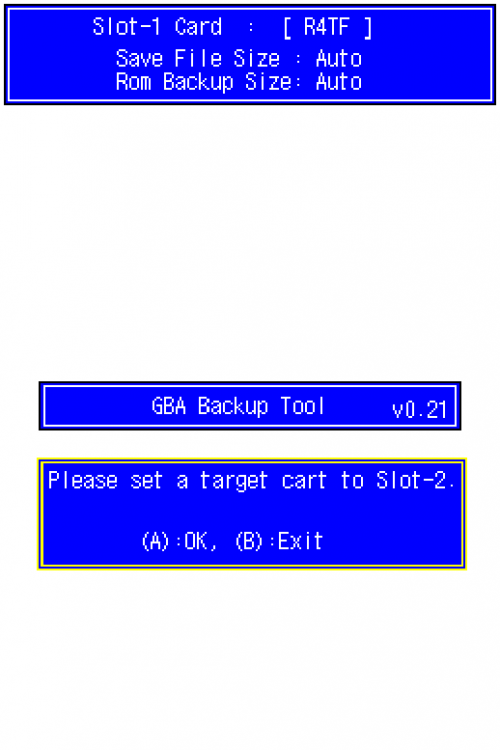
4. Click "B" and then "A" to back your save up to the SD card on the flash card. To restore an edited save back to the cartridge, click "R" until the "Save Backup" section changes to "Save Restore".

5. After you are finished, turn off your DS and eject your SD card from your flash card.
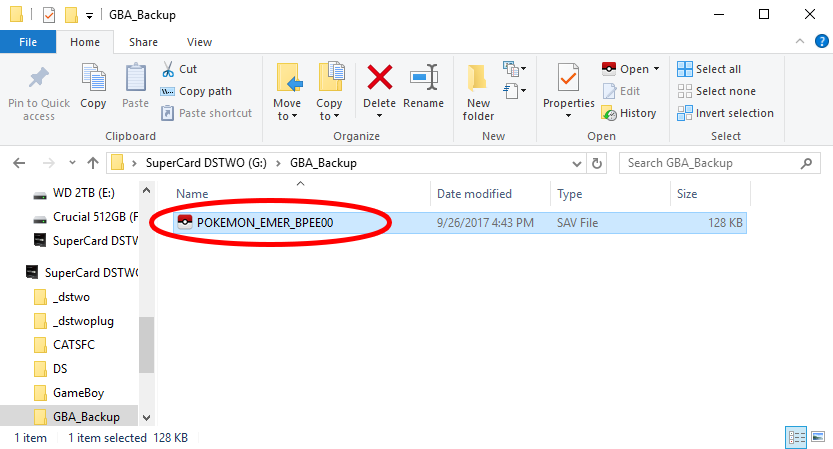
6. Insert your SD card from your flash card into your computer and navigate to "GBA_Backup". Inside this folder you should find your newly created save backup ready for use.
7. MAKE A BACKUP OF THIS FILE BEFORE USING OR EDITING IT WITH ANY SAVE EDITORS.
Files:
Note, if one version doesn't work for you, try another version.
Also, if you have a clone/fake/repro cart, neither of these would work for you.
GBA_Backup_Tool_0.1.zip
GBA_Backup_Tool_0.2.zip
GBA_Backup_Tool_0.21.zip
-
2
-
-
Just now, DuoForce said:
This is great! I love the fact that Retron can extract saves and later import them!
Yeah it used to be really bad and you weren't able to restore your saves back to the cartridge. It would literally delete your save,but now its pretty reliable.
-
If you are trying to back up your cartridge save for Gen 1-2 there are a few things you will need. The main device I will be using in this tutorial is the Retron 5. There are other cheaper methods, but plenty of people have the Retron 5, and it is the most reliable method for me. (As a side note this will also allow you to replace your save battery in your GB cartridge without losing your save, if it hasn't already died somehow.)
1. Make sure you update your Retron to the latest update (early updates are not reliable with save backup and restore).
2. Insert your cartridge and make sure you have an SD card inserted into the back of the Retron.
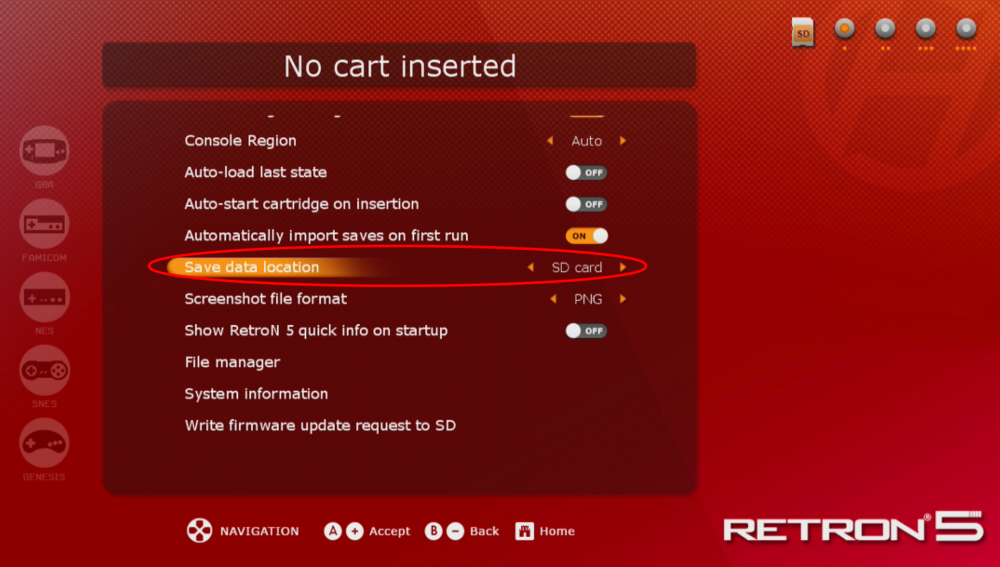
3. Make sure that in the settings, save data location is set to "SD card".
4. Click "Game Menu" on the home screen.
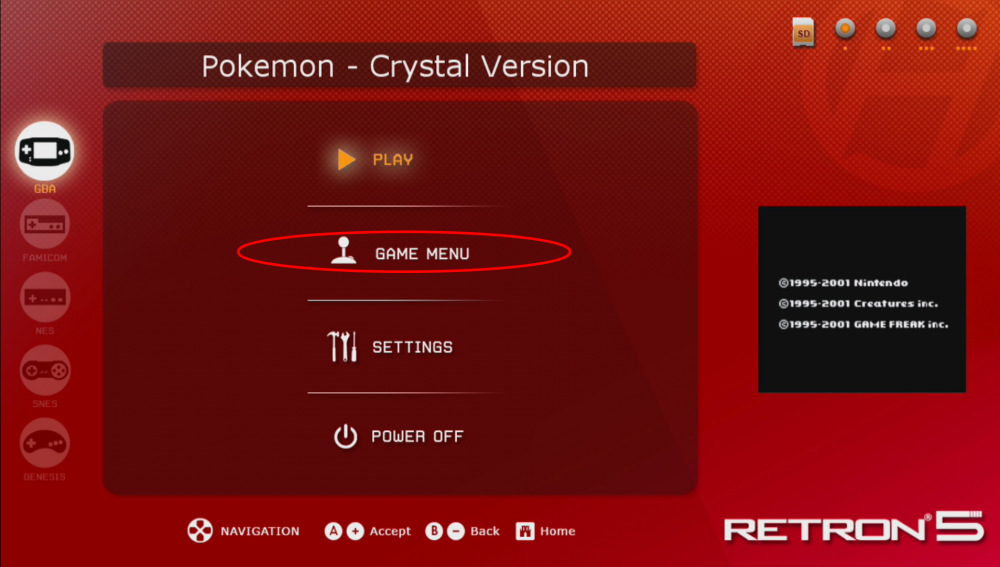
5. Click on "Copy Save to Retron".

6. Once you have dumped your save from the cartridge, take the SD card from the Retron and put it in your computer. Then navigate to (Retron>>Saves>>SRAM>>Gameboy) You will see your save you just dumped in this directory.
7. MAKE A BACKUP OF THIS FILE BEFORE USING OR EDITING IT WITH ANY SAVE EDITORS.

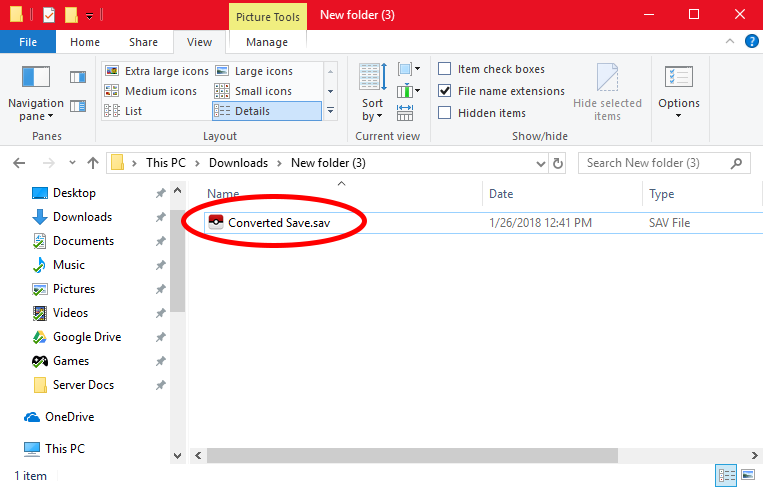
8. Unfortunately Retron saves must be converted before use in PKHeX, Emulators, ETC. They also must be converted back to the Retron format if you wish to put the save back on your Cartridge after editing in PKHeX. First download the Retron save converter here: Retron5FileConverter.zip. Open the program and point the "Old file name" to the save on your SD card you just created. Then point the "New file name" to anywhere you want (this will be the converted save) and make sure whatever name you make the file, add ".sav" to the end of it (Example: Pokemon Red.sav). Then click "Read from Retron5 file" (Reverse this step to convert the converted save back into the Retron format).

9. If your save was successfully exported, you should see it in the folder you exported it to.
10. MAKE A BACKUP OF THIS FILE BEFORE USING OR EDITING IT WITH ANY SAVE EDITORS.
-
These tutorials will guide you through backing up and restoring saves for your Gameboy and Gameboy Color games. These saves can be used with emulators, save editors, and as general save backups.
Cartridge Methods
If you wish to backup or restore your save from a physical cartridge, and if you have a Retron 5, follow this guide:
Alternatively, if you have a Hyperkin Smartboy, follow this guide:
3DS VC Methods
If your target Gameboy or Gameboy Color game is a 3DS virtual console version, please refer to the tutorial for managing 3DS saves:
Using Emulators
If you're playing on an emulator instead of a console, getting your save data is far easier and requires no hardware except for a compatible computer. follow this guide to learn how to get your saves from certain emulators:
-
 1
1
-


Save File Backups. Are they completely safe?
in Saves - Research
Posted · Edited by NinFanBoyFTW
Either way (I recommend using the boot9strap 3DS) a save backup is a save backup. Nothing is changed unless you use something like PKHeX so nothing is altered, and even if you alter stuff like most of us do, it doesn't matter because there are only certain criteria that would ban you online anyway. I personally would backup your save files, then backup all of your important pokemon for easy access and also so that god forbid your save backup is lost or anything happens, you would still have all of your pokemon.